一、背景
之前项目中用到了Apollo配置中心,对接Apollo配置中心后,配置中心的属性就可以在程序中使用了,那么这个是怎么实现的呢?配置中心的属性又是何时加载到程序中的呢?那么我们如果找到了这个是怎么实现的是否就可以 从任何地方加载配置属性、配置属性的加解密功能呢?
二、需求

从上图中得知,我们的需求很简单,即我们自己定义的属性需要比配置文件中的优先级更高。
三、分析
1、什么时候向SpringBoot中加入我们自己的配置属性
当我们想在Bean中使用配置属性时,那么我们的配置属性必须在Bean实例化之前就放入到Spring到Environment中。即我们的接口需要在 application context refreshed 之前进行调用,而 EnvironmentPostProcessor 正好可以实现这个功能。
2、获取配置属性的优先级
我们知道在 Spring中获取属性是有优先级的。
比如我们存在如下配置属性 username
├─application.properties
│   >> username=huan
├─application-dev.properties
│   >> username=huan.fu
那么此时 username 的值是什么呢?此处借用 Apollo的一张图来说解释一下这个问题。
参考链接:https://www.apolloconfig.com/#/zh/design/apollo-design
Spring从3.1版本开始增加了ConfigurableEnvironment和PropertySource:
ConfigurableEnvironment
- Spring的ApplicationContext会包含一个Environment(实现ConfigurableEnvironment接口)
- ConfigurableEnvironment自身包含了很多个PropertySource
PropertySource
- 属性源
- 可以理解为很多个Key – Value的属性配置
由上方的原理图可知,key在最开始出现的PropertySource中的优先级更高,上面的例子在SpringBoot中username的值为huan.fu。
3、何时加入我们自己的配置
由第二步 获取配置属性的优先级 可知,PropertySource 越靠前越先执行,那么要我们配置生效,就必须放在越前面越好。
由上图可知,SpringBoot加载各种配置是通过EnvironmentPostProcessor来实现的,而具体的实现是ConfigDataEnvironmentPostProcessor来实现的。那么我们自己编写一个EnvironmentPostProcessor的实现类,然后在ConfigDataEnvironmentPostProcessor后执行,并加入到 Environment中的第一位即可。
四、实现
1、引入SpringBoot依赖
<?xml version="1.0" encoding="UTF-8"?>
<project xmlns="http://maven.apache.org/POM/4.0.0" xmlns:xsi="http://www.w3.org/2001/XMLSchema-instance"
         xsi:schemaLocation="http://maven.apache.org/POM/4.0.0 https://maven.apache.org/xsd/maven-4.0.0.xsd">
    <modelVersion>4.0.0</modelVersion>
    <parent>
        <groupId>org.springframework.boot</groupId>
        <artifactId>spring-boot-starter-parent</artifactId>
        <version>2.6.6</version>
        <relativePath/> <!-- lookup parent from repository -->
    </parent>
    <groupId>com.huan.springcloud</groupId>
    <artifactId>springboot-extension-point</artifactId>
    <version>0.0.1-SNAPSHOT</version>
    <name>springboot-extension-point</name>
    <properties>
        <java.version>1.8</java.version>
    </properties>
    <dependencies>
        <dependency>
            <groupId>org.springframework.boot</groupId>
            <artifactId>spring-boot-starter-web</artifactId>
        </dependency>
    </dependencies>
</project>
2、在application.properties中配置属性
vim application.properties
username=huan
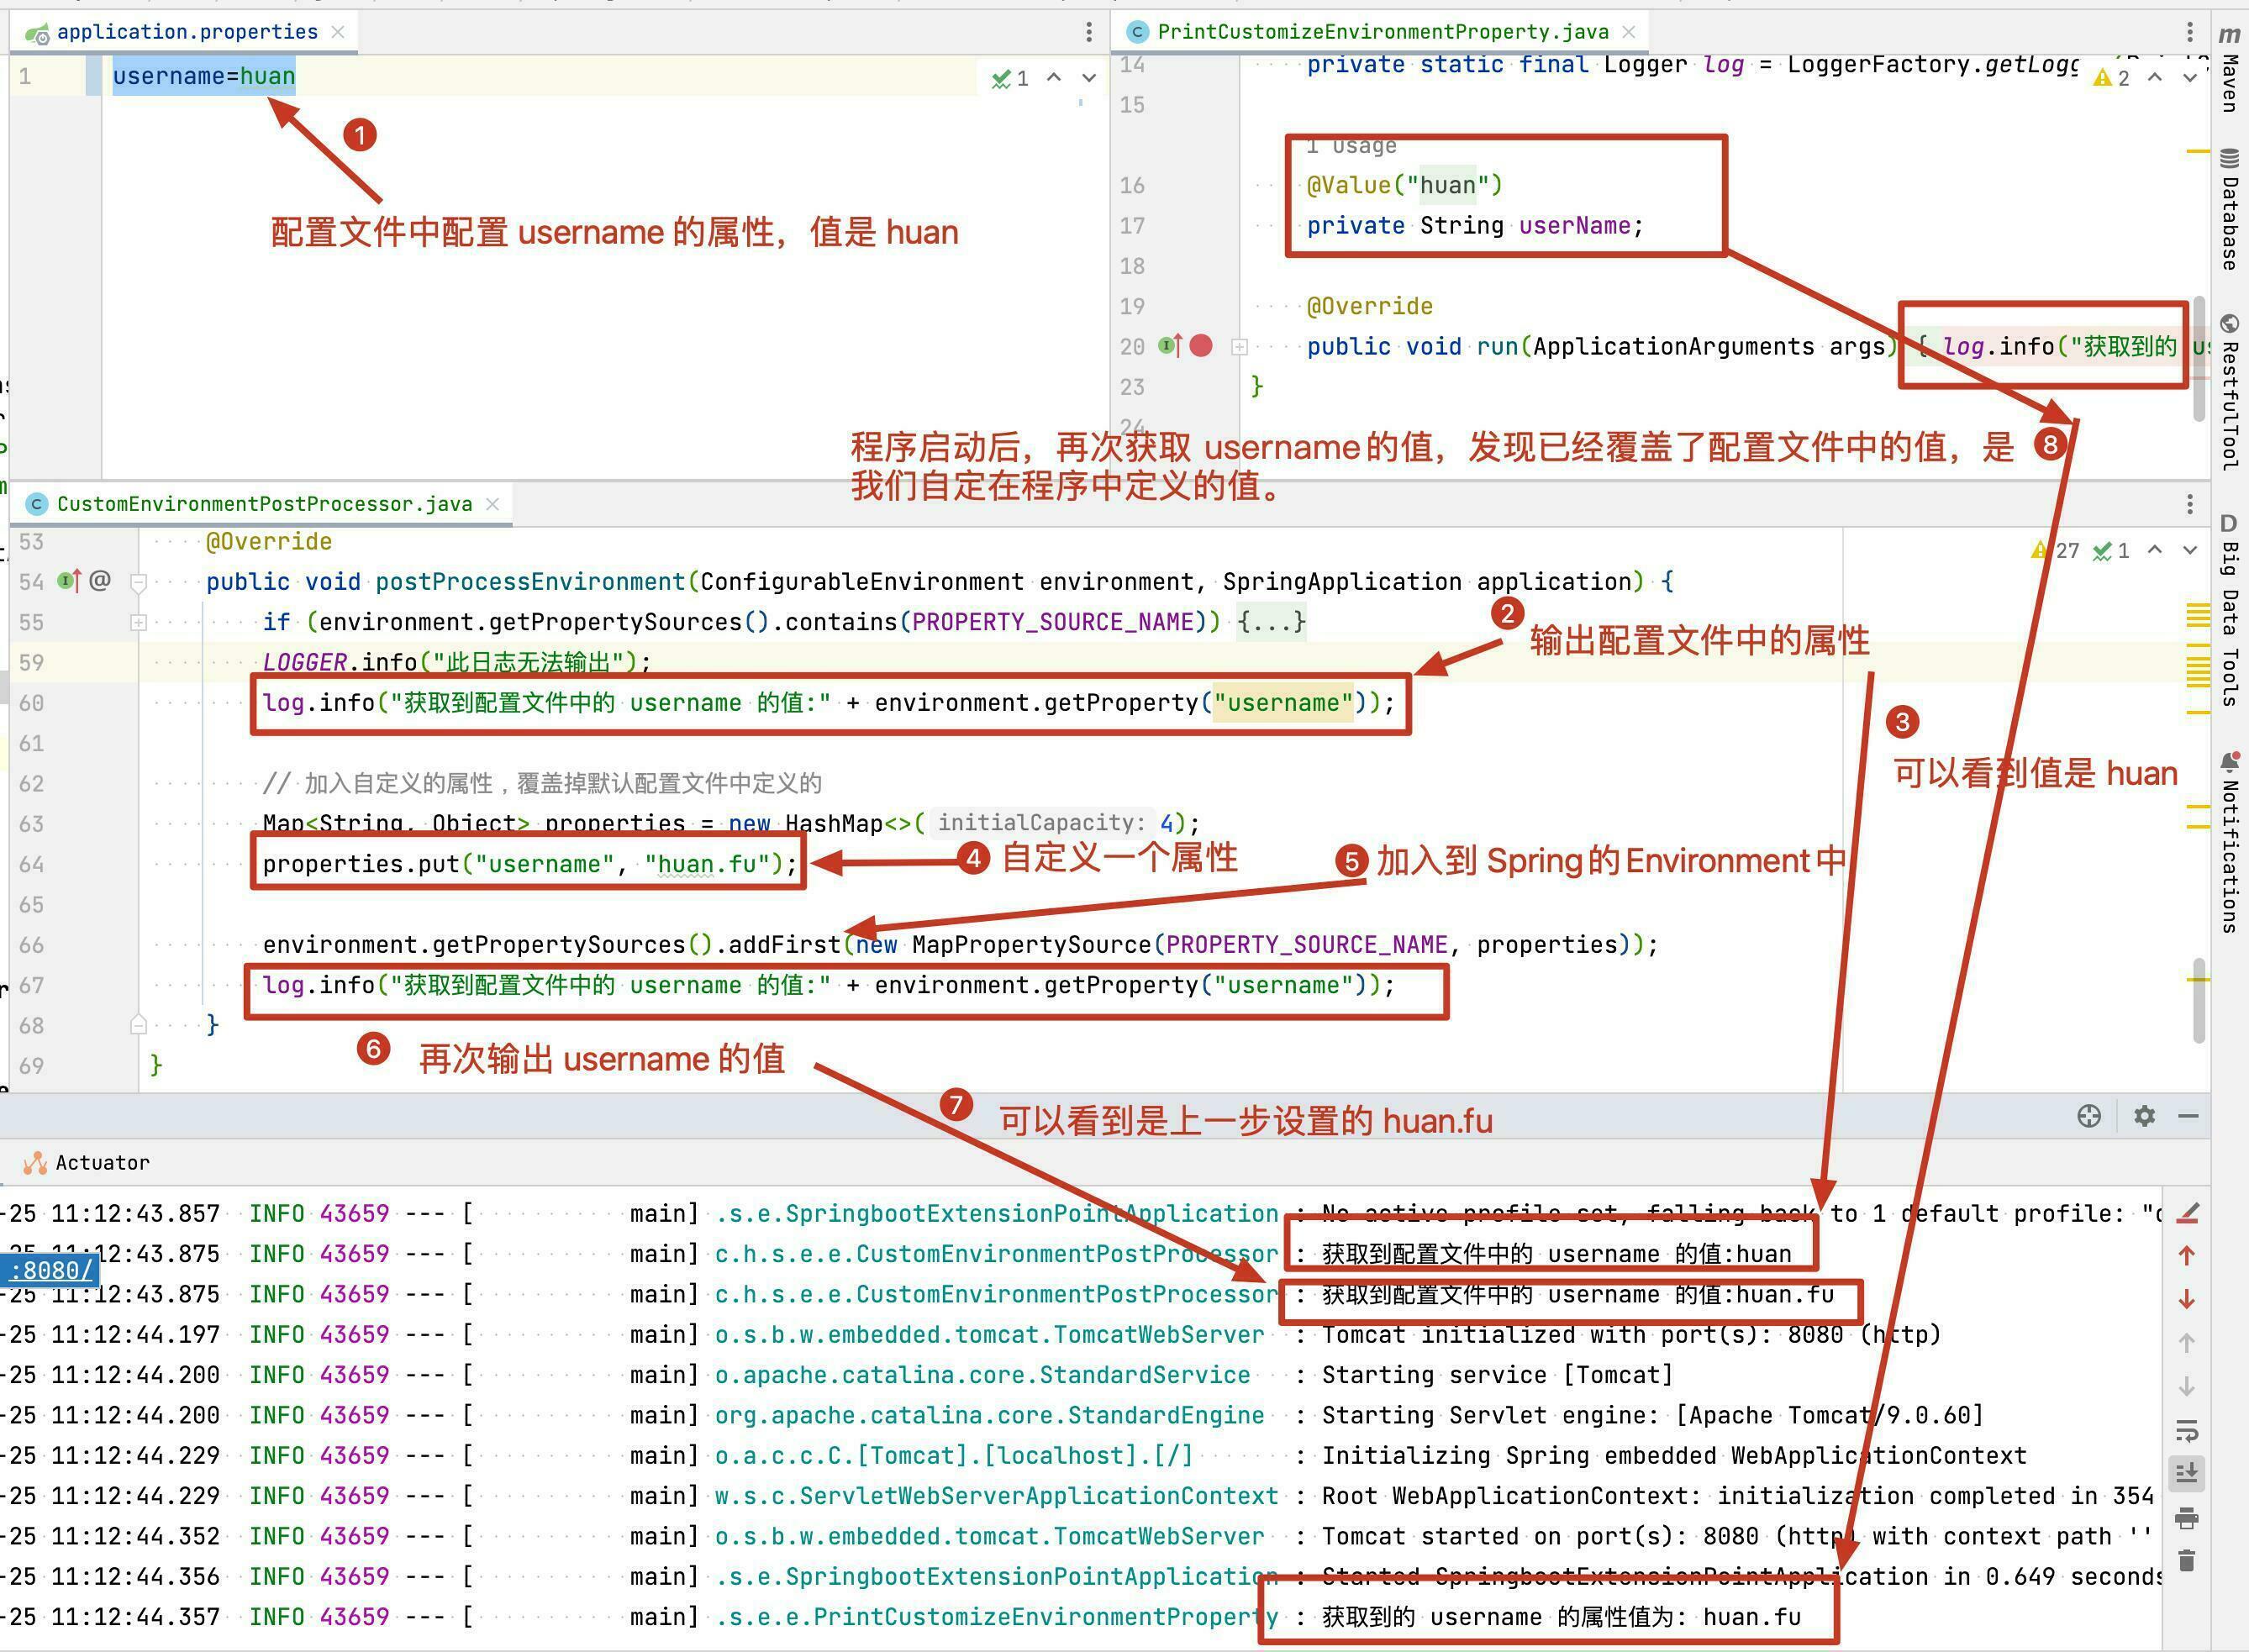
3、编写自定义属性并加入Spring Environment中

注意:
1、如果发现程序中日志没有输出,检查是否使用了slf4j输出日志,此时因为日志系统未初始化无法输出日志。解决方法如下:
SpringBoot版本
		>= 2.4 可以参考上图中的使用 DeferredLogFactory 来输出日志
		< 2.4
			1、参考如下链接 https://stackoverflow.com/questions/42839798/how-to-log-errors-in-a-environmentpostprocessor-execution
			2、核心代码:
				@Component
				public class MyEnvironmentPostProcessor implements
				        EnvironmentPostProcessor, ApplicationListener<ApplicationEvent> {
				    private static final DeferredLog log = new DeferredLog();
				    @Override
				    public void postProcessEnvironment(
				            ConfigurableEnvironment env, SpringApplication app) {
				        log.error("This should be printed");
				    }
				    @Override
				    public void onApplicationEvent(ApplicationEvent event) {
				        log.replayTo(MyEnvironmentPostProcessor.class);
				    }
				}
4、通过SPI使自定义的配置生效
1、在 src/main/resources下新建META-INF/spring.factories文件
2、配置
org.springframework.boot.env.EnvironmentPostProcessor=\
  com.huan.springcloud.extensionpoint.environmentpostprocessor.CustomEnvironmentPostProcessor
5、编写测试类,输出定义的 username 属性的值
@Component
public class PrintCustomizeEnvironmentProperty implements ApplicationRunner {

    private static final Logger log = LoggerFactory.getLogger(PrintCustomizeEnvironmentProperty.class);

    @Value("${username}")
    private String userName;

    @Override
    public void run(ApplicationArguments args) {
        log.info("获取到的 username 的属性值为: {}", userName);
    }
}
6、运行结果
五、注意事项
1、日志无法输出
参考上方的 3、编写自定义属性并加入Spring Environment中提供的解决方案。
2、配置没有生效
- 检查
EnvironmentPostProcessor的优先级,看看是否@Order或者Ordered返回的优先级值不对。 - 看看别的地方是否实现了
EnvironmentPostProcessor或ApplicationContextInitializer或BeanFactoryPostProcessor或BeanDefinitionRegistryPostProcessor等这些接口,在这个里面修改了PropertySource的顺序。 - 理解 Spring 获取获取属性的顺序 参考
2、获取配置属性的优先级
3、日志系统如何初始化
如下代码初始化日志系统
org.springframework.boot.context.logging.LoggingApplicationListener
六、完整代码
七、参考链接
1、https://github.com/apolloconfig/apollo/blob/master/apollo-client/src/main/java/com/ctrip/framework/apollo/spring/boot/ApolloApplicationContextInitializer.java
2、https://github.com/apolloconfig/apollo/blob/master/apollo-client/src/main/java/com/ctrip/framework/apollo/spring/config/PropertySourcesProcessor.java
3、https://www.apolloconfig.com/#/zh/design/apollo-design