vue-admin-template是在码云平台(gitee.com)上,搜索vue admin关键字,出来的结果中,相对说明算是比较多的开源代码,既有Demo的演示网站(https://panjiachen.gitee.io/vue-admin-template),也有系列教程帖子,不过作为一个仅在vue官网(https://cn.vuejs.org/)粗看了一遍教程的Vue小白,在下载了源码之后,即便是对照着admin的手把手系列教程,还是看的一头雾水,里面有太多的基础概念缺失,最终在慕课网,学习了vue的一些基础入门知识,基本大多数免费课程(vuex基础入门,vue-cli全集,vue2.5入门,3小时速成 Vue2.x 核心技术,axios在vue中的使用),对vue的脚手架vue-cli,路由插件vue-route,交互插件axios,前端数据插件vuex,模拟接口mockjs,都有了一些基本概念后(这些也都在之前的学习笔记中有说明),才总算是看懂能够开始看懂一些vue-admin-template的代码了。
有了这些基础后,打算开始学习花裤衩大神的vue-adminplat-template项目,我并不打算通过git克隆下来整个源码后,通过npm install的方式来学习,这种方式感觉适合直接拿了使用,不太适合学习。我打算先通过vue-cli脚手架来建立一个空白项目,然后再逐步的把vue-admin-template中的源码,一步一步的复制到项目中去。
1.通过vue-cli创建项目
vue create -n vue-admin不同于初次创建项目,我们为了了解Vue是什么,我们尽可能选择最少的插件,避免更多的困扰,来帮助我们更直观的了解Vue本身,而现在我们已经对Vue,以及那些常用的插件有了一定的了解,现在是为了一个可运行的项目,而不是在当初简单的demo,我们有必须要对脚手架提供的插件有一个基础的了解,并有选择的安装。
-
Babel:这是一个 JavaScript 转码器,当我们使用新的语法时,旧版本的浏览器可能就无法支持这种新的语法,通过 Babel,我们就可以添加不同的转换规则,从而就可以自动的将新版本的语法糖转换成传统的 JavaScript 语法。
-
TypeScript:它提供了一些 JavaScript 不支持的强语言特性,例如,类、接口、参数类型约束等等,它使 JavaScript 写起来更像我们的 C# 或是 Java 这种强类型语言,当然最终还是会编译成 js 文件从而让浏览器识别出。
-
PWA:渐进式的 Web 应用,主要是利用提供的标准化框架,在网页应用中实现和原生应用相近的用户体验,让用户以为自己正在使用的是原生应用,微信的小程序其实就可以看成是一种 PWA 应用的载体。
-
Router:这个大家应该很熟悉了,在前面的文章中我们也有介绍过,是 Vue 官方的路由管理组件。
-
Vuex:一个 Vue.js 中的状态管理模式,这里的状态可以简单理解为数据。因为在使用 Vue 的开发中,我们会编写各种组件,有些时候,多个组件之间需要共享相同的数据,以及,各个组件之间的数据传递也比较复杂,所以我们需要一个集中式的状态管理器从而更好的管理数据,方便组件之间的通信。
-
CSS Pre-processors:CSS 的预处理器,可以让我们以一种编程的方式来写 CSS 文件,当然最终它们都会被编译器编译成标准 css 文件。
-
Linter / Foramtter:代码格式检查和格式化工具,主要是为了让我们的项目中写的代码可以更好的采用统一的风格。
-
Unit Testing / E2E Testing:单元测试工具
这次,我们选择这几个基本的插件 Babel,Router,Vuex,CSS Pre-processors,Linter / Foramtter。其中CSS Pre-processors提供4个选择,dart-sass,node-sass,less,stylus,这里我暂时选择了dart-sass。而Linter / Foramtter 也提供了4种选择,都是基于ESLint的不同模式,error prevention only(只提醒错误), Airbnb config,Standard config,Prettier。Airbnb是github上Star最多的,而Standard特点是无分号,不支持修改规则,Prettier的特点是一键改变代码风格,而不需要改变开发风格,而error only则是最基础部分,表示只校验代码质量,提出错误部分。毕竟是初学者,先选择error only,后期可以再追加配置的。

2. 配置ESLint相关
我们使用Vscode来进行编辑开发Vue项目,需要在Vscode中追加这几个相关的扩展,Vue 2 Snippets,ESLint,Vuter,AutoFix Toggle,来调整一下Vscode的首选项配置中,打开setting.json文件,追加相关配置到json文件中
// setting.json

{
    .....之前原本的配置,新增部分可以直接追加在后面

    //打开文件不覆盖
    "workbench.editor.enablePreview": false,
    "editor.minimap.enabled": false, //关闭快速预览
    // "files.autoSave": "afterDelay", //打开自动保存
    "editor.formatOnSave": true, //每次保存自动格式化
    // 每次保存的时候将代码按eslint格式进行修复
    "editor.codeActionsOnSave": {
        "source.fixAll.eslint": true
    },
    "javascript.format.insertSpaceBeforeFunctionParenthesis": true, //让函数(名)和后面的括号之间加个空格

    // px to rem 扩展配置
    "px-to-rem.px-per-rem": 100, //rem适配

    //由于prettier不能格式化vue文件template  所以使用js-beautify-html格式化
    "vetur.format.defaultFormatter.html": "js-beautify-html",
    "vetur.format.defaultFormatterOptions": {
        "js-beautify-html": {
            "wrap_line_length": 120,
            "wrap_attributes": "auto", // "force-aligned"属性强制折行对齐
            "end_with_newline": false
        },
        "prettier": {
            "singleQuote": true,  // 单引号替代双引号
            "semi": false    // 结尾不需要;
        }
    }
    "editor.tabSize": 2,
    "eslint.run": "onSave",
}
之后,调整eslint在项目中的配置文件.eslintrc.js,调整配置如下:
// .eslintrc.js

module.exports = {
  root: true,
  env: {
    node: true
  },
  extends: [
    'plugin:vue/essential',
    'eslint:recommended'
  ],
  // required to lint *.vue files
  plugins: ['vue'],

  parserOptions: {
    parser: 'babel-eslint'
  },
  rules: {
    'no-console': process.env.NODE_ENV === 'production' ? 'warn' : 'off',
    'no-debugger': process.env.NODE_ENV === 'production' ? 'warn' : 'off'
  }
}
追加eslint的ignore文件,在.eslintrc.js文件同目录下创建.eslintignore文件
# .eslintignore
build/*.js
src/assets
public
dist
在vscode中,vuter插件默认的风格是prettier的,而prettier风格在有些地方是会和eslint发生冲突的,我们需要在项目根目录下补充一个.prettierrc的配置文件
// .prettierrc
{
  "printWidth": 300,
  "singleQuote" : true,
  "tabWidth": 2,
  "useTabs": false,
  "semi": false,
  "trailingComma": "none",
  "bracketSpacing": true,
  "arrowParens": "avoid"
}
如果你不想使用 ESLint 校验(不推荐取消),只要找到 vue.config.js 文件。 进行如下设置 lintOnSave: false 即可。vue.config.js文件在下面会有说明。
3.安装Package
完成了ESLint的相关配置后,下一步就需要把几个Vue开发常用的插件包安装进去,因为是学习vue-admin-template项目的源码,我们就尽可能参考源码的package.json文件中的插件包。这里通过手工指令安装,而不是copy整个package.json文件之后用npm install方式,也是为了进一步熟悉package包的安装区别。
> npm i -S axios element-ui normalize.css nprogress js-cookie path-to-regexp --registry=https://registry.npm.taobao.org

> npm i -D autoprefixer babel-plugin-dynamic-import-node chalk connect mockjs runjs serve-static svg-sprite-loader svgo --registry=https://registry.npm.taobao.org
同时参考源码的package.json文件,补充package.json文件中的内容,最终package.json内容如下:
// package.json
{
  "name": "adminplat-vue",
  "version": "0.1.0",
  "description": "A vue admin study Pan's vue-admin-template source ",
  "author": "Myron.Maoyz",
  "private": true,
  "scripts": {
    "serve": "vue-cli-service serve",
    "build": "vue-cli-service build",
    "lint": "vue-cli-service lint"
  },
  "dependencies": {
    "axios": "^0.21.0",
    "core-js": "^3.6.5",
    "element-ui": "^2.14.1",
    "js-cookie": "^2.2.1",
    "normalize.css": "^8.0.1",
    "nprogress": "^0.2.0",
    "path-to-regexp": "^6.2.0",
    "vue": "^2.6.11",
    "vue-router": "^3.2.0",
    "vuex": "^3.4.0"
  },
  "devDependencies": {
    "@vue/cli-plugin-babel": "~4.5.0",
    "@vue/cli-plugin-eslint": "~4.5.0",
    "@vue/cli-plugin-router": "~4.5.0",
    "@vue/cli-plugin-vuex": "~4.5.0",
    "@vue/cli-service": "~4.5.0",
    "autoprefixer": "^10.0.2",
    "babel-eslint": "^10.1.0",
    "babel-jest": "^26.6.3",
    "babel-plugin-dynamic-import-node": "^2.3.3",
    "chalk": "^4.1.0",
    "connect": "^3.7.0",
    "eslint": "^6.7.2",
    "eslint-plugin-vue": "^6.2.2",
    "mockjs": "^1.1.0",
    "runjs": "^4.4.2",
    "sass": "^1.26.5",
    "sass-loader": "^8.0.2",
    "serve-static": "^1.14.1",
    "svg-sprite-loader": "^5.0.0",
    "svgo": "^1.3.2",
    "vue-template-compiler": "^2.6.11"
  },
  "browserslist": [
    "> 1%",
    "last 2 versions"
  ],
  "engines": {
    "node": ">=14.13",
    "npm": ">= 6.14.8"
  },
  "license": "MIT"
}
其中engines下的node和npm可以根据自己搭建的环境来填写,忘记了的话,可以直接通过node -v以及npm -v来获取版本号
4.添加配置文件
- .eslintrc.js .eslintignore 文件,通常情况下,在你安装了eslint插件后,就会默认出现,没有的话,就在项目根目录下直接创建一个即可。这里我们全盟copy源码的对应配置文件,也可以直接就删除这两个文件来关闭eslint插件。
// .eslintrc.js

module.exports = {
  root: true,
  env: {
    browser: true,
    node: true,
    es6: true,
  },
  extends: [
    'plugin:vue/essential',
    'eslint:recommended'
  ],
  // required to lint *.vue files
  plugins: ['vue'],

  parserOptions: {
    parser: 'babel-eslint',
    sourceType: 'module'
  },
  rules: {
    "vue/max-attributes-per-line": 0,
    "vue/singleline-html-element-content-newline": "off",
    "vue/multiline-html-element-content-newline":"off",
    "vue/name-property-casing": ["error", "PascalCase"],
    "vue/no-v-html": "off",
    'accessor-pairs': 2,
    'arrow-spacing': [2, {
      'before': true,
      'after': true
    }],
    'block-spacing': [2, 'always'],
    'brace-style': [2, '1tbs', {
      'allowSingleLine': true
    }],
    'camelcase': [0, {
      'properties': 'always'
    }],
    'comma-dangle': [2, 'never'],
    'comma-spacing': [2, {
      'before': false,
      'after': true
    }],
    'comma-style': [2, 'last'],
    'constructor-super': 2,
    'curly': [2, 'multi-line'],
    'dot-location': [2, 'property'],
    'eol-last': 2,
    'eqeqeq': ["error", "always", {"null": "ignore"}],
    'generator-star-spacing': [2, {
      'before': true,
      'after': true
    }],
    'handle-callback-err': [2, '^(err|error)$'],
    'indent': [2, 2, {
      'SwitchCase': 1
    }],
    'jsx-quotes': [2, 'prefer-single'],
    'key-spacing': [2, {
      'beforeColon': false,
      'afterColon': true
    }],
    'keyword-spacing': [2, {
      'before': true,
      'after': true
    }],
    'new-cap': [2, {
      'newIsCap': true,
      'capIsNew': false
    }],
    'new-parens': 2,
    'no-array-constructor': 2,
    'no-caller': 2,
    'no-console': 'off',
    'no-class-assign': 2,
    'no-cond-assign': 2,
    'no-const-assign': 2,
    'no-control-regex': 0,
    'no-delete-var': 2,
    'no-dupe-args': 2,
    'no-dupe-class-members': 2,
    'no-dupe-keys': 2,
    'no-duplicate-case': 2,
    'no-empty-character-class': 2,
    'no-empty-pattern': 2,
    'no-eval': 2,
    'no-ex-assign': 2,
    'no-extend-native': 2,
    'no-extra-bind': 2,
    'no-extra-boolean-cast': 2,
    'no-extra-parens': [2, 'functions'],
    'no-fallthrough': 2,
    'no-floating-decimal': 2,
    'no-func-assign': 2,
    'no-implied-eval': 2,
    'no-inner-declarations': [2, 'functions'],
    'no-invalid-regexp': 2,
    'no-irregular-whitespace': 2,
    'no-iterator': 2,
    'no-label-var': 2,
    'no-labels': [2, {
      'allowLoop': false,
      'allowSwitch': false
    }],
    'no-lone-blocks': 2,
    'no-mixed-spaces-and-tabs': 2,
    'no-multi-spaces': 2,
    'no-multi-str': 2,
    'no-multiple-empty-lines': [2, {
      'max': 1
    }],
    'no-native-reassign': 2,
    'no-negated-in-lhs': 2,
    'no-new-object': 2,
    'no-new-require': 2,
    'no-new-symbol': 2,
    'no-new-wrappers': 2,
    'no-obj-calls': 2,
    'no-octal': 2,
    'no-octal-escape': 2,
    'no-path-concat': 2,
    'no-proto': 2,
    'no-redeclare': 2,
    'no-regex-spaces': 2,
    'no-return-assign': [2, 'except-parens'],
    'no-self-assign': 2,
    'no-self-compare': 2,
    'no-sequences': 2,
    'no-shadow-restricted-names': 2,
    'no-spaced-func': 2,
    'no-sparse-arrays': 2,
    'no-this-before-super': 2,
    'no-throw-literal': 2,
    'no-trailing-spaces': 2,
    'no-undef': 2,
    'no-undef-init': 2,
    'no-unexpected-multiline': 2,
    'no-unmodified-loop-condition': 2,
    'no-unneeded-ternary': [2, {
      'defaultAssignment': false
    }],
    'no-unreachable': 2,
    'no-unsafe-finally': 2,
    'no-unused-vars': [2, {
      'vars': 'all',
      'args': 'none'
    }],
    'no-useless-call': 2,
    'no-useless-computed-key': 2,
    'no-useless-constructor': 2,
    'no-useless-escape': 0,
    'no-whitespace-before-property': 2,
    'no-with': 2,
    'one-var': [2, {
      'initialized': 'never'
    }],
    'operator-linebreak': [2, 'after', {
      'overrides': {
        '?': 'before',
        ':': 'before'
      }
    }],
    'padded-blocks': [2, 'never'],
    'quotes': [2, 'single', {
      'avoidEscape': true,
      'allowTemplateLiterals': true
    }],
    'semi': [2, 'never'],
    'semi-spacing': [2, {
      'before': false,
      'after': true
    }],
    'space-before-blocks': [2, 'always'],
    'space-before-function-paren': 0,
    'space-in-parens': [2, 'never'],
    'space-infix-ops': 2,
    'space-unary-ops': [2, {
      'words': true,
      'nonwords': false
    }],
    'spaced-comment': [2, 'always', {
      'markers': ['global', 'globals', 'eslint', 'eslint-disable', '*package', '!', ',']
    }],
    'template-curly-spacing': [2, 'never'],
    'use-isnan': 2,
    'valid-typeof': 2,
    'wrap-iife': [2, 'any'],
    'yield-star-spacing': [2, 'both'],
    'yoda': [2, 'never'],
    'prefer-const': 2,
    'no-debugger': process.env.NODE_ENV === 'production' ? 2 : 0,
    'object-curly-spacing': [2, 'always', {
      objectsInObjects: true
    }],
    'array-bracket-spacing': [2, 'never']
  }
}
# .eslintignore
build/*.js
src/assets
public
dist
- vue.config.js 这个是vue项目的配置文件,我这里照搬template项目源码中对应文件,但是我们暂时不考虑打包,也没有安装webpack包,所以把和webpack相关的配置就直接先删除了。
// vue.config.js
'use strict'

// If your port is set to 80,
// use administrator privileges to execute the command line.
// For example, Mac: sudo npm run
// You can change the port by the following methods:
// port = 8080 npm run dev OR npm run dev --port = 8080
const port = process.env.port || process.env.npm_config_port || 8080 // dev port

// All configuration item explanations can be find in https://cli.vuejs.org/config/
module.exports = {
  /**
   * You will need to set publicPath if you plan to deploy your site under a sub path,
   * for example GitHub Pages. If you plan to deploy your site to https://foo.github.io/bar/,
   * then publicPath should be set to "/bar/".
   * In most cases please use '/' !!!
   * Detail: https://cli.vuejs.org/config/#publicpath
   */
  publicPath: '/',
  outputDir: 'dist',
  assetsDir: 'static',
  lintOnSave: process.env.NODE_ENV === 'development',
  productionSourceMap: false,
  devServer: {
    port: port,
    open: true,
    overlay: {
      warnings: false,
      errors: true
    },
    before: require('./mock/mock-server.js')
  }

}
- .env.development, .evn.production这两个是vue.config.js配置文件中提到的两个配置文件,也从template项目中搬过来,这两个文件其实很简单,也就是表明是哪个配置,主要区别就是develop和product会调用不同的api通道,这也是一般项目中常用的设置。
# .env.production
# just a flag
ENV = 'production'

# base api
VUE_APP_BASE_API = '/prod-api'
# .env.development
# just a flag
ENV = 'development'

# base api
VUE_APP_BASE_API = '/dev-api'
- mock目录,在vue.config.js中,最后一行,引用了mock/mock-server.js的文件,主要是用来针对开发服务器的时候,拦截api请求的。这个有点复杂,暂时我们可以直接在vue.config.js中注释掉这句配置,或者从template项目源码中,copy整个mock目录到项目的对应路径下。
除此之外,在template项目源码中,还有一些别的配置文件,但目前我们暂时用不上,等后期学习到了,再补充。
5.改造启动文件main.js,以及根组件App.vue
先来看App.vue文件,不同于vue-cli创建App.vue,template源码中App.vue极为精简,仅保留了初始的框架,这也符合后台管理平台的特征,毕竟进入管理页面前的login页面,和内部页面有很大区别,也都很简单。
<template>
  <div id="app">
    <router-view />
  </div>
</template>

<script>
export default {
  name: 'App'
}
</script>
再来看一下main.js,源码中的main.js加载了不少插件,来作为全局引用,我们先直接把整个代码copy过来,再细细分析。
// main.js
import Vue from 'vue'

import 'normalize.css/normalize.css' // A modern alternative to CSS resets

import ElementUI from 'element-ui'
import 'element-ui/lib/theme-chalk/index.css'
import locale from 'element-ui/lib/locale/lang/en' // lang i18n

import '@/styles/index.scss' // global css

import App from './App'
import store from './store'
import router from './router'

import '@/icons' // icon
import '@/permission' // permission control

/**
 * If you don't want to use mock-server
 * you want to use MockJs for mock api
 * you can execute: mockXHR()
 *
 * Currently MockJs will be used in the production environment,
 * please remove it before going online ! ! !
 */
if (process.env.NODE_ENV === 'production') {
  const { mockXHR } = require('../mock')
  mockXHR()
}

// set ElementUI lang to EN
Vue.use(ElementUI, { locale })
// 如果想要中文版 element-ui,按如下方式声明
// Vue.use(ElementUI)

Vue.config.productionTip = false

new Vue({
  el: '#app',
  router,
  store,
  render: h => h(App)
})
- import ‘@/styles/index.scss’ 这是加载全局css样式文件,去template源码中看了一下对应的index.scss文件,起手就把整个styles目录下的其余文件都加载了进来,所以,干脆把template源码中styles目录copy过来吧
-
import router from ‘./router’ 这是加载路由,我们默认就有这个目录和文件,但是对比template源码中的路由文件,还是需要大幅度改造的
// router/index.js

import Vue from 'vue'
import Router from 'vue-router'

Vue.use(Router)

/* Layout */
import Layout from '@/layout'

/**
 * Note: sub-menu only appear when route children.length >= 1
 * Detail see: https://panjiachen.github.io/vue-element-admin-site/guide/essentials/router-and-nav.html
 *
 * hidden: true                   if set true, item will not show in the sidebar(default is false)
 * alwaysShow: true               if set true, will always show the root menu
 *                                if not set alwaysShow, when item has more than one children route,
 *                                it will becomes nested mode, otherwise not show the root menu
 * redirect: noRedirect           if set noRedirect will no redirect in the breadcrumb
 * name:'router-name'             the name is used by <keep-alive> (must set!!!)
 * meta : {
    roles: ['admin','editor']    control the page roles (you can set multiple roles)
    title: 'title'               the name show in sidebar and breadcrumb (recommend set)
    icon: 'svg-name'/'el-icon-x' the icon show in the sidebar
    breadcrumb: false            if set false, the item will hidden in breadcrumb(default is true)
    activeMenu: '/example/list'  if set path, the sidebar will highlight the path you set
  }
 */

/**
 * constantRoutes
 * a base page that does not have permission requirements
 * all roles can be accessed
 */
export const constantRoutes = [
  {
    path: '/login',
    component: () => import('@/views/login/index'),
    hidden: true
  },

  {
    path: '/404',
    component: () => import('@/views/404'),
    hidden: true
  },

  {
    path: '/',
    component: Layout,
    redirect: '/dashboard',
    children: [{
      path: 'dashboard',
      name: 'Dashboard',
      component: () => import('@/views/dashboard/index'),
      meta: { title: 'Dashboard', icon: 'dashboard' }
    }]
  },

  // 404 page must be placed at the end !!!
  { path: '*', redirect: '/404', hidden: true }
]

const createRouter = () => new Router({
  // mode: 'history', // require service support
  scrollBehavior: () => ({ y: 0 }),
  routes: constantRoutes
})

const router = createRouter()

// Detail see: https://github.com/vuejs/vue-router/issues/1234#issuecomment-357941465
export function resetRouter() {
  const newRouter = createRouter()
  router.matcher = newRouter.matcher // reset router
}

export default router
这里先采用template中的路由文件,但是仅保留了login,404以及dashboard这几个文件的路由,其余的暂时先删除,后期再视情况处理,从路由文件中可以看到,包含了布局文件layout目录,我们先把layout目录也copy过来。
-
import store from ‘./store’ 这是加载前端状态管理,虽然vue-cli创建项目的时候,我们选择了Vuex插件,所以已经存在store目录,以及index.js文件,但是文件中基本都是空的构造函数,而template源码中的store则有多个文件,并且内容也都比较多,暂时我们先copy过来,以便项目能够运行起来,打开login页面。
-
import ‘@/icons’ // icon 这是加载的svg图标目录,去template源码中看了一下对应的icons/index.js文件
import Vue from 'vue'
import SvgIcon from '@/components/SvgIcon'// svg component

// register globally
Vue.component('svg-icon', SvgIcon)

const req = require.context('./svg', false, /\.svg$/)
const requireAll = requireContext => requireContext.keys().map(requireContext)
requireAll(req)
代码没几行,不过第二行就需要加载components下的SvgIcon目录,而打开SvgIcon目录下的index.vue文件,发现其中引用了utils/validate.js文件,干脆把components,util这两个目录页全部都copy过来。
-
import ‘@/permission’ // permission control 这是前段权限控制处理代码,主要也就是引用了util下的几个文件,以及router,store目录。先把permission.js文件都copy过来。
这样,main.js算是改造好了,template源码中src下的components,icons,layout,router,store,styles,utils这几个目录算是全部都copy过来了,剩下的还有api,assets,views这三个目录还没有搬。assets是用来存放静态资源文件的,我们直接把assets中的资源copy过来就行,没太多的讲究。
6.创建login,dashboard,404页面
template项目源码中,大多数采用的是每一个页面都在views下创建了一个对应的目录名,在目录下在创建index.vue作为默认页面组件。个人不太喜欢这种风格,做个小的改动,单组件页面就直接在views下建立对应的vue文件,多组件页面才建立页面目录这一级,而login,dashboard,404都是单组件页面,先删除vue-cli创建的默认hello和about两个vue文件,再创建login.vue,dashboard.vue,404.vue,相关内容就copy自template中对应文件的内容。注意:在调整了views下组件的名称和路径后,也要记得在\router\index.js中,同步修改对应的路由组件路径。下面是对应需要修改后的结果。
// src\router\index.js

.....

export const constantRoutes = [
  {
    path: '/login',
    component: () => import('@/views/login'),
    hidden: true
  },

  {
    path: '/404',
    component: () => import('@/views/404'),
    hidden: true
  },

  {
    path: '/',
    component: Layout,
    redirect: '/dashboard',
    children: [{
      path: 'dashboard',
      name: 'Dashboard',
      component: () => import('@/views/dashboard'),
      meta: { title: 'Dashboard', icon: 'dashboard' }
    }]
  },

  // 404 page must be placed at the end !!!
  { path: '*', redirect: '/404', hidden: true }
]

.....
启动服务器,提示缺少settings.js文件,原来在src\utils\get-page-title.js以及src\store\modules\settings.js这两个文件中,都有引用src\settings.js文件,我们照搬template项目源码中的文件。
// src\settings.js
module.exports = {

  title: 'AdminPlat Vue',

  /**
   * @type {boolean} true | false
   * @description Whether fix the header
   */
  fixedHeader: false,

  /**
   * @type {boolean} true | false
   * @description Whether show the logo in sidebar
   */
  sidebarLogo: false
}
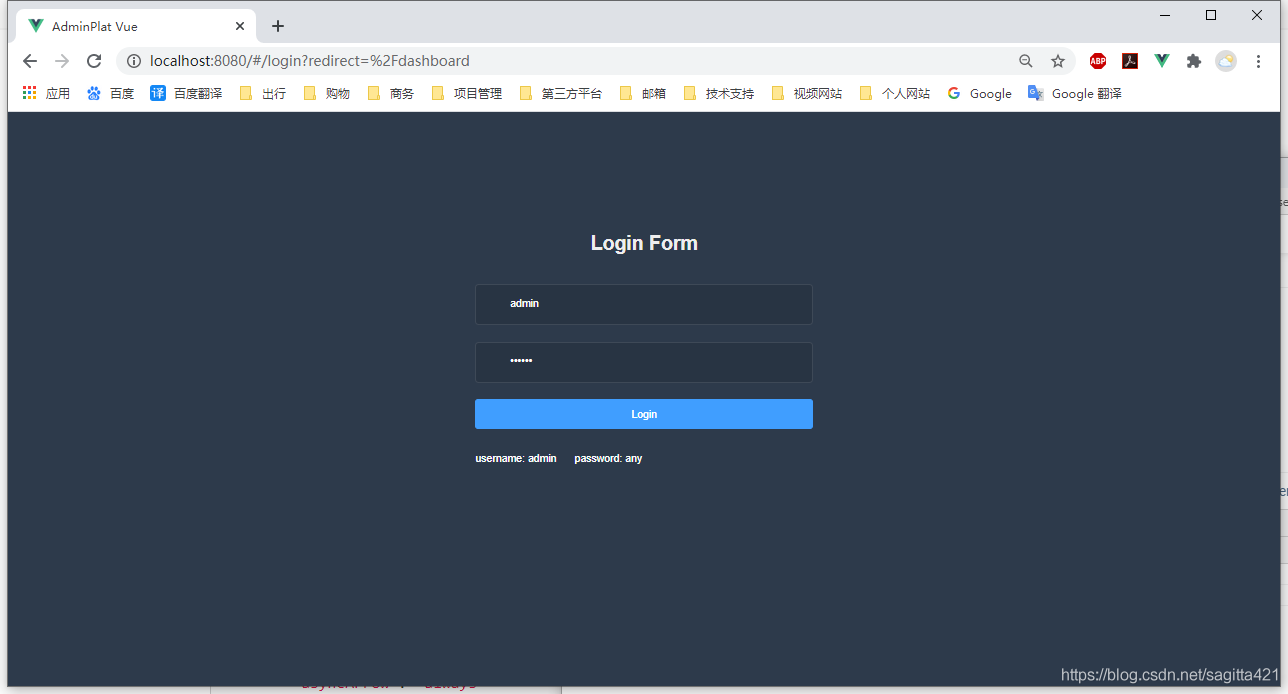
这里,根据我们的项目名称,将title的值做了替换。之后,启动服务,成功显示登录页面。

但是点击login按钮,却提示404错误,通过网页的调试工具,看到console中提示:POST http://localhost:8080/adminplat-vue/user/login 404 (Not Found),应该是api请求连接没有响应。重新再来审查mock相关的代码,发现main.js中,mock的加载有点问题,居然是默认在production的配置下才加载,而默认的vue的serve的启动模式是development,我们这里把if判断直接注释掉后,login按钮就成功跳转到dashboard页面了。
// main.js
.....

// if (process.env.NODE_ENV === 'production') {
  const { mockXHR } = require('../mock')
  mockXHR()
// }

.....
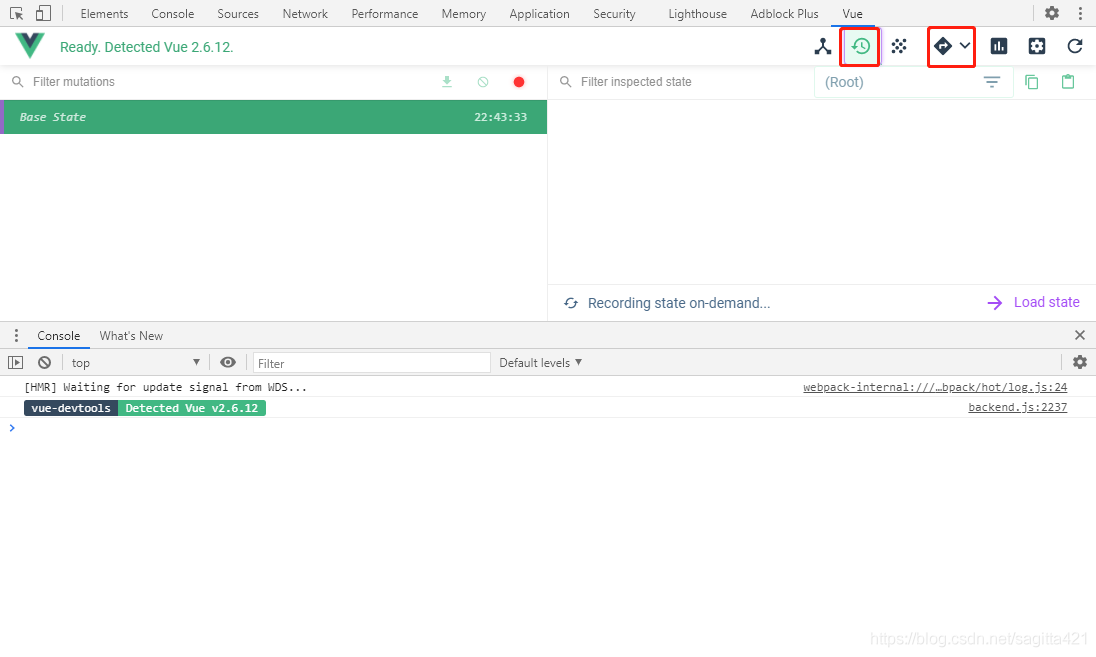
这里,建议使用chrom浏览器,并安装vue-devtools扩展,这是针对vue开发的调试工具,帮助我们进行相关的页面调试,在里面可以更直观的看到vuex,router的数据值。vue-devtools怎么使用呢?在成功安装后,可以看到上面图片的右上角有一个vue的小图标,绿色状态表示已经启动,没有启动的情况下会是灰色的。启动vue-devtools后,按f12打开chrome的开发者工具页面,我们就会发现会新增一的Vue的标签栏,如下图所示,其中红框标注的就是用来查看vuex和router数据的选项。

参考资源:
https://www.jianshu.com/p/dd07cca0a48e
https://cloud.tencent.com/developer/article/1477063