STM8S103F3
- 基本信息: 16MHz 8位 MCU, 8K字节Flash, 1K内存, 640字节EEPROM, 内置振荡源, 支持3.3V和5V电压, 支持SPI, UART, I2C, ADC, PWM
- 产品手册: https://www.st.com/resource/en/datasheet/stm8s103f2.pdf
内核
- 16 MHz advanced STM8 core with Harvard architecture and 3-stage pipeline 16MHz, 哈佛结构, 三级流水线
- Extended instruction set
存储
- Program memory: 8 Kbyte Flash; data retention 20 years at 55 °C after 10 kcycle 程序8K字节, 可擦写1万次
- Data memory: 640 byte true data EEPROM; endurance 300 kcycle 数据640字节, 可擦写30万次
- RAM: 1 Kbyte 内存1K字节
时钟, 重置和电源管理
- 2.95 to 5.5 V operating voltage 支持2.95V到5.5V的电压
- Flexible clock control, 4 master clock sources
- Low power crystal resonator oscillator
- External clock input
- Internal, user-trimmable 16 MHz RC 可调节的内部16MHz振荡源
- Internal low-power 128 kHz RC 低功耗内部128KHz振荡源
- Clock security system with clock monitor
- Power management:
- Low-power modes (wait, active-halt, halt)
- Switch-off peripheral clocks individually
- Permanently active, low-consumption poweron and power-down reset
中断管理
- Nested interrupt controller with 32 interrupts
- Up to 27 external interrupts on 6 vectors
时钟
- Advanced control timer: 16-bit, 4 CAPCOM channels, 3 complementary outputs, dead-time insertion and flexible synchronization
- 16-bit general purpose timer, with 3 CAPCOM channels (IC, OC or PWM)
- 8-bit basic timer with 8-bit prescaler
- Auto wake-up timer
- Window watchdog and independent watchdog timers
通信接口
- UART with clock output for synchronous operation, SmartCard, IrDA, LIN master mode
- SPI interface up to 8 Mbit/s
- I2C interface up to 400 kbit/s
ADC转换接口
- 10-bit, ±1 LSB ADC with up to 5 multiplexed channels, scan mode and analog watchdog 5个10位ADC
I/Os
- Up to 28 I/Os on a 32-pin package including 21 high sink outputs
- Highly robust I/O design, immune against current injection
Unique ID
- 96-bit unique key for each device
硬件
ST-Link V2 用于烧录
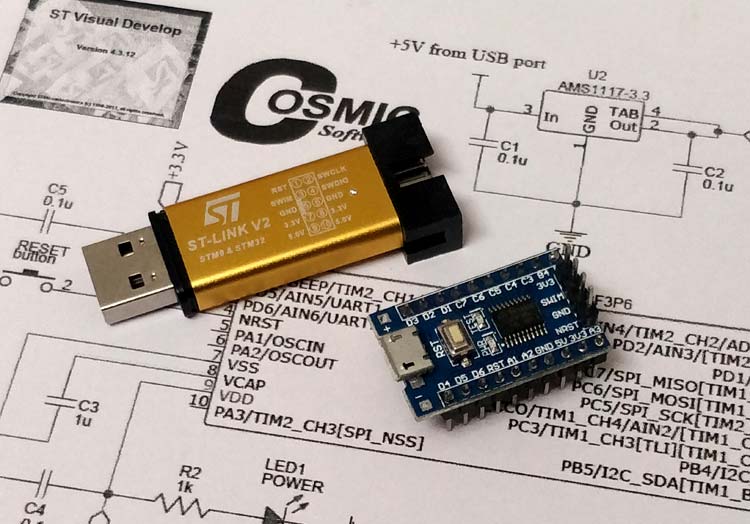
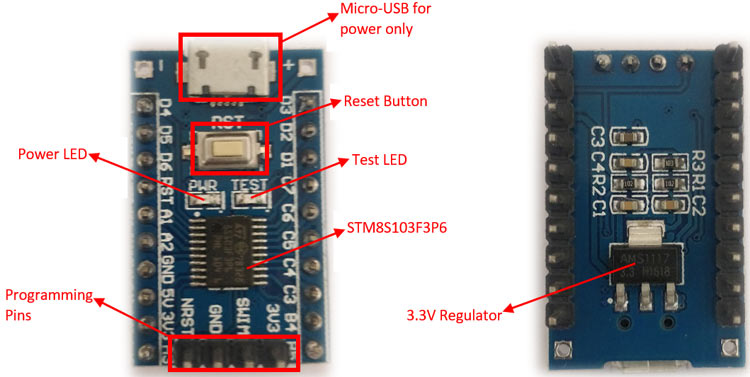
STM8S103F3P6 开发板
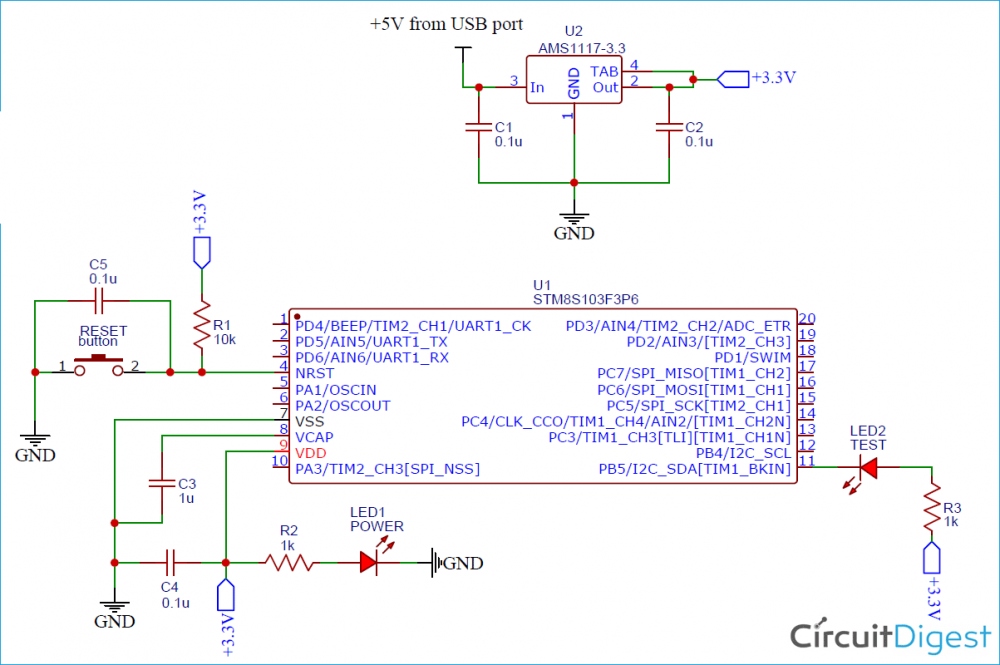
开发板电路图
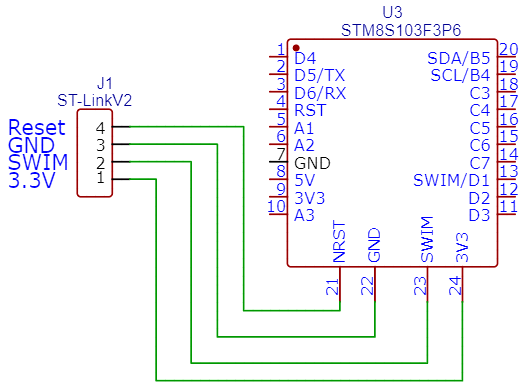
接线
ST-LINK和开发板的SWIM口是一一对应的, 直接连到开发板的同名PIN
ST-LINK-V2  STM8S103F3

SWIM        -> SWIM
RST         -> NRSt
VCC         -> 3V3
GND         -> GND
软件
ST Visual Develop (STVD) 和 STVP(ST Visual Programmer)
https://www.st.com/en/development-tools/stvd-stm8.html
- STVD是开发工具, 当前版本是4.3.12
- STVP是烧录工具, 当前版本是4.3.1
Cosmic C Compiler
https://www.cosmicsoftware.com/download_stm8_free.php
需要注册, 安装后需要注册获得 license 文件, 并放到安装目录下
开发工具库 SPL
- ST Microelectronics 提供的原始SPL https://www.st.com/en/embedded-software/stsw-stm8069.html
- GitHub 上第三方维护的 STM8S103F3_SPL(推荐) https://github.com/CircuitDigest/STM8S103F3_SPL
开发
创建项目
打开 STVD
- File -> WorkSpace, New Workspace 输入 Workspace 名称, 项目名和路径
- 创建项目, 注意在路径中增加子目录给项目, 否则项目会和Workspace生成到同一个目录下
- 设置工具链: 选择STM8 Cosmic, 指定toolchains到对应的目录, 默认的目录为
C:\Program Files (x86)\COSMIC\FSE_Compilers\CXSTM8 - 选择芯片型号, 例如对于 STM8S103F3P6 选择 STM8S103F3P, 然后点 Select 按钮, 会出现在下面的 Selected MCU 中, 然后点 OK
建好后能看到项目结构下有三个目录Source Files, Include Files 和 External Dependencies, 在 Source Files 下创建了 main.c 和 stm8_interrupt_vector.c 这两个文件
这时候直接按 F7 检查是否能正确编译
添加SPL
将下载的SPL的 inc 和 src 目录解压到项目目录下, 目录结构如下
.
│  main.c
│  stm8_interrupt_vector.c
├─Debug
├─Release
└─STM8S103F3_SPL
    ├─inc
    │      stm8s.h
    │      stm8s103_ADC.h
    │      stm8s103_LCD_16x2.h
    |      ...
    │      stm8s_uart1.h
    │      stm8s_wwdg.h
    │
    ├─src
    │      stm8s_adc1.c
    │      stm8s_awu.c
    │      ...
    │      stm8s_tim2.c
    │      stm8s_uart1.c
    │      stm8s_wwdg.c
    │
    ├─stm8s103 Libraries
    └─Tutorials
也可以SPL放到项目其他目录下, 位置无所谓, 因为文件是否包含是通过STVD的项目配置控制的.
- 在STVD中, 在项目结构下创建 SPL Inc 目录和 SPL Src 目录
- 将STM8S103F3_SPL/inc下的.h文件添加到项目的 SPL Inc
- 将STM8S103F3_SPL/src下的.c文件添加到项目的 SPL Src
测试代码
修改 main.c, 下面的代码会驱动板载LED(B5)闪灯
#include "stm8s.h"

void delay (int ms) //Function Definition
{
	int i = 0;
	int j = 0;
	for (i=0; i<=ms; i++)
	{
		for (j=0; j<120; j++) // Nop = Fosc/4
			_asm("nop"); //Perform no operation //assembly code
	}
}

main()
{
	GPIO_DeInit(GPIOB); // prepare Port B for working

	GPIO_Init(GPIOB, GPIO_PIN_5, GPIO_MODE_OUT_PP_LOW_SLOW);
	while (1)
	{
		GPIO_WriteReverse(GPIOB,GPIO_PIN_5);
		delay (100);
	}
}
编译
直接按 F7 编译
Debug
设置
- 在ST Visual Develop中, 点击 Debug instrument -> Target Settings
- Debug Instrument Selection 选择 Swim ST-Link
- 勾选 Restart the application with Swim Off on stop debug
- Target Port Selection 保留默认的 usb://usb
- 勾选 Show the selected target notification at start of debugging session
- 点击OK
开始Debug
- 点击图标栏中的蓝色 D 图标, 或者菜单中的 Debug -> Start Debugging 开始 Debug
- 弹出提示选择Target, 如果有设置多个则选择 Swim ST-Link, 点击OK
- ST Visual Develop 会将程序写入目标开发板, 然后进入Debug状态, 程序停留在第一行
这时候就可以进行debug了
- 在代码行号右边点左键, 可以增加断点
- 按 F5 往下继续执行 (直到遇到断点)
- 按 F10 单步运行, Alt + F10 汇编单步运行, Ctr + F10 运行到光标当前位置
- 按 F11 进入方法, Ctr + F11 跳出方法
退出Debug
点击图标栏或者菜单中的 Stop Debugging 退出 Debug
单独烧录
运行STVP
点击 Configure -> Configure ST Visual Programmer, 选择 ST-LINK + USB + SWIM + STM8S103F3
在STVP中, 打开项目 Debug 目录下的 .s19 文件, 写入 PROGRAM MEMORY
写入后程序不运行的解决
写完后ST-LINK亮红灯, 并不会自动重启, 此时在STVP中打开Configure对话框点击一下确认, 就会变回蓝灯, 程序就会开始运行
The device is protected解决方法
在STVP软件中, 在”PROGRAM MEMORY”和”DATA MEMORY”界面用Ctrl+R读出数据, 提示”The device is protected”
- 右侧主面板上切换到”OPTION BYTE”页
- 在表格的ROP选项, 选择”read out Protection OFF”
- 菜单栏点击 Program -> Current tab 保存配置, 配置写入之后就解开写保护了
- 回到”PROGRAM MEMORY”和”DATA MEMORY”界面, 用
Ctrl+R就可以读出数据了
参考
- 官方产品页 https://www.st.com/en/microcontrollers-microprocessors/stm8s103f3.html
- STM8环境搭建和编译, 烧录 https://circuitdigest.com/microcontroller-projects/getting-started-with-stm8s-using-stvd-and-cosmic-c-compiler
- STM8的GPIO https://circuitdigest.com/microcontroller-projects/gpio-functions-on-stm8s-using-cosmic-c-and-spl-blinking-led-with-push-button
- https://www.instructables.com/STM8s-Breakout-Board-ST-Link-V2-Connection-Failure/