一、quartz的环境配置
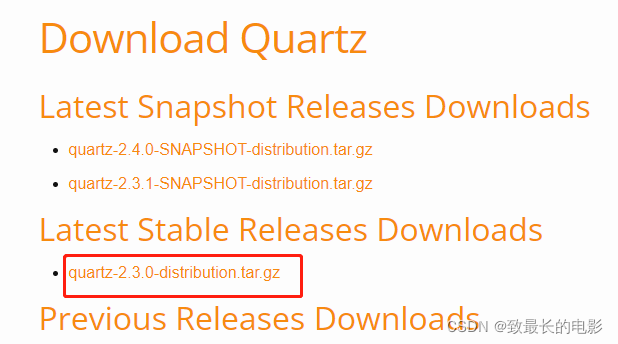
1. 首先进入quartz官网,下载安装包
quartz官网下载地址

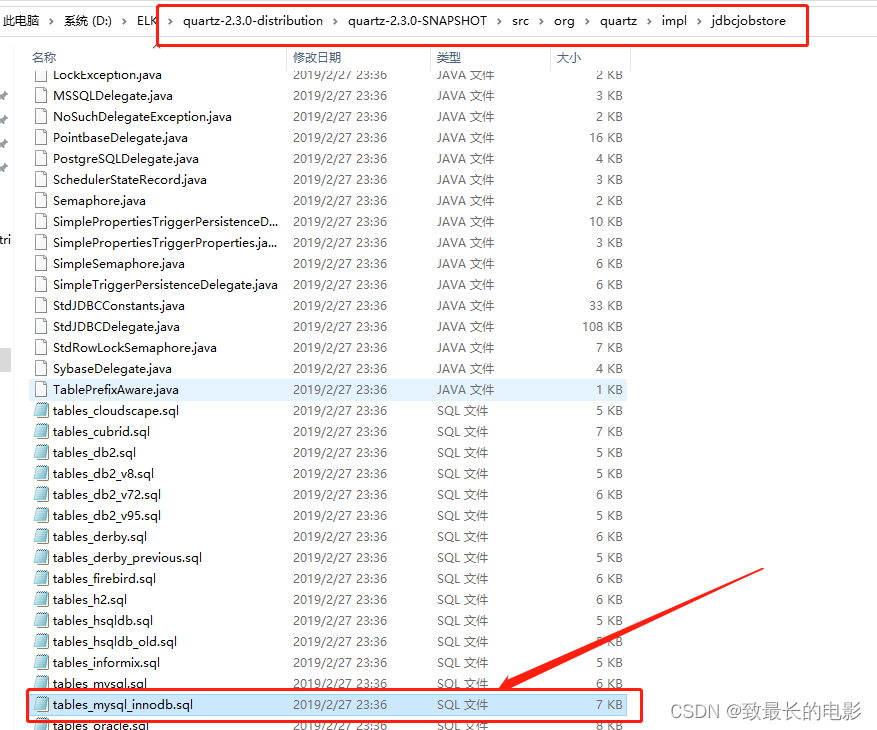
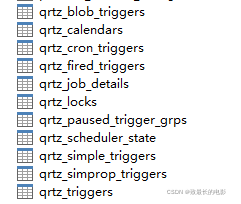
2. 将安装包解压,拿出里面的sql脚本,塞入到mysql服务器中


二、springboot整合bulkProcessor使用quartz做定时任务
1.pom文件加上elasticsearch和quartz依赖
        <dependency>
            <groupId>org.springframework.boot</groupId>
            <artifactId>spring-boot-starter-quartz</artifactId>
        </dependency>
        <dependency>
            <groupId>org.elasticsearch.client</groupId>
            <artifactId>elasticsearch-rest-high-level-client</artifactId>
            <version>7.9.3</version>
        </dependency>
        <dependency>
            <groupId>org.elasticsearch.client</groupId>
            <artifactId>elasticsearch-rest-client</artifactId>
            <version>7.9.3</version>
        </dependency>
        <dependency>
            <groupId>org.elasticsearch</groupId>
            <artifactId>elasticsearch</artifactId>
            <version>7.9.3</version>
        </dependency>
2.properties文件中加上quartz配置(其他mysql配置自行添加)
# 调度配置 -- 将任务等保存化到数据库
spring.quartz.job-store-type=jdbc
#spring.quartz.jdbc.initialize-schema=always
#程序结束时会等待quartz相关的内容结束
spring.quartz.wait-for-jobs-to-complete-on-shutdown=true
# 修改定时触发时间能随时生效
spring.quartz.overwrite-existing-jobs=true
# scheduler实例名  调度器实例名称
spring.quartz.properties.org.quartz.scheduler.instanceName=myScheduler
# 调度器实例编号自动生成
spring.quartz.properties.org.quartz.scheduler.instanceId=AUTO
# 持久化方式配置 -- 数据保存方式为数据库持久化
spring.quartz.properties.org.quartz.jobStore.class=org.quartz.impl.jdbcjobstore.JobStoreTX
# 数据库代理类,一般org.quartz.impl.jdbcjobstore.StdJDBCDelegate可以满足大部分数据库
spring.quartz.properties.org.quartz.jobStore.driverDelegateClass=org.quartz.impl.jdbcjobstore.StdJDBCDelegate
# 数据表的前缀,默认QRTZ_
spring.quartz.properties.org.quartz.jobStore.tablePrefix=qrtz_
# JobDataMaps是否都为String类型
spring.quartz.properties.org.quartz.jobStore.useProperties=false
spring.quartz.properties.org.quartz.jobStore.clusterCheckinInterval=10000
# 是否支持集群
spring.quartz.properties.org.quartz.jobStore.isClustered=false
# 线程池相关 -- 线程池的实现类
spring.quartz.properties.org.quartz.threadPool.class=org.quartz.simpl.SimpleThreadPool
# 线程池中的线程数量
spring.quartz.properties.org.quartz.threadPool.threadCount=10
# 线程优先级
spring.quartz.properties.org.quartz.threadPool.threadPriority=5
# 配置是否启动自动加载数据库内的定时任务,默认true
spring.quartz.properties.org.quartz.threadPool.threadsInheritContextClassLoaderOfInitializingThread=true
3.编写QuartzConfig、ESConfigClient配置类
package com.example.gauditdemo.config;

import com.example.gauditdemo.task.MysqlAddEsScheduler;
import org.quartz.*;
import org.springframework.context.annotation.Bean;
import org.springframework.context.annotation.Configuration;


/**
 * @author Frederic.Hu
 * @Description  Quartz的相关配置,注册JobDetail和Trigger
 * 注意JobDetail和Trigger是org.quartz包下的,不是spring包下的,不要导入错误
 * @date 2021/12/08 17:32
 */
@Configuration
public class QuartzConfig {

    /** builder 类创建了一个JobDetail和一个Trigger并注册成为Spring bean,
     * 这些bean会自动关联到调度器上,JobDetail和Trigger需要设置组名和自己的名字,用来作为唯一标识
     * JobDetail里有一个StartOfDayJob类,这个类就是job接口的一个实现类,里面定义了任务的具体内容
     */
    @Bean
    public JobDetail jobDetail() {
        // 指定具体的定时任务类
        JobDetail jobDetail = JobBuilder.newJob(MysqlAddEsScheduler.class)
                .withIdentity("myJob1", "myJobGroup1")
                .storeDurably()
                .build();
        return jobDetail;
    }

    /** Trigger通过corn表达式指定了任务执行的周期。 */
    @Bean
    public Trigger trigger() {
        Trigger trigger = TriggerBuilder.newTrigger()
                .forJob(jobDetail())
                .withIdentity("myTrigger1", "myTriggerGroup1")
                .startNow()
                // 0 */1 * * * ?   每分钟执行
                // */5 * * * * ?   每5s执行
                .withSchedule(CronScheduleBuilder.cronSchedule("*/5 * * * * ?"))
                .build();
        // 返回任务触发器
        return trigger;
    }

    /** 这边你可以写另外一个定时任务 */
//    @Bean
//    public JobDetail jobDetail2() {
//        // 指定具体的定时任务类
//        JobDetail jobDetail = JobBuilder.newJob(ElasticSearchUtil.class)
//                .withIdentity("myJob2", "myJobGroup2")
//                .storeDurably()
//                .build();
//        return jobDetail;
//    }
//
//    @Bean
//    public Trigger trigger2() {
//        Trigger trigger = TriggerBuilder.newTrigger()
//                .forJob(jobDetail2())
//                .withIdentity("myTrigger2", "myTriggerGroup2")
//                .startNow()
//                // 每天0点执行  0 0 0 * * ?   这里设定执行方式
//                // 0 */1 * * * ?   每分钟执行
//                // */5 * * * * ?   每5s执行
//                .withSchedule(CronScheduleBuilder.cronSchedule("*/5 * * * * ?"))
//                .build();
//        // 返回任务触发器
//        return trigger;
//    }


}
package com.example.gauditdemo.config;
import org.apache.http.HttpHost;
import org.elasticsearch.client.RestClient;
import org.elasticsearch.client.RestHighLevelClient;
import org.slf4j.Logger;
import org.slf4j.LoggerFactory;
import org.springframework.context.annotation.Bean;
import org.springframework.stereotype.Component;
/**
* @author Frederic.Hu
* @Description
* @date 2021/12/02 13:37
*/
@Component
public class ESConfigClient {
public final Logger logger = LoggerFactory.getLogger(this.getClass());
@Bean
public RestHighLevelClient esClient(){
return new RestHighLevelClient(RestClient.builder(new HttpHost("localhost", 9200, "http")));
}
}4.写一个bulkProcessor的配置类(ESCommonConfig)
package com.example.gauditdemo.utils;

import com.example.gauditdemo.config.ESConfigClient;
import org.elasticsearch.action.ActionListener;
import org.elasticsearch.action.bulk.BackoffPolicy;
import org.elasticsearch.action.bulk.BulkProcessor;
import org.elasticsearch.action.bulk.BulkRequest;
import org.elasticsearch.action.bulk.BulkResponse;
import org.elasticsearch.client.RequestOptions;
import org.elasticsearch.client.RestHighLevelClient;
import org.elasticsearch.common.unit.ByteSizeUnit;
import org.elasticsearch.common.unit.ByteSizeValue;
import org.elasticsearch.common.unit.TimeValue;
import org.slf4j.Logger;
import org.slf4j.LoggerFactory;
import org.springframework.beans.factory.annotation.Autowired;
import org.springframework.context.annotation.Bean;
import org.springframework.context.annotation.Scope;
import org.springframework.stereotype.Component;

import javax.annotation.PreDestroy;
import java.io.IOException;
import java.util.function.BiConsumer;

/**
 * @author Frederic.Hu
 * @Description
 * @date 2021/12/16 10:19
 */
@Component
public class ESCommonConfig {

    public final Logger logger = LoggerFactory.getLogger(this.getClass());

    @Autowired
    private ESConfigClient esConfigClient;

    @PreDestroy
    public void destory() {
        try {
            esConfigClient.esClient().close();
            logger.info("esClient客户端已经关闭:{}", esConfigClient.esClient());
        } catch (Exception e) {
            logger.error("关闭restHighLevelClient异常:", e);
        }
    }

    /**
     * @return org.elasticsearch.action.bulk.BulkProcessor
     * @description: 构建bulkProcessor接口 异步执行
     *
     */
    @Bean
    @Scope("prototype")
    public BulkProcessor getBulkAsyncProcessor( ) {
        RestHighLevelClient restHighLevelClient = esConfigClient.esClient();
        BiConsumer<BulkRequest, ActionListener<BulkResponse>> consumer =
                (bulkRequest, bulkResponseActionListener) -> restHighLevelClient.bulkAsync(
                        bulkRequest, RequestOptions.DEFAULT, bulkResponseActionListener);
        logger.info("getBulkAsyncProcessor 中 ES客户端地址:{}", restHighLevelClient);

        return BulkProcessor.builder(consumer, new BulkProcessor.Listener() {
            @Override
            public void beforeBulk(long executionId, BulkRequest bulkRequest) {
                //重写beforeBulk,在每次bulk request发出前执行,在这个方法里面可以知道在本次批量操作中有多少操作数
                int numberOfActions = bulkRequest.numberOfActions();
                logger.info("同步数量 Executing bulk [{}] with {} requests", executionId, numberOfActions);
            }

            @Override
            public void afterBulk(long executionId, BulkRequest bulkRequest, BulkResponse bulkResponse) {
                //重写afterBulk方法,每次批量请求结束后执行,可以在这里知道是否有错误发生。
                if (bulkResponse.hasFailures()) {
                    logger.error("Bulk [{}] executed with failures,response = {}", executionId, bulkResponse.buildFailureMessage());
                } else {
                    logger.info("写入成功 Bulk [{}] completed in {} milliseconds", executionId, bulkResponse.getTook().getMillis());
                    try {
                        restHighLevelClient.close();
                        logger.info("运行到最后时的es客户端地址:{}", restHighLevelClient);
                    } catch (IOException e) {
                        e.printStackTrace();
                    }
                }
            }

            @Override
            public void afterBulk(long l, BulkRequest bulkRequest, Throwable failure) {
                //重写方法,如果发生错误就会调用。
                logger.error("写入失败 Failed to execute bulk", failure);
            }

        }).setBulkActions(20000)  //  达到刷新的条数
                .setBulkSize(new ByteSizeValue(15L, ByteSizeUnit.MB)) // 达到 刷新的大小
                .setConcurrentRequests(100) // 并发请求数量, 0不并发, 1并发允许执行
                .setFlushInterval(TimeValue.timeValueSeconds(20))  // 固定刷新的时间频率
                .setBackoffPolicy(BackoffPolicy.constantBackoff(
                        TimeValue.timeValueSeconds(100L), 3)) // 重试补偿策略
                .build();
    }

}
5.写定时任务类MysqlAddEsScheduler类
package com.example.gauditdemo.task;

import com.example.gauditdemo.dao.OperationDao;
import org.elasticsearch.action.bulk.BulkProcessor;
import org.elasticsearch.action.index.IndexRequest;
import org.elasticsearch.common.xcontent.XContentType;
import org.quartz.JobExecutionContext;
import org.quartz.JobExecutionException;
import org.slf4j.Logger;
import org.slf4j.LoggerFactory;
import org.springframework.beans.factory.annotation.Autowired;
import org.springframework.beans.factory.annotation.Value;
import org.springframework.scheduling.quartz.QuartzJobBean;
import org.springframework.stereotype.Component;
import org.springframework.transaction.annotation.Transactional;

import javax.annotation.Resource;
import java.text.ParseException;
import java.text.SimpleDateFormat;
import java.util.Calendar;
import java.util.List;
import java.util.Map;

/**
 * @author Frederic.Hu
 * @Description
 * @date 2021/12/15 10:32
 */
@Component
public class MysqlAddEsScheduler extends QuartzJobBean {

    public final Logger logger = LoggerFactory.getLogger(this.getClass());

    @Resource
    private OperationDao operationDao;

    @Value("${audit.index.prefix.env}")
    private String auditIndexPrefixEnv;

    @Autowired
    private BulkProcessor bulkProcessor;

    @Override
    protected void executeInternal(JobExecutionContext jobExecutionContext) throws JobExecutionException {
        long startTime = System.currentTimeMillis();
        List<Map<String, Object>> mapList = selectAll();
        logger.info("同步数据 tongBuSize:{}条", mapList.size());
        try {
            if (!mapList.isEmpty()) {
                mapList.parallelStream().forEach(item -> {
                    try {
                        SimpleDateFormat sdFormat = new SimpleDateFormat("yyyy-MM-dd HH:mm:ss");
                        Calendar cal = Calendar.getInstance();
                        // 自动生成的operationtime自动映射成date类型
                        cal.setTime(sdFormat.parse(item.get("operationtime").toString()));
                        // 插入es数据时间相差8小时
                        cal.add(Calendar.HOUR_OF_DAY, +8);
                        item.replace("operationtime", cal.getTime());
                    } catch (ParseException e) {
                        logger.error("Failed to convert time:", e);
                    }
                    bulkProcessor.add(new IndexRequest().index(auditIndexPrefixEnv + item.get("indexsuffix").toString()).source(item, XContentType.JSON));
                });
            }
            // 刷新
            bulkProcessor.flush();
            bulkProcessor.close();
        } catch (Exception e) {
            logger.error("BulkProcessor,插入数据异常", e);
        }
        logger.info("tongbu use time: " + (System.currentTimeMillis() - startTime) + "ms");
    }

    @Transactional
    List<Map<String, Object>> selectAll() {
        return operationDao.selectOperationAndChangeDate();
    }

}
6. 控制台打印输出

7.kibana数据打印输出

三、使用方法
-
配置类不用改,需要改的地方就是定时任务MysqlAddEsScheduler类业务需求的地方
-
定时任务几分钟同步一次,可以自己写cron表达式,在quartzConfig配置类里面修改时间
-
自已已应用到测试、预生产环境,是能正常运行的
四、自己过程中遇到的问题及解决办法
-
mysql时间类型与es中时间类型不一致
原因及解决办法:mysql中有一个时间date类型,同步到es中,这个时间类型在es中是text类型,导致查询会报错,预想应该在es中也是date类型才对。解决办法:mybatis中查询出来的结果将时间进行转换,代码中有,我写了注释。最好将es中的索引先删除掉,然后es会自动创建索引和字段类型的。
-
es中时间比mysql中查询出来的时间少了8个小时
原因及解决办法:同步的时候发现es中时间少8小时。解决办法:mybatis中查询出来的结果将时间加8个小时,代码中有,可以参考一下,我写了注释。
-
如果使用@Scheduler注解做定时任务,想要其起效果,需要三个条件
原因及解决办法:自己搜索0.0
-
测试的时候,我是在windwos中安装的es和kibana
原因及解决办法:比较方便,方便我调式
-
为什么同步es中要用bulkProcessor
原因及解决办法:当你数据量特别大的时候,不用bulkProcessor,如果一次性同步几百万条数据,会将es弄崩掉的。解决办法:加上bulkProcessor,可以自行设置多少条同步一次,或者几s自动同步一次,也比较方便
-
定时同步中,之前bulkProcessor一直创建对象,导致长时间运行服务挂掉,内存溢出
原因及解决办法:定时任务类中,批量塞入数据时,只创建一个bulkProcessor对象,就不需要批量多少条数据就创建多少个对象。解决办法:将 bulkProcessor 对象给 Spring 容器管理
-
定时任务中,bulkProcessor同步完,bulkProcessor要关闭
原因及解决办法:每次批量同步完,记得最后要将bulkProcessor关闭掉,不然长时间同步下去,服务就会宕机。解决办法:在最后同步完,加上bulkProcessor关闭掉。
-
定时任务中,当设置每5分钟同步一次时,都是整点同步的
现象及解决办法:当我定时任务设置每5分钟执行一次,都会整点执行,不会说你启动服务是在8点53分启动,定时任务就会在8点58分执行,不是这样的,定时任务会在8点55分开始执行一次,下一次则是在9点整执行一次。解决办法:当你有两个定时任务对同一张表操作时,可以将其时间错开,设定一个特定时间。
五、测试环境同步日志
