文章目录
- 1、窗口设置
- 2、Label 标签部件
- 3、Button 按钮部件
- 4、Checkbutton 选择部件(可以多选)
- 5、Radiobutton 选择部件(只能单选)
- 6、Frame 部件
- 7、Entry 单行文本输入框
- 8、Text 文本框
- 9、Listbox 列表框
- 10、Scrollbar 滚动条
- 11、Scale 刻度
- 12、Menu 菜单
- 13、OptionMenu 选择菜单
- 14、Spinbox 组件
- 15、Canvas 画布组件
- 16、PanedWindow 空间管理组件
- 17、Message 消息组件
- 18、标准对话框
- 19、事件绑定
- 20、布局管理 pack,grid,place
- 21、ttk
查看某个组件的帮助文档(构造方法),可使用
print(help(tk.Label.init))
1、窗口设置
import tkinter as tk

root = tk.Tk()
root.title('窗口参数设置')           # 设置窗口标题。
root.iconbitmap(r'.\kenan.ico')     # 设置窗口左上角的图标。

"获取电脑屏幕尺寸大小"
window_x = root.winfo_screenwidth()
window_y = root.winfo_screenheight()

"设置窗口大小参数"
WIDTH = 500
HEIGHT = 350

"获取窗口左上角的X, Y坐标,用来设置窗口的放置位置为屏幕的中间。"
x = (window_x - WIDTH) / 2
y = (window_y - HEIGHT) / 2

root.geometry(f'{WIDTH}x{HEIGHT}+{int(x)}+{int(y)}')
root.resizable(width=True, height=True)        # 设置是否禁止调整窗口的宽和高。
root.minsize(250, 250)                        # 设置窗口的最小尺寸。
root.maxsize(800, 600)                        # 设置窗口的最大尺寸。

win_width = root.winfo_width()                #获取窗口宽度(单位:像素)
win_height = root.winfo_height()              #获取窗口高度(单位:像素)
x=root.winfo_x()                              #获取窗口左上角的 x 坐标(单位:像素)
y=root.winfo_y()                              #获取窗口左上角的 y 坐标(单位:像素)
# print(win_width, win_height, x, y)

#root.attributes("-toolwindow", 1)            # 工具栏样式。参数1:没有最大化/最小化按钮。
#root.attributes("-topmost", 1)               # 窗口置顶显示。
# root.overrideredirect(True)                 #参数True,隐藏窗口标题栏。即不显示窗口标题和最大化、最小化、关闭按钮。

# root.state("iconic")                        # 隐藏窗口,可以在任务管理器中查看,相当于在后台运行了。
# root.state("normal")                        # 设置为普通窗口。
# root.withdraw()                             # 从屏幕中移除窗口。相当于影藏窗口了(并没有销毁)。
# root.deiconify()							  # 使窗口重新显示在电脑屏幕上。
# root.attributes("-fullscreen", True)        # 全屏显示,用 Windows 热键 “ Alt+F4 ” 关闭这个全屏的Tkinter窗口。
root.attributes("-alpha",0.8)                 #设置窗口的透明度 0.8, 参数为 0 到 1。

"Toplevel有和顶层窗口一样的属性。"
top_window = tk.Toplevel(root)
top_window.geometry(f'260x200+{int(x)+50}+{int(y)+50}')
top_window.transient(root)                    # 使弹出窗口一直置于 root 窗口之上。

tk.mainloop()
各控件 显示 一览表:
变量有:
tk.StringVar()
tk.IntVar()
tk.DoubleVar()
控件显示简图
颜色说明
字体设置详细方法
对齐和浮雕风格
位图和图片格式
2、Label 标签部件
label = tk.Label(root,text='我是一个标签',     # text为显示的文本内容
                 bg='black',fg='white',			# bg为背景色,fg为前景色
                 font=("华文行楷", 20),			# 设置字体为“华文行楷”,大小为20
                 width=30,height=3)         	# width为标签的宽,height为高
3、Button 按钮部件
tk.Button(window,width=20,height=2,text='单击',command=回调函数)
4、Checkbutton 选择部件(可以多选)
默认情况下,variable 选项设置为 1 表示选中状态,反之设置为 0。你可以使用 onvalue 和 offvalue 选项修改它们的值,例如下边代码,只要 var 被设置为“T”即选中状态,设置为“F”则相反:
var = tk.StringVar()
var.set("T")
c = tk.Checkbutton(root, text="你喜欢Python吗", variable=var, onvalue="T", offvalue="F")
5、Radiobutton 选择部件(只能单选)
为了实现其“单选”行为,确保一组中的所有按钮的 variable 选项都使用同一个变量,并使用 value 选项来指定每个按钮代表什么值:
v = tk.IntVar()
v.set(2)
tk.Radiobutton(root, text="One", variable=v, value=1).pack(anchor="w")
tk.Radiobutton(root, text="Two", variable=v, value=2).pack(anchor="w")
tk.Radiobutton(root, text="Three", variable=v, value=3).pack(anchor="w"
6、Frame 部件
f_top = tk.Frame(root, height=65, width=1080, bd=1, relief="flat")  # "sunken" "raised","groove" 或 "ridge"
f_top.pack_propagate(False)                 # 如果不加这个参数,当Frame框架中加入部件时,会自动变成底层窗口,自身的特性会消失。
f_top.pack(side='top', pady=5)
LabelFrame 部件
7、Entry 单行文本输入框
e = tk.Entry(window, show='*', font=('Arial', 14)) # 显示成密文形式
v = tk.StringVar()
e = tk.Entry(master, textvariable=v)
8、Text 文本框
text = tk.Text(root, width=40, height=5)
9、Listbox 列表框
from tkinter import *


class App:
    def __init__(self, master):
        self.master = master
        self.initWidgets()

    def initWidgets(self):
        topF = Frame(self.master)
        topF.pack(fill=Y, expand=YES)

        # 定义StringVar变量
        self.v = StringVar()

        # 创建Listbox组件,与v变量绑定
        self.lb = Listbox(topF, listvariable = self.v)
        self.lb.pack(side=LEFT, fill=Y, expand=YES)
        for item in range(20):
            self.lb.insert(END, str(item))

        # 创建Scrollbar组件,设置该组件与self.lb的纵向滚动关联
        scroll = Scrollbar(topF, command=self.lb.yview)
        # 设置self.lb的纵向滚动影响scroll滚动条
        self.lb.configure(yscrollcommand=scroll.set)
        scroll.pack(side=RIGHT, fill=Y)

        f = Frame(self.master)
        f.pack()
        Button(f, text="选中10项", command=self.select).pack(side=LEFT)
        Button(f, text="清除选中3项", command=self.clear_select).pack(side=LEFT)
        Button(f, text="删除3项", command=self.delete).pack(side=LEFT)
        Button(f, text="绑定变量", command=self.var_select).pack(side=LEFT)

    def select(self):
        # 选中指定项
        self.lb.selection_set(0, 9)
        print(self.lb.curselection())    # 获取选中的元素的索引值。
        print(self.lb.size())            # 获取列表框中所有元素的数量。

    def clear_select(self):
        # 取消选中指定项
        self.lb.selection_clear(1,3)
        print(self.lb.curselection())     # 获取选中的元素的索引值。

    def delete(self):
        # 删除指定项
        self.lb.delete(5, 8)

    def var_select(self):
        # 修改与Listbox绑定的变量,即直接把列表中的元素替换成 set()中的元组了。
        self.v.set(('set12', 'set15'))
        print(self.v.get())

root = Tk()
root.title("Listbox测试")
App(root)
root.mainloop()
Combobox

相当于 一个 Entry和“下拉栏”的组合。
即提供一个“输入框”用来输入信息,和“下拉栏”可以快捷选择输入。
import tkinter as tk
from tkinter import ttk


root = tk.Tk()
root.title("Combobox测试")

strVar = tk.StringVar()

def choose():
    ''' 获取 Combbox 的当前值 的方法'''
    print('cb.get()方法获取的值:', cb.get())          # 方法1
    print('strVar.get()方法获取的值:', strVar.get())  # 方法2

"创建Combobox组件"
cb = ttk.Combobox(root,
                textvariable=strVar,  # 绑定到self.strVar变量
                postcommand=choose)   # 当用户单击 下拉箭头 时触发 choose 方法
cb.pack(side=tk.TOP)

"为Combobox配置多个选项"
cb['values'] = ['Python', 'Ruby', 'Kotlin', 'Swift']

f = tk.Frame(root)
f.pack()

""" 给 Combobox 绑定变量"""
isreadonly = tk.IntVar()

def change():
    """设置 Combobox 输入框是否 只读 属性。
       如果设置 为 readonly, 那就不能在 Combobox 中手动输入内容了。"""
    cb['state'] = 'readonly' if isreadonly.get() else 'enable'

def setvalue():
    """两种方法 在 Combobox 框中输入内容"""
    # cb.insert('end', '插入元素')    # 方法 1.
    strVar.set('我爱Python')          # 方法 2.

# 创建Checkbutton,绑定到isreadonly变量
tk.Checkbutton(f, text='是否只读:', variable=isreadonly, command=change).pack(side=tk.LEFT)

# 创建Button,单击该按钮激发setvalue方法
tk.Button(f, text='绑定变量设置', command=setvalue).pack(side=tk.LEFT)

root.mainloop()
10、Scrollbar 滚动条
import tkinter as tk

root = tk.Tk()

""" 先建立一个 listbox 框,等会用来绑定 滚动条 """
Lb = tk.Listbox(root)
for i in range(1, 101):
    Lb.insert('end', i)
Lb.pack(side='left', expand=1)

Sl = tk.Scrollbar(root)           # 建立 滚动条部件。
Sl.config(orient='vertical')      # 设置滚动条显示方向:vertical=垂直,horizontal=水平。
Sl.pack(side='left', fill='y', expand=1)

"""关联 列表框 和 滚动条"""
# 用列表框的 yscrollcommand (垂直移动)属性绑定到 滚动条的set() 方法。
Lb.config(yscrollcommand=Sl.set)   # 列表框 → 控制 → 滚动条,
                                   # 即当鼠标中键在列表框内滚动时,滚动条的滑块会对应的移动。
#Lb['yscrollcommand'] = Sl.set     # 也可以这样写,效果一样。

# 滚动条用 command 属性 绑定到 列表框的 yview 移动方向。
Sl.config(command=Lb.yview)  # 滚动条 → 控制 → 列表框。
                             # 即当滑动滚动条的滑块时,列表框的内容也会对应移动。
#Sl['command'] = Lb.yview    # 也可以这样写,效果一样。

root.mainloop()
11、Scale 刻度

import tkinter as tk

root = tk.Tk()
root.title("Scale测试")

doubleVar = tk.DoubleVar()

def change(value):
    """ 获取Scale值的三种方式:
        1、Scale 绑定的函数,它会接收到Scale部件传过来的一个值。
        2、通过 Scale 部件的 get()方法。
        3、通过绑定变量的 get()方法。"""
    print(value, scale.get(), doubleVar.get())

scale = tk.Scale(root,
               label='示范Sacle',     # 设置标签内容
               from_=-100,           # 设置最大值
               to=100,               # 设置最小值
               resolution=5,         # 设置步长
               length=400,           # 设置轨道的长度
               width=30,             # 设置轨道的宽度
               orient=tk.HORIZONTAL, # 设置水平方向
               digits=10,            # 设置十位有效数字,即显示的数字个数。
               command=change,       # 绑定事件处理函数,会自动传入一个“当前值”的参数进去。
               variable=doubleVar    # 绑定变量
                   )
scale.pack()
scale.set(20)  # 设置Scale的当前值

root.mainloop()
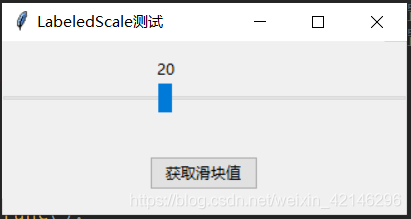
ttk.LabeledScale

这个部件不能设置轨道的固定长度 和 回调参数。
import tkinter as tk
from tkinter import ttk


root = tk.Tk()
root.title("LabeledScale测试")
root.geometry(f'500x300+500+300')

scale = ttk.LabeledScale(root,
                        from_=-100,       # 设置最大值
                        to=200,           # 设置最小值
                        compound = 'top'  # 设置显示数值在轨道的位置。 ‘bottom':下方。
                              )
scale.pack(fill='x', expand=1)

scale.value = 20    # 设置初始值。

def command_func():
    '''获取滑块的值'''
    print(scale.value)

ttk.Button(root, text='获取滑块值', command=command_func).pack(pady=20)

root.mainloop()
12、Menu 菜单
1、原理:
import tkinter as tk

root = tk.Tk()
root.mainloop()
上面生成的 root 窗口有一个‘menu’属性,只要在这个属性中添加一个 菜单 的部件,就能在窗口顶部生成一个菜单条。
所以 第 1 步 要做的就是 生成一个菜单部件:
menubar = tk.Menu(root) # 参数也可为空,即 menubar = tk.Menu()
此时的菜单部件由于没有添加任何内容,所以是一个空的部件,即使把它添加到root的菜单属性中,我们也看不到任何东西。
代码如下:
import tkinter as tk

root = tk.Tk()
menubar = tk.Menu()
root.config(menu=menubar)	  # 添加 root 窗口的菜单属性,方法1。
# root['menu'] = menubar      # 添加 root 窗口的菜单属性,方法2。
root.mainloop()
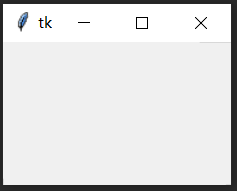
生成的窗口是这样的,看不到菜单条的任何内容。
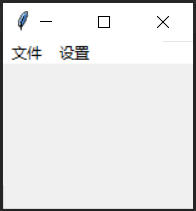
接下来,就是往 菜单部件 中塞内容了。
import tkinter as tk

root = tk.Tk()
menubar = tk.Menu()             # 生成一个菜单部件。
root.config(menu=menubar)       # 把菜单部件添加到 root 窗口的菜单属性中。
# root['menu'] = menubar

photo = tk.PhotoImage(file='路径/名字.png')   # 创建图片实例
menubar.add_command(label='文件',
					command=None,
					image=photo,         # 加入图片。可以参考 lable 中加图片的方法。
                    compound=tk.LEFT)    # 图片的放置位置。可以参考 lable
menubar.add_command(label='设置', command=None)

root.mainloop()

2、菜单嵌套菜单
上面利用 add_command 添加的菜单,其实就像添加了一个 button。
如果想要点击一个菜单后,它会展开 里面还有供选择的菜单,
可以使用 add_cascade() 往菜单部件中添加菜单部件。
import tkinter as tk

root = tk.Tk()
menubar = tk.Menu(tearoff=False)
root.config(menu=menubar)

menubar.add_command(label='文件', command=None)
menubar.add_command(label='设置', command=None)

choice_1 = tk.IntVar()
choice_2 = tk.IntVar()

def get_value_1():
    """获取多选菜单点击后,返回的值:选中为 1,取消为 0"""
    print(choice_1.get())

def get_value_2():
    """获取单选菜单点击后,返回的值:选中 1 返回值为 11;选中 2 返回值为 12,"""
    print(choice_2.get())

"""设置展开菜单"""
more_menu = tk.Menu(tearoff=False)      # 新建一个 菜单部件。
menubar.add_cascade(label='展开', menu=more_menu)    # 把这个菜单部件添加到 menubar 这个菜单中。
more_menu.add_checkbutton(label='多选菜单', variable=choice_1, command=get_value_1)
more_menu.add_separator()  # 分割线。
more_menu.add_radiobutton(label='单选菜单1', variable=choice_2, value=11, command=get_value_2)
more_menu.add_radiobutton(label='单选菜单2', variable=choice_2, value=12, command=get_value_2
正文完