webpack4和webpack3区别还是比较大,而且webpack4虽然可以自定义配置,但是配置过程还是较为繁琐,所以我们使用react-app-rewired来减少配置,react-app-rewired传送门:https://github.com/timarney/react-app-rewired
webpack4官方不再支持node4以下的版本,依赖node的环境版本>=6.11.5,当然考虑到最佳的es6特性实现,建议node版本可以升级到V8.9.4或以上版本,具体更新说明部分可以见:webpack4更新日志
1、初始化创建一个demo 文件夹,做一些简单的初始化信息,并本地安装webpack,此时项目中没有 webpack 配置文件。
mkdir webpack4-demo ## 创建目录
cd webpack4-demo ## 进入目录
npm install yarn -g
yarn init -y ## 快速 yarn 初始化
yarn add webpack --dev ## 安装 webpack2、修改package.json 文件:
"scripts": {
    "build": "webpack"
}
3、创建项目目录
在目录下创建src 文件夹,并且新建一个文件index.js 并且输入内容console.log('hello webpack 4'),再次运行yarn build。
4、运行
yarn build过程中会报错
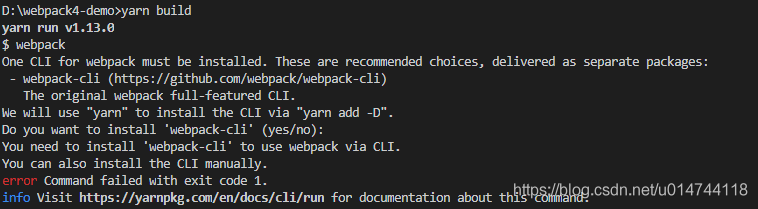
根据提示安装webpack-cli:
yarn add webpack-cli5、再次运行
yarn build这时可以看到编译成功,项目目录下多出一个dist 文件夹,我们事先也并没有配置output 输出指向,Webpack 默认将 bundle 好的内容,放在了 dist 文件夹内。
在执行成功的过程中,有一处警告提示,webpack4新增的mode属性,可以指定生产/开发模式。
6、此时根据你的项目框架React/Vue使用情况安装react/vue全家桶,省略(React项目需要安装react-scripts)。。。
7、接下来安装react-app-rewired最新版本,切记:不能安装react-app-rewired1.x版本
npm install react-app-rewired --save-dev8、新建config-overrides.js,并输入
/* config-overrides.js */

module.exports = function override(config, env) {
  //do stuff with the webpack config...
  return config;
}
此时目录大体结构:
+-- your-project
|   +-- config-overrides.js
|   +-- node_modules
|   +-- package.json
|   +-- public
|   +-- README.md
|   +-- src
9、将package.json中的scripts替换如下:
"scripts": {
    "start": "react-app-rewired start",
    "build": "react-app-rewired build",
    "test": "react-app-rewired test",
    "eject": "react-app-rewired eject"
  },
10、此时react-app-rewired使用方式为
npm start 开发模式
npm run build 生产模式如果想要修改默认配置,可以在config-overrides.js中完成我们的webpack配置文件修改。
11、使用customize-cra简化config-overrides配置
详见https://github.com/arackaf/customize-cra
12、package.json
{
  "name": "demo",
  "version": "0.1.0",
  "private": true,
  "dependencies": {
    "accounting": "^0.4.1",
    "antd": "^3.15.1",
    "babel-plugin-transform-decorators-legacy": "^1.3.5",
    "babel-polyfill": "^6.26.0",
    "babel-preset-env": "^1.7.0",
    "echarts": "^4.2.0-rc.2",
    "echarts-for-react": "^2.0.15-beta.0",
    "echarts-gl": "^1.1.1",
    "less": "^3.9.0",
    "loadsh": "^0.0.3",
    "moment": "^2.24.0",
    "re-resizable": "^4.11.0",
    "react": "^16.8.2",
    "react-addons-pure-render-mixin": "^15.6.2",
    "react-dom": "^16.8.2",
    "react-intl": "^2.8.0",
    "react-redux": "^6.0.1",
    "react-router-config": "^5.0.0",
    "react-router-dom": "^4.3.1",
    "react-scripts": "2.1.5",
    "redux": "^4.0.1",
    "redux-promise-middleware": "^5.0.0"
  },
  "scripts": {
    "start": "react-app-rewired start --mode development",
    "build": "react-app-rewired build",
    "test": "react-app-rewired test",
    "eject": "react-app-rewired eject"
  },
  "eslintConfig": {
    "extends": "react-app"
  },
  "browserslist": [
    ">0.2%",
    "not dead",
    "not ie <= 11",
    "not op_mini all"
  ],
  "devDependencies": {
    "@babel/plugin-proposal-decorators": "^7.3.0",
    "babel-plugin-import": "^1.11.0",
    "customize-cra": "^0.2.11",
    "less-loader": "^4.1.0",
    "react-app-rewired": "^2.1.0",
    "webpack-bundle-analyzer": "^3.0.4",
    "webpack-dev-server": "^3.2.1"
  },
  "homepage": ".",
  "proxy": "http://22.222.22.22/",//代理ip
  "main": "index.js",
  "license": "MIT"
}
12、config-overrides.js
const {
  override,
  fixBabelImports,
  addLessLoader,
  addDecoratorsLegacy,
  addWebpackAlias
} = require('customize-cra');
const path = require('path');
const BundleAnalyzerPlugin = require('webpack-bundle-analyzer').BundleAnalyzerPlugin;

const addCustomize = () => config => {
  if (process.env.NODE_ENV === 'production') {
    config.devtool = false; //去掉map文件
    if (config.plugins) {
      config.plugins.push(new BundleAnalyzerPlugin());
    }
    const splitChunksConfig = config.optimization.splitChunks;
     if (config.entry && config.entry instanceof Array) {
       config.entry = {
         main: config.entry,
         vendor: ["react", "react-dom", "react-router-dom", "react-redux", "redux", 'react-router-config',
           "lodash", "moment", 'react-intl', 'react-addons-pure-render-mixin', 'redux-promise-middleware', "react-router",
         ]
       }
     } else if (config.entry && typeof config.entry === 'object') {
       config.entry.vendor = ["react", "react-dom", "react-router-dom", "react-redux", "redux", 'react-router-config',
          "lodash", "moment", 'react-intl', 'react-addons-pure-render-mixin', 'redux-promise-middleware', "react-router",
       ];
     }

    Object.assign(splitChunksConfig, {
      chunks: 'all',
      cacheGroups: {
        vendors: {
          test: /node_modules/,
          name: 'vendors',
          priority: -10,
        },
        common: {
          name: 'common',
          minChunks: 2,
          minSize: 30000,
          chunks: 'all'
        }
      }
    })
  }
  return config;
}


module.exports = override(
  fixBabelImports('lodash', {
    libraryDirectory: '',
    camel2DashComponentName: false
  }),
  addLessLoader({
    modifyvars: {
      "@icon-url": `${path.resolve(__dirname,'build/assets/font/iconfont')}`, //使用本地字体文件
      '@font-size-base': '13px',
      '@primary-color': '#00879C'
    },
    javascriptEnabled: true
  }),
  addWebpackAlias({
    '@': path.resolve(__dirname, 'src')
  }),
  addDecoratorsLegacy(),
  addCustomize()
);
参考资料:
1、Webpack4 实战 React 和 Vue 项目 https://jdc.jd.com/archives/212580
2、最新React全家桶实战使用配置指南https://github.com/lvming6816077/react-family-bucket/issues/2
3、react-app-rewiredhttps://github.com/timarney/react-app-rewired
4、React-CRA 多页面配置(react-app-rewired)https://segmentfault.com/a/1190000017858725
5、customize-crahttps://github.com/arackaf/customize-cra
customize-cra API
customize-cra
This project provides a set of utilities to customize the Create React App v2 configurations leveragingreact-app-rewiredcore functionalities.
How to install
![]() make sure you havereact-app-rewired installed. You need to use this project with
make sure you havereact-app-rewired installed. You need to use this project withreact-app-rewired; be sure to read their docs if you never have. The code in this project, documented below, is designed to work inside ofreact-app-rewired'sconfig-overrides.js file.
npm
npm install customize-cra --save-devyarn
yarn add customize-cra --devWarning
"Stuff can break" - Dan Abramov
Using this library will override default behavior and configuration of create-react-app, and therefore invalidate the guarantees that come with it. Use with discretion!
Overview
To start, this project will export methods I need for what I'm using CRA for, but PRs will of course be welcome.
The functions documented below can be imported by name, and used in yourconfig-overrides.js file, as explained below.
Available plugins
addBabelPlugin(plugin)
Adds a babel plugin. Whatever you pass forplugin will be added to Babel'splugins array. Consult their docs for more info. Note that this rewirer will not add the plugin to theyarn test's Babel configuration. SeeuseBabelRc() to learn more.
addBabelPlugins(plugins)
A simple helper that callsaddBabelPlugin for each plugin you pass in here. Make sure you use the spread operator when using this, for example
module.exports = override(
  disableEsLint(),
  ...addBabelPlugins(
    "polished",
    "emotion",
    "babel-plugin-transform-do-expressions"
  ),
  fixBabelImports("lodash", {
    libraryDirectory: "",
    camel2DashComponentName: false
  }),
  fixBabelImports("react-feather", {
    libraryName: "react-feather",
    libraryDirectory: "dist/icons"
  })
);
addBabelPresets(preset)
Adds a babel plugin. Whatever you pass forpreset will be added to Babel'spreset array. Consult their docs for more info. Note that this rewirer will not add the preset to theyarn test's Babel configuration. SeeuseBabelRc() to learn more.
addBabelPresets(presets)
A simple helper that callsaddBabelPreset for each preset you pass in here. Make sure you use the spread operator when using this, for example
module.exports = override(
  ...addBabelPresets([
    [
      "@babel/env",
      {
        targets: {
          browsers: ["> 1%", "last 2 versions"]
        },
        modules: "commonjs"
      }
    ],
    "@babel/preset-flow",
    "@babel/preset-react"
  ])
);
babelInclude
Overwrites theinclude option for babel loader, for when you need to transpile a module in yournode_modules folder.
module.exports = override(
  babelInclude([
    path.resolve("src"), // make sure you link your own source
    path.resolve("node_modules/native-base-shoutem-theme"),
    path.resolve("node_modules/react-navigation"),
    path.resolve("node_modules/react-native-easy-grid")
  ])
);
fixBabelImports(libraryName, options)
Adds thebabel-plugin-import plugin. See above for an example.
addDecoratorsLegacy()
Add decorators in legacy mode. Be sure to have@babel/plugin-proposal-decorators installed.
useBabelRc()
Use a .babelrc file for Babel configuration.
disableEsLint()
Does what it says. You may need this along withaddDecoratorsLegacy in order to get decorators and exports to parse together.
If you want use@babel/plugin-proposal-decorators with EsLint, you can enableuseEslintRc, described below, with the follow configuration in your.eslintrc orpackage.json:
{
  "extends": "react-app",
  "parserOptions": {
    "ecmaFeatures": {
      "legacyDecorators": true
    }
  }
}
useEslintRc(configFile)
Causes your .eslintrc file to be used, rather than the config CRA ships with.configFile is an optional parameter that allows to specify the exact path to the ESLint configuration file.
enableEslintTypescript()
Updates Webpack eslint-loader to lint both .js(x) and .ts(x) files and show linting errors/warnings in console.
addWebpackAlias(alias)
Adds the provided alias info into webpack's alias section. Pass an object literal with as many entries as you'd like, and the whole object will be merged in.
addWebpackResolve(resolve)
Adds the provided resolve info into webpack's resolve section. Pass an object literal with as many entries as you'd like, and the whole object will be merged in.
addBundleVisualizer(options, behindFlag = false)
Adds the bundle visualizer plugin to your webpack config. Be sure to havewebpack-bundle-analyzer installed. By default, the options passed to the plugin will be:
{
  "analyzerMode": "static",
  "reportFilename": "report.html"
}
You can hide this plugin behind a command line flag (--analyze) by passingtrue as second argument.
addBundleVisualizer({}, true);useBabelRc()
Causes your .babelrc (or .babelrc.js) file to be used, this is especially useful if you'd rather override the CRA babel configuration and make sure it is consumed both byyarn start andyarn test (along withyarn build).
// config-overrides.js
module.exports = override(
  useBabelRc()
);

// .babelrc
{
  "presets": ["babel-preset-react-app"],
  "plugins": ["emotion"]
}
{
analyzerMode: "static",
reportFilename: "report.html"
}which can be overridden with the (optional) options argument.
adjustWorkbox(fn)
Adjusts Workbox configuration. Pass a function which will be called with the current Workbox configuration, in which you can mutate the config object as needed. See below for an example.
adjustWorkbox(wb =>
  Object.assign(wb, {
    skipWaiting: true,
    exclude: (wb.exclude || []).concat("index.html")
  })
);
addLessLoader(loaderOptions)
First, installless andless-loader packages:
yarn add less
yarn add --dev less-loader
or:
npm i less
npm i -D less-loader
After it's done, calladdLessLoader inoverride like below:
const { addLessLoader } = require("customize-cra");

module.exports = override(addLessLoader(loaderOptions));
loaderOptions is optional. If you have Less specific options, you can pass to it. For example:
const { addLessLoader } = require("customize-cra");

module.exports = override(
  addLessLoader({
    strictMath: true,
    noIeCompat: true,
    localIdentName: '[local]--[hash:base64:5]' // if you use CSS Modules, and custom `localIdentName`, default is '[local]--[hash:base64:5]'.
  })
);CheckLess document for all available specific options you can use.
Onceless-loader is enabled, you can import.less file in your project.
.module.less will use CSS Modules.
disableChunk
Prevents the default static chunking, and forces the entire build into one file. Seethis thread for more info.
Using the plugins
To use these plugins, import theoverride function, and call it with whatever plugins you need. Each of these plugin invocations will return a new function, thatoverride will call with the newly modified config object. Falsy values will be ignored though, so if you need to conditionally apply any of these plugins, you can do so like below.
For example
const {
  override,
  addDecoratorsLegacy,
  disableEsLint,
  addBundleVisualizer,
  addWebpackAlias,
  adjustWorkbox
} = require("customize-cra");
const path = require("path");

module.exports = override(
  addDecoratorsLegacy(),
  disableEsLint(),
  process.env.BUNDLE_VISUALIZE == 1 && addBundleVisualizer(),
  addWebpackAlias({
    ["ag-grid-react$"]: path.resolve(__dirname, "src/shared/agGridWrapper.js")
  }),
  adjustWorkbox(wb =>
    Object.assign(wb, {
      skipWaiting: true,
      exclude: (wb.exclude || []).concat("index.html")
    })
  )
);
removeModuleScopePlugin()
This will remove the CRA plugin that prevents to import modules from outside thesrc directory, useful if you use a different directory.
A common use case is if you are using CRA in a monorepo setup, where your packages are underpackages/ rather thansrc/.
MobX Users
If you want CRA 2 to work with MobX, use theaddDecoratorsLegacy anddisableEsLint.
Override dev server configuration
To override the webpack dev server configuration, you can use theoverrideDevServer utility:
const {
  override,
  disableEsLint,
  overrideDevServer,
  watchAll
} = require("customize-cra");

module.exports = {
  webpack: override(
    // usual webpack plugin
    disableEsLint()
  ),
  devServer: overrideDevServer(
    // dev server plugin
    watchAll()
  )
};
watchAll()
When applied, CRA will watch all the project's files, includednode_modules. To use it, just apply it and run the dev server withyarn start --watch-all.
watchAll();add post-css plugins
To add post-css plugins, you can useaddPostcssPlugins.
const { override, addPostcssPlugins } = require("customize-cra");

module.exports = override(
  addPostcssPlugins([require("postcss-px2rem")({ remUnit: 37.5 })])
);
addTslintLoader(loaderOptions)
Need to installtslint-loader.
const {
  addTslintLoader
} = require("customize-cra");

module.exports = override(
  addTslintLoader(),
);