言于头:本节讨论的是在项目中利用HttpClient/PostMethod相关api进行上传文件操作时,会出现上传中文文件名乱码问题。为解决这个问题,下面是总结的一个HTTP工具类以及测试用例。
publicclassHttpUtils{publicstatic final String UTF_8="UTF-8";privatestatic final  Logger LOGGER= LoggerFactory.getLogger(HttpUtils.class);privatestatic MultiThreadedHttpConnectionManager connectionManager= null;privatestaticint connectionTimeOut=60000;privatestaticint socketTimeOut=60000;privatestaticint maxConnectionPerHost=20;privatestaticint maxTotalConnections=20;privatestatic HttpClient client;static{
        connectionManager=newMultiThreadedHttpConnectionManager();
        connectionManager.getParams().setConnectionTimeout(connectionTimeOut);
        connectionManager.getParams().setSoTimeout(socketTimeOut);
        connectionManager.getParams().setDefaultMaxConnectionsPerHost(maxConnectionPerHost);
        connectionManager.getParams().setMaxTotalConnections(maxTotalConnections);
        client=newHttpClient(connectionManager);
        client=newHttpClient(connectionManager);}/*  *
     * @description:  上传一个文件
     * url :请求路径
     * file: 上传的文件
     * parmas:其他表单参数
     **/publicstatic StringsendFileRequest(String url, File file,Map<String,String> parmas){
        String response="";
        PostMethod postMethod= null;// 自定义header:如果需要的话
        Map headers=newHashMap();try{
            postMethod=newPostMethod(url){
                @Overridepublic StringgetRequestCharSet(){return"UTF-8";}};// 填入header:如果需要的话if(headers!= null&& headers.size()>0){
                Iterator var5= headers.entrySet().iterator();while(var5.hasNext()){
                    Map.Entry entry=(Map.Entry)var5.next();
                    postMethod.setRequestHeader(entry.getKey().toString(), entry.getValue().toString());}}//填入其他表单参数
            Integer len=parmas.size()+1;
            Part[] parts=new Part[len];
            Integer indx=0;for(Map.Entry<String, String> stringStringEntry: parmas.entrySet()){
                postMethod.setParameter(stringStringEntry.getKey(),stringStringEntry.getValue());
                StringPart stringPart=newStringPart(stringStringEntry.getKey(),stringStringEntry.getValue());
                parts[indx]=stringPart;
                indx++;}// 自定义文件解析器(解决中文文件乱码),需要注意的是其中 file:对应的是被调用接口中的file 参数
            CustomFilePart filePart=newCustomFilePart("file", file);
            parts[parmas.size()]=filePart;
            postMethod.setRequestEntity(newMultipartRequestEntity(parts,postMethod.getParams()));int statusCode= client.executeMethod(postMethod);if(statusCode==200){
                response=convertStreamToString(postMethod.getResponseBodyAsStream());}else{
                LOGGER.error("响应状态码 = "+ postMethod.getStatusCode()+";响应状态信息 = "+postMethod.getStatusText()+"响应体信息 = "+ postMethod.getResponseBodyAsString());}}catch(HttpException var11){
            LOGGER.error("发生致命的异常,可能是协议不对或者返回的内容有问题", var11);}catch(IOException var12){
            LOGGER.error("发生网络异常", var12);} finally{if(postMethod!= null){
                postMethod.releaseConnection();}}return response;}/**
     * 输入流转字符串
     * @param inputStream 输入流
     * @return 返回结果
     * @throws IOException IO异常
     */privatestatic StringconvertStreamToString(InputStream inputStream) throws IOException{
        String result="";
        ByteArrayOutputStream out=newByteArrayOutputStream();
        byte[] buffer=new byte[Constant.Numberic.N_1024];int len;// 将输入流转移到内存输入流中try{while((len= inputStream.read(buffer, Constant.Numberic.N_0, buffer.length))!= Constant.Numberic.NEGATIVE_ONE){
                out.write(buffer, Constant.Numberic.N_0, len);}// 将内存流转换成字符串
            result=newString(out.toByteArray(),"UTF-8");}catch(IOException e){
            LOGGER.error("convertStreamToString发生异常",e);} finally{
            out.close();}return result;}}
自定义的文件接收器CustomFilePart 继承FilePart :
publicclassCustomFilePart extends FilePart{publicCustomFilePart(String name, File file) throws FileNotFoundException{super(name, file);}

    @OverrideprotectedvoidsendDispositionHeader(OutputStream out) throws IOException{//super.sendDispositionHeader(out);//下面部分其实为实现父类super.sendDispositionHeader(out) 里面的逻辑
        out.write(CONTENT_DISPOSITION_BYTES);
        out.write(QUOTE_BYTES);
        out.write(EncodingUtil.getBytes(getName(),"utf-8"));
        out.write(QUOTE_BYTES);
        String fileName=getSource().getFileName();// 此处为解决中文文件名乱码部分if(!StringUtils.isEmpty(fileName)){
            out.write(EncodingUtil.getAsciiBytes(FILE_NAME));
            out.write(QUOTE_BYTES);
            out.write(EncodingUtil.getBytes(fileName,"utf-8"));
            out.write(QUOTE_BYTES);}}}
如下为一个测试用例,过程:
1、先在Controller中编写两个普通的上传文件接口。
2、在其中一个A上传接口中利用上面编写的http调用另外一个B上传接口,并在B接口中打印输出查看效果。
实现如下:
@Controller
@RequestMapping(value="/test/api/v1")publicclassTestController{privatestatic final Logger LOGGER= LoggerFactory.getLogger(TestController.class);/**
	* A上传接口,用于web端调用,此处使用postman测试
	**/
    @RequestMapping("/import/file")
    @ResponseBodypublic ResponseuploadFile(@RequestParam("file") MultipartFile uploadFile, String objType, String createUser){try{
            Map parma=newHashMap();
            parma.put("objType",objType);
            parma.put("createUser",createUser);// 此处url为下面的B上传接口
            String url="http://15.*******:***/test/api/v1/import/file/http";return Response.ok(HttpUtils.sendFileRequest(url,mutilFile2File(uploadFile),parma));}catch(Exception e){
            LOGGER.error("上传数据文件异常",e);return Response.error("获取uploadFile失败!"+e.getMessage());}}/**
	* B上传接口,直接打印输出
	**/
    @RequestMapping("/import/file/http")
    @ResponseBodypublic ResponseuploadFileHttp(@RequestParam("file") MultipartFile uploadFile, Integer objType, String createUser){try{
            LOGGER.info("fileName:"+uploadFile.getOriginalFilename()+";objType:"+objType+";createUser:"+createUser);return Response.ok(uploadFile.getOriginalFilename());}catch(Exception e){
            LOGGER.error("上传数据文件异常uploadFileHttp",e);return Response.error("获取uploadFileHttp失败!"+e.getMessage());}}/**
	* 将web端上传的MultipartFile 转换成普通的File
	**/public FilemutilFile2File(MultipartFile multipartFile){
        File file=null;try{
            File destFile=newFile("/upload/data/");if(!destFile.exists()){
                destFile.mkdirs();}//将文件存储到本地
            String fileName=newString(multipartFile.getOriginalFilename().getBytes("utf-8"));
            file=newFile(destFile.getAbsolutePath()+"/"+ fileName);
            multipartFile.transferTo(file);
            file.createNewFile();}catch(Exception e){
            LOGGER.error("mutilFile2File异常:",e);}finally{return file;}}}
postman调用如下:
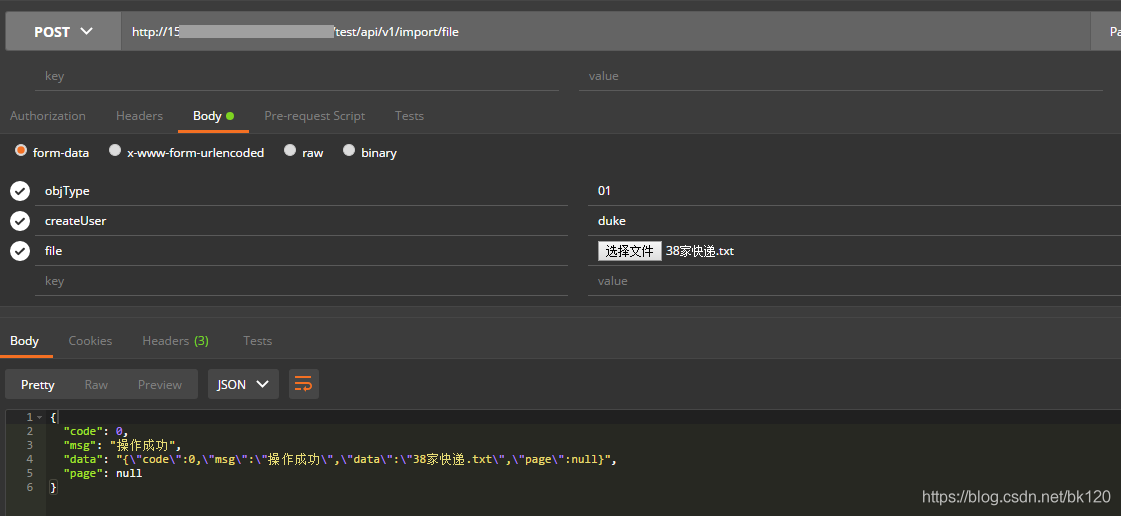
B上传接口输出:
