vue-element-admin导入组件封装
模板和样式
首先封装一个类似的组件,首先需要注意的是,类似功能,vue-element-admin已经提供了,我们只需要改造即可
excel导入功能需要使用npm包xlsx,所以需要安装xlsx插件
npm i xlsx将vue-element-admin提供的导入功能新建一个组件,位置: src/components/UploadExcel
import CommonToolsfrom'./CommonTools'import UploadExcelfrom'./UploadExcel'exportdefault{install(Vue){
    Vue.component('CommonTools', CommonTools)// 注册工具栏组件
    Vue.component('UploadExcel', UploadExcel)// 注册导入excel组件}}
修改样式和布局
<template><divclass="upload-excel"><divclass="btn-upload"><el-button:loading="loading" size="mini" type="primary" @click="handleUpload">
        点击上传</el-button></div><input ref="excel-upload-input"class="excel-upload-input" type="file" accept=".xlsx, .xls" @change="handleClick"><divclass="drop" @drop="handleDrop" @dragover="handleDragover" @dragenter="handleDragover"><iclass="el-icon-upload"/><span>将文件拖到此处</span></div></div></template><script>importXLSXfrom'xlsx'exportdefault{
  props:{
    beforeUpload: Function,// eslint-disable-line
    onSuccess: Function// eslint-disable-line},data(){return{
      loading:false,
      excelData:{
        header:null,
        results:null}}},
  methods:{generateData({ header, results}){this.excelData.header= headerthis.excelData.results= resultsthis.onSuccess&&this.onSuccess(this.excelData)},handleDrop(e){
      e.stopPropagation()
      e.preventDefault()if(this.loading)returnconst files= e.dataTransfer.filesif(files.length!==1){this.$message.error('Only support uploading one file!')return}const rawFile= files[0]// only use files[0]if(!this.isExcel(rawFile)){this.$message.error('Only supports upload .xlsx, .xls, .csv suffix files')returnfalse}this.upload(rawFile)
      e.stopPropagation()
      e.preventDefault()},handleDragover(e){
      e.stopPropagation()
      e.preventDefault()
      e.dataTransfer.dropEffect='copy'},handleUpload(){this.$refs['excel-upload-input'].click()},handleClick(e){const files= e.target.filesconst rawFile= files[0]// only use files[0]if(!rawFile)returnthis.upload(rawFile)},upload(rawFile){this.$refs['excel-upload-input'].value=null// fix can't select the same excelif(!this.beforeUpload){this.readerData(rawFile)return}const before=this.beforeUpload(rawFile)if(before){this.readerData(rawFile)}},readerData(rawFile){this.loading=truereturnnewPromise((resolve, reject)=>{const reader=newFileReader()
        reader.onload= e=>{const data= e.target.resultconst workbook=XLSX.read(data,{ type:'array'})const firstSheetName= workbook.SheetNames[0]const worksheet= workbook.Sheets[firstSheetName]const header=this.getHeaderRow(worksheet)const results=XLSX.utils.sheet_to_json(worksheet)this.generateData({ header, results})this.loading=falseresolve()}
        reader.readAsArrayBuffer(rawFile)})},getHeaderRow(sheet){const headers=[]const range=XLSX.utils.decode_range(sheet['!ref'])letCconstR= range.s.r/* start in the first row */for(C= range.s.c;C<= range.e.c;++C){/* walk every column in the range */const cell= sheet[XLSX.utils.encode_cell({ c:C, r:R})]/* find the cell in the first row */let hdr='UNKNOWN '+C// <-- replace with your desired defaultif(cell&& cell.t) hdr=XLSX.utils.format_cell(cell)
        headers.push(hdr)}return headers},isExcel(file){return/\.(xlsx|xls|csv)$/.test(file.name)}}}</script><style scoped lang="scss">.upload-excel{
  display: flex;
  justify-content: center;
   margin-top:100px;.excel-upload-input{
       display: none;
        z-index:-9999;}.btn-upload,.drop{
      border:1px dashed #bbb;
      width:350px;
      height:160px;
      text-align: center;
      line-height:160px;}.drop{
       line-height:80px;
       color: #bbb;
      i{
        font-size:60px;
        display: block;}}}</style>
创建路由和组件
建立公共导入的页面路由,新建一个公共的导入页面,挂载路由 src/router/index.js
    path:'/import',
    component: Layout,
    hidden:true,// 隐藏在左侧菜单中
    children:[{
      path:'',// 二级路由path什么都不写 表示二级默认路由
      component:()=>import('@/views/import')}]},
创建import路由组件 src/views/import/index.vue
<template><!-- 公共导入组件--><upload-excel:on-success="success"/></template>实现导入
封装导入用户的api接口
exportfunctionimportUser(data){returnrequest({
    url:'user/batch',
    method:'post',
    data})}
获取导入的excel数据, 导入excel接口
asyncsuccess({ header, results}){// 如果是导入用户const userRelations={'入职日期':'create_time','手机号':'mobile','用户名':'username','密码':'password','邮箱':'email','部门':'部门'}const arr=[]
       results.forEach(item=>{const userInfo={}
          Object.keys(item).forEach(key=>{
            userInfo[userRelations[key]]= item[key]})
         arr.push(userInfo)})awaitimportUser(arr)// 调用导入接口this.$router.back()}
为了让这个页面可以服务更多的导入功能,我们可以在页面中用参数来判断,是否是导入用户
data(){return{
      type:this.$route.query.type}},
当excel中有日期格式的时候,实际转化的值为一个数字,我们需要一个方法进行转化
formatDate(numb, format){const time=newDate((numb-1)*24*3600000+1)
      time.setYear(time.getFullYear()-70)const year= time.getFullYear()+''const month= time.getMonth()+1+''const date= time.getDate()-1+''if(format&& format.length===1){return year+ format+ month+ format+ date}return year+(month<10?'0'+ month: month)+(date<10?'0'+ date: date)}
导入的手机号不能和之前的存在的手机号重复
逻辑判断
asyncsuccess({ header, results}){if(this.type==='user'){const userRelations={'入职日期':'create_time','手机号':'mobile','用户名':'username','密码':'password','邮箱':'email','部门':'部门'}const arr=[]// 遍历所有的数组
        results.forEach(item=>{// 需要将每一个条数据里面的中文都换成英文const userInfo={}
          Object.keys(item).forEach(key=>{// key是当前的中文名 找到对应的英文名if(userRelations[key]==='timeOfEntry'|| userRelations[key]==='correctionTime'){
              userInfo[userRelations[key]]=newDate(this.formatDate(item[key],'/'))// 只有这样, 才能入库return}
            userInfo[userRelations[key]]= item[key]})// 最终userInfo变成了全是英文
          arr.push(userInfo)})awaitimportUser(arr)this.$message.success('导入成功')}this.$router.back()// 回到上一页},formatDate(numb, format){const time=newDate((numb-1)*24*3600000+1)
      time.setYear(time.getFullYear()-70)const year= time.getFullYear()+''const month= time.getMonth()+1+''const date= time.getDate()-1+''if(format&& format.length===1){return year+ format+ month+ format+ date}return year+(month<10?'0'+ month: month)+(date<10?'0'+ date: date)}
用户页面跳转
<el-button type="warning" size="small" @click="$router.push('/import?type=user')">导入</el-button>用户导出**
日常业务中,我们经常遇到excel导出功能, 怎么使用呢
Excel 的导入导出都是依赖于js-xlsx来实现的。
在 js-xlsx的基础上又封装了Export2Excel.js来方便导出数据。
安装所需依赖
npm install xlsx file-saver-S
npm install script-loader-S-D
由于js-xlsx体积还是很大的,导出功能也不是一个非常常用的功能,所以使用的时候建议使用懒加载。使用方法如下:
import('@/vendor/Export2Excel').then(excel=>{
excel.export_json_to_excel({
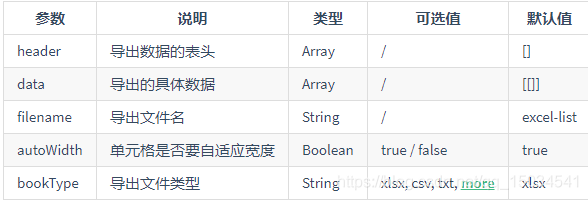
header: tHeader,//表头 必填
data,//具体数据 必填
filename:'excel-list',//非必填
autoWidth:true,//非必填
bookType:'xlsx'//非必填})})excel导出参数的介绍
vue-element-admin提供了导出的功能模块,在课程资源/excel导出目录下,放置到src目录下
excel导出基本的结构
下面代码会用到 Export2Excel.js 模块,所以首先在 src 目录下新建 vendor 目录,其中新建 Export2Excel.js ,输入如下代码
/* eslint-disable */import{ saveAs}from'file-saver'importXLSXfrom'xlsx'functiongenerateArray(table){var out=[];var rows= table.querySelectorAll('tr');var ranges=[];for(varR=0;R< rows.length;++R){var outRow=[];var row= rows[R];var columns= row.querySelectorAll('td');for(varC=0;C< columns.length;++C){var cell= columns[C];var colspan= cell.getAttribute('colspan');var rowspan= cell.getAttribute('rowspan');var cellValue= cell.innerText;if(cellValue!==""&& cellValue==+cellValue) cellValue=+cellValue;//Skip ranges
      ranges.forEach(function(range){if(R>= range.s.r&&R<= range.e.r&& outRow.length>= range.s.c&& outRow.length<= range.e.c){for(var i=0; i<= range.e.c- range.s.c;++i) outRow.push(null);}});//Handle Row Spanif(rowspan|| colspan){
        rowspan= rowspan||1;
        colspan= colspan||1;
        ranges.push({
          s:{
            r:R,
            c: outRow.length},
          e:{
            r:R+ rowspan-1,
            c: outRow.length+ colspan-1}});};//Handle Value
      outRow.push(cellValue!==""