文章目录
前言
1、此文适合刚刚开始学习的同学,欢迎指正.
2、当刚开始学习spring security整合JWT时总是无法分清楚JWT整合的具体过程,在网上找到的代码总是没有详细的注释,所以写了这样一篇文章,来记录。
备注:此文书写结构为先贴图或者代码,然后分析代码和内容,所以建议代码和下面分析的文字对比阅读
一、文件结构
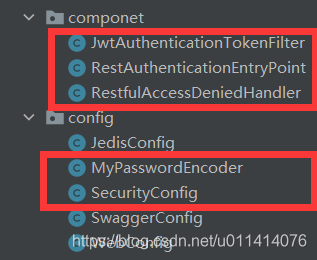

整合JWT一共会使用 6个配置文件+各自的用户和权限文件(这里使用了5个表)
以上是会用到的文件除单文件外均使用红色框选出来,可以同下述文章对比查看
二、代码解析
1.securityConfig文件内容及分析
代码如下(示例):
/**
 * SpringSecurity的配置
 */@Configuration@EnableWebSecurity@EnableGlobalMethodSecurity(prePostEnabled=true)publicclassSecurityConfigextendsWebSecurityConfigurerAdapter{@Autowiredprivate UmsAdminService adminService;@Autowiredprivate RestfulAccessDeniedHandler restfulAccessDeniedHandler;@Autowiredprivate RestAuthenticationEntryPoint restAuthenticationEntryPoint;@Overrideprotectedvoidconfigure(HttpSecurity httpSecurity)throws Exception{
        httpSecurity.csrf()// 由于使用的是JWT,我们这里不需要csrf.disable().sessionManagement()// 基于token,所以不需要session.sessionCreationPolicy(SessionCreationPolicy.STATELESS).and().authorizeRequests().antMatchers(HttpMethod.GET,// 允许对于网站静态资源的无授权访问"/","/*.html","/favicon.ico","/**/*.html","/**/*.css","/**/*.js","/swagger-resources/**","/v2/api-docs/**").permitAll().antMatchers("/admin/login","/admin/register")// 对登录注册要允许匿名访问.permitAll().antMatchers(HttpMethod.OPTIONS)//跨域请求会先进行一次options请求.permitAll().antMatchers("/**")//测试时全部运行访问.permitAll().anyRequest()// 除上面外的所有请求全部需要鉴权认证.authenticated();// 禁用缓存
        httpSecurity.headers().cacheControl();// 添加JWT filter
        httpSecurity.addFilterBefore(jwtAuthenticationTokenFilter(), UsernamePasswordAuthenticationFilter.class);//添加自定义未授权和未登录结果返回
        httpSecurity.exceptionHandling().accessDeniedHandler(restfulAccessDeniedHandler).authenticationEntryPoint(restAuthenticationEntryPoint);}@Overrideprotectedvoidconfigure(AuthenticationManagerBuilder auth)throws Exception{//使用自定义省份验证组件
        auth.userDetailsService(userDetailsService()).passwordEncoder(passwordEncoder());}@Beanpublic PasswordEncoderpasswordEncoder(){returnnewMyPasswordEncoder();}//获取用户信息@Override@Beanpublic UserDetailsServiceuserDetailsService(){//获取登录用户信息returnnewUserDetailsService(){@Overridepublic UserDetailsloadUserByUsername(String username)throws UsernameNotFoundException{
                UmsMember adminByName= adminService.getAdminByName(username);if(adminByName!=null){//查询用户的权限
                    List<UmsPermission> permissionList= adminService.getPermissionList(adminByName.getId());returnnewMemberDetails(adminByName, permissionList);}thrownewUsernameNotFoundException("用户名或密码错误");}};}@Beanpublic JwtAuthenticationTokenFilterjwtAuthenticationTokenFilter(){returnnewJwtAuthenticationTokenFilter();}/**
     * 允许跨域调用的过滤器
     */@Beanpublic CorsFiltercorsFilter(){
        UrlBasedCorsConfigurationSource source=newUrlBasedCorsConfigurationSource();
        CorsConfiguration config=newCorsConfiguration();
        config.addAllowedOrigin("*");
        config.setAllowCredentials(true);
        config.addAllowedHeader("*");
        config.addAllowedMethod("*");
        source.registerCorsConfiguration("/**", config);
        FilterRegistrationBean bean=newFilterRegistrationBean(newCorsFilter(source));
        bean.setOrder(0);returnnewCorsFilter(source);}//将Spring Security自带的authenticationManager声明成Bean//声明它的作用是用它帮我们进行认证操作,调用这个Bean的authenticate方法会由Spring Security自动帮我们做认证。@Bean@Overridepublic AuthenticationManagerauthenticationManagerBean()throws Exception{returnsuper.authenticationManagerBean();}}
1.1 代码分析
security配置文件中一共使用了7个方法:方法一:configure(HttpSecurity httpSecurity)
1、此方法中主要定义了JWT过滤器
httpSecurity.addFilterBefore(jwtAuthenticationTokenFilter(), UsernamePasswordAuthenticationFilter.class);这一句话将JWT的过滤类添加到了security的过滤规则UsernamePasswordAuthenticationFilter之后;
采用的是addFilterBefore这个方法,这个方法和addFilter以及addFilterAfter类似;分别是将自定义的过滤器添加在某个过滤器之前/之后/相等的位置;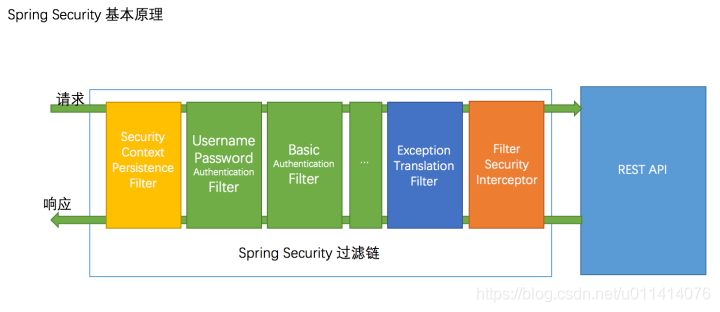
上图中绿色部分就是spring security自带的过滤器,而使用addFilter等方法就是将我们自定义的过滤器加入自带过滤器的队列中;
而本身的UsernamePasswordAuthenticationFilter和BasicAuthenticationFilter是需要手动开启的,而在这里我们没有使用,所以使用addFilter添加在哪个位置不影响。
2、加入自定义返回类
httpSecurity.exceptionHandling().accessDeniedHandler(restfulAccessDeniedHandler).authenticationEntryPoint(restAuthenticationEntryPoint);返回类内容:
/**
 * 当未登录或者token失效访问接口时,自定义的返回结果
 * https://gitee.com/zscat-platform/mall on 2018/5/14.
 */@ComponentpublicclassRestAuthenticationEntryPointimplementsAuthenticationEntryPoint{@Overridepublicvoidcommence(HttpServletRequest request, HttpServletResponse response, AuthenticationException authException)throws IOException, ServletException{
        response.setCharacterEncoding("UTF-8");
        response.setContentType("application/json");
        response.getWriter().println(JsonUtil.objectToJson(自己封装的统一返回类(authException.getMessage())));
        response.getWriter().flush();}}
/**
* 当访问接口没有权限时,自定义的返回结果
*/@ComponentpublicclassRestfulAccessDeniedHandlerimplementsAccessDeniedHandler{@Overridepublicvoidhandle(HttpServletRequest request,
HttpServletResponse response,
AccessDeniedException e)throws IOException, ServletException{
response.setCharacterEncoding("UTF-8");
response.setContentType("application/json");
response.getWriter().println(JsonUtil.objectToJson(自己封装的统一返回类(e.getMessage())));
response.getWriter().flush();}}方法二、configure(AuthenticationManagerBuilder auth)
1、此方法中主要配置自定义的加密类
//使用自定义省份验证组件
        auth.userDetailsService(userDetailsService()).passwordEncoder(passwordEncoder());
在springboot 2.x之前好像是可以使用自带的加密方式,springbbot2.x之后好像就必须自定义加密方式了,具体还没有了解到,欢迎补充。
其中passwordEncoder调用的方法三
方法三:自定义加密类
1、此方法中导入自定义的加密类
@Beanpublic PasswordEncoderpasswordEncoder(){returnnewMyPasswordEncoder();}使用方式由方法二中调用
方法四:userDetailsService()
此类用于获取用户信息和比对用户数据
returnnewUserDetailsService(){@Overridepublic UserDetailsloadUserByUsername(String username)throws UsernameNotFoundException{
                UmsMember adminByName= adminService.getAdminByName(username);if(adminByName!=null){//查询用户的权限
List<UmsPermission> permissionList= adminService.getPermissionList(adminByName.getId());returnnewMemberDetails(adminByName, permissionList);}thrownewUsernameNotFoundException("用户名或密码错误");}};此类方法有些喜欢单独定义一个类来使用,这里是写在一起,单独定义原理一样,只不过就是在return的时候调用一个继承了UserDetailsService的类
方法五:jwtAuthenticationTokenFilter()
1、此方法中主要导入JWT工具类
@Beanpublic JwtAuthenticationTokenFilterjwtAuthenticationTokenFilter(){returnnewJwtAuthenticationTokenFilter();}此方法中new了一个写好的JWT过滤类方法,在方法1中添加JWT过滤时引入
总结
本文章分为3个模块,这是第一个模块主要分析securityconfig部分