公司项目业务业务需求需要一个能够上传图片附件的功能,发现iView官方有个组件Upload,展示使用方法以及后续的过程。

<div class="pic_upload">
		<Upload
		ref="upload"
		:show-upload-list="false"
		type="drag"
		:format="['jpg','jpeg','png']"
		:on-success="handleSuccess"
		action="http://localhost:2442/api/handler2.ashx"
		style="display: inline-block;width:90px;">
		<div style="width: 90px;height:90px;line-height: 90px;">
			<Icon type="camera" size="20"></Icon>
		</div>
		</Upload>
		<div class="pic_upload_list" v-model="Lists">
		    	<div style="width: 88px;height: 88px;display: inline-block;"
		    		v-for="item in Lists" :key="item.imgName">
		    	        <!--<photoframe :imgurl="item.imgUrl" :imgname="item.imgName"></photoframe>-->
		    		<photoframe :imgExample="item"></photoframe>
		    	</div>
		   </div>
	</div>
看代码,上传界面分为2部分,一个是Upload的控件,还有一个是div的展示框。
Upload控件
public void ProcessRequest(HttpContext context)
        {
            if (context.Request.HttpMethod != "OPTIONS") // 加头部判断逻辑
            {
                //context.Response.AddHeader("Access-Control-Allow-Headers", "Content-Type, Authorization, Accept,X-Requested-With");
                //context.Response.AddHeader("Access-Control-Allow-Methods", "POST, GET, OPTIONS");
                //context.Response.AddHeader("Access-Control-Allow-Origin", "*");
                //context.Response.AddHeader("Access-Control-Max-Age", "1728000");
                //context.Response.End();
            }
            HttpPostedFile file = context.Request.Files.Get(0);
            int filelength = file.ContentLength;
            string filename = file.FileName.ToString();
            string filetype = file.ContentType.ToString();
            if (filetype.Equals("image/jpeg"))
            {
                filetype = ".jpg";
            }
            else if (filetype.Equals("image/png")) {
                filetype = ".png";
            }
            string date = DateTime.Now.ToString("yyyy-MM");
            string path = HttpRuntime.AppDomainAppPath.ToString();
            string guid = Guid.NewGuid().ToString();
            string savepath = path + "img\\" + date + "\\";
            if (!Directory.Exists(savepath))
            {
                Directory.CreateDirectory(savepath);
            }
            savepath += guid + filetype;
            file.SaveAs(savepath);
            //HttpPostedFileBase filestring = context.Request.Files[0];
            context.Response.Write( context.Request.Url.Authority.ToString() + "/img/" + date + "/" + guid + filetype);
        }
这是C#后台在获取upload的请求,将图片到项目img文件下的过程,同时返回该图片的链接地址。
DIV展示框
首先自定义一个“单个photo”的相框
photoframe.vue
<template>
	<div class="demo-upload">
		<img :src="itemPhoto.imgUrl">
		<div class="demo-upload-text">
    		<span class="demo-upload-text-span">{{itemPhoto.imgName}}</span>
    	</div>
	    <div class="demo-upload-list-cover">
	        <Icon type="ios-eye-outline" @click.native="handleView(itemPhoto)"></Icon>
	        <Icon type="ios-trash-outline" @click.native="handleRemove(itemPhoto)"></Icon>
	    </div>

	    <Modal :title="photoName" v-model="visible">
        	<img :src="imgofurl" v-if="visible" style="width: 100%">
    	</Modal>
    </div>

</template>

<script>
	export default{
		props:['imgExample'],
		data(){
			return{
				itemPhoto: {
					imgUrl: this.imgExample.imgUrl,
					imgName: this.imgExample.imgName,
				},
				imgofurl: '',
				photoName: '',
                visible: false
			}
		},
		methods:{
			handleView (ph) {
				console.log("当前操作是:显示大图 " + ph.imgName);
                this.imgofurl = ph.imgUrl;
                this.photoName = ph.imgName;
                this.visible = true;
            },
            handleRemove (ph) {
            	//通过ref的name查找父组件的引用
                //const fileList = this.$refs.upload.Lists;
                //this.$refs.upload.Lists.splice(Lists.indexOf(file), 1);
                console.log("当前动作是删除文件操作:" + ph.imgName);
                this.$root.eventHub.$emit('itemphoto',ph);
            }
		},

		mounted(){

		}
	}
</script>

<style>
	.demo-upload{
		width: 88px;
		height: 88px;
		display: inline-block;
		text-align: center;
		line-height: 60px;
		position: relative;
		margin-left: 4px;
	}
	.demo-upload img{
		width: 88px;
		height: 88px;
		border: 1px solid ghostwhite;
	}
	.demo-upload-text{
		display: none;
		bottom: 20px;
		height: 5px;
		line-height: 5px;
	}
	.demo-upload-text-span{
		height: 8px;
		font-size: 8px;
	}
	.demo-upload-list-cover{
		/*height: 100%;
		width: 100%;*/
        display: none;
        position: absolute;
        top: 0;
        bottom: 0;
        left: 0;
        right: 0;
        background: rgba(0,0,0,0.4);
    }
    /* 鼠标移上去,Icon变为展示 */
    .demo-upload:hover .demo-upload-list-cover{
        display: block;
    }
    .demo-upload-list-cover i{
        color: #fff;
        font-size: 20px;
        cursor: pointer;
        margin: 0px 6px;
    }
</style>
然后在div-upload-list的长条相框中循环遍历得到photoframe
在data(){ return{}}中定义Lists:[] (TIPS: 这个list对象最好命名为复数)
在Upload的success函数里将返回的数据压入Lists,核心 this.Lists.push()方法
handleSuccess (res, file) {
           	//console.log("name:" +  + "\nurl:" + res.toString());
                this.Lists.push({"imgUrl": "http://" + res.toString(), "imgName": file.name.toString()});
                var i = this.Lists.findIndex(
	           			function(value, index, arr){return value.imgName == file.name.toString();}
	           		);
           		console.log("add index :" + i );
           	},
这样就可以一直添加图片了(过滤操作,限制操作参见官方文档)
需求还要求能够删除上传但未提交的图片
过程:
1在photoframe里点击删除,发送请求到服务器
handleRemove (ph) {
                console.log("当前动作是删除文件操作:" + ph.imgName);
                this.$root.eventHub.$emit('itemphoto',ph);
} 2回调到父组件的接受方法,并指向handlerRemove()方法
//回调接收
created(){
			var a = 1;
			console.log("当前次数是:" + a++);
			this.$root.eventHub.$on('itemphoto',(data)=>this.handlerRemove(data));
		},
//handlerRemove()方法
handlerRemove (data){
//console.log("删除前:"+JSON.stringify(this.Lists));
console.log("Ready to delelte:" + data.imgName);
var i = this.Lists.findIndex(
function(value, index, arr){return value.imgUrl == data.imgUrl;}
);
console.log("delete index :" + i );
//console.log("delete 操作:",
this.Lists.splice( i , 1 );
this.$axios.post("http://localhost:2442/api/Handler1.ashx",
{'urlName':data.imgUrl},
{headers: {
'Content-Type': 'application/x-www-form-urlencoded;charset=utf-8'
}}
)
.then(res=>{
console.log(res.data);
});
//console.log("删除后:"+JSON.stringify(this.Lists));
//console.log(" index length:" + this.Lists.length );
//this.Lists.splice(this.Lists.length);
//console.log("刷新后:"+JSON.stringify(this.Lists));
//i=i-1;
//);
}3就是简单的用 this.Lists.splice()方法删除Lists里的对象,具体实现是查找对应的index,然后删除操作。
同时,用axios通知服务器,删除文件
///api/handler1.ashx
public void ProcessRequest(HttpContext context)
        {
            context.Response.ContentType = "text/plain";
            string filepath;
            byte[] byts = new byte[HttpContext.Current.Request.InputStream.Length];
            HttpContext.Current.Request.InputStream.Read(byts, 0, byts.Length);
            string jspnstring = System.Text.Encoding.UTF8.GetString(byts);
            jspnstring = HttpContext.Current.Server.UrlDecode(jspnstring);
            string date = DateTime.Now.ToString("yyyy-MM");
            string path = HttpRuntime.AppDomainAppPath.ToString();
            JObject obj = JObject.Parse(jspnstring);
            string urlName = (string)obj["urlName"];
            foreach (Match m in Regex.Matches(urlName, String.Format(@"[^/]+\.[^/]+$")))
            {
                Console.WriteLine(m.Value);
                filepath = path + "img\\" + date + "\\" + m.Value;
                FileOperate.DeleteFile(filepath);
            }

            context.Response.Write("Hello World");
        }
如果要保证客户端与服务端的实际数据的一致性,可以response判断。
出现问题
在删除过程中出现的问题,有三个图片编号 0,1,2,删除1时,界面显示2被删除,百度一下发现他人有同样的问题
现在参看handlerRemove()注释中的log,测试发现
删除前
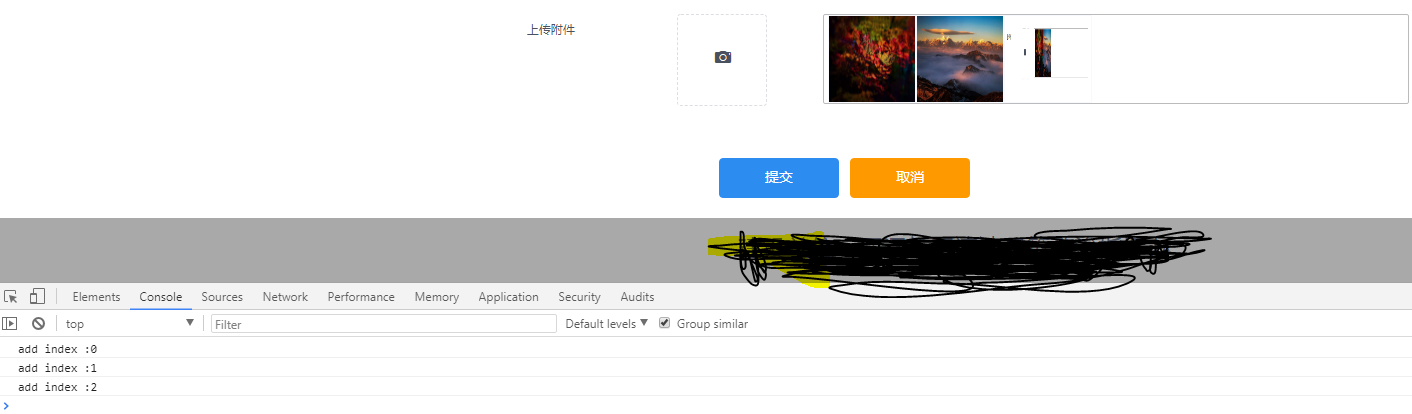
删除第二个(index=1)后
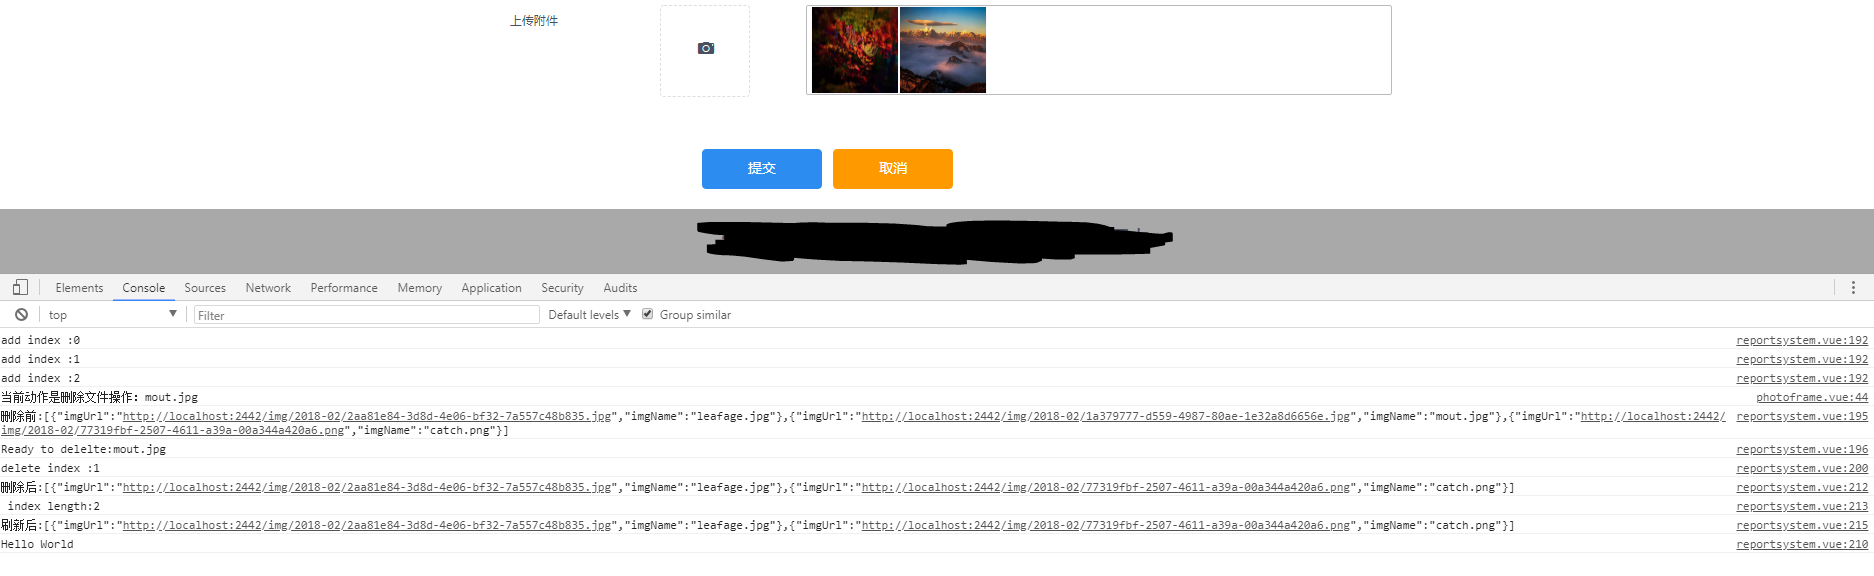
发现,Lists对象删除没有问题,但是图像显示出现,判断可能是二次渲染出现问题。(这张是后面补得,有图片guid名不同,意思到位就行)
查找官方文档,发现Vue内部组件缓存机制导致JavaScript不能双向绑定刷新
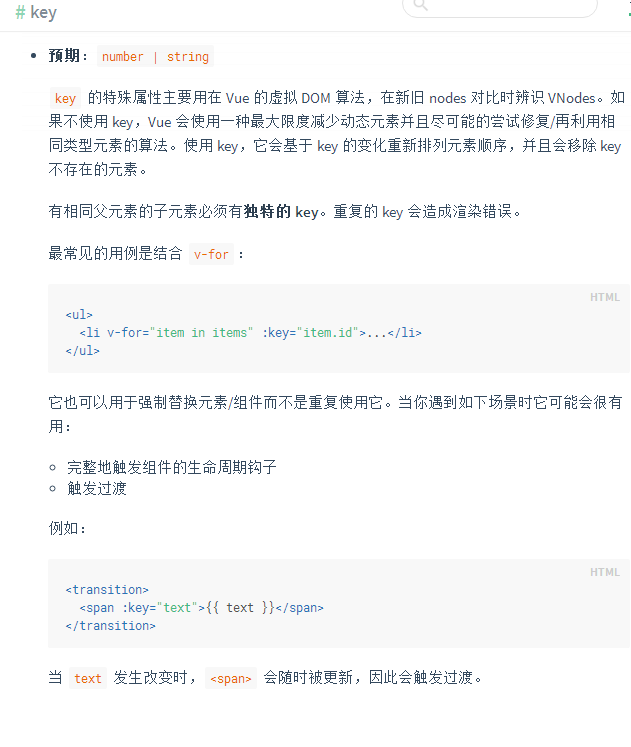
<div style="width: 88px;height: 88px;display: inline-block;"
		    				 v-for="item in Lists" :key="item.imgName">
		    				<!--<photoframe :imgurl="item.imgUrl" :imgname="item.imgName"></photoframe>-->
		    				<photoframe :imgExample="item"></photoframe>
		    			</div>
添加:key保证唯一即可,后验证确实能够实现html和data的一致性