今天对Spring Boot 中 Start组件原理 进行一个总结,以 自己写的一个小demo为例子进行讲解;
1、 要了解 Start组件原理 得先理解如下注解的功能:
@Configuration 项目中的配置类
@ConditionalOnBean(xxx.class) 当Spring 容器中存在xxx Bean 时则装载该 Bean;
@Import 导入其他配置类
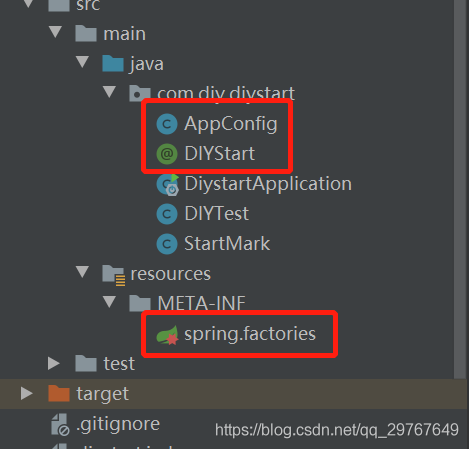
2、 Demo 整体概览
先看下我demo的整体概览,画红框的为主要类,下面将针通过这几个类来描述 Start组件基本原理
3、 Start组件基本原理
① AppConfig 类为项目的整体配置类,注解 @ConditionalOnBean 的意思是 当Spring要加载AppConfig时会先校验容器中是否装载了StartMark, 该注解的主要作用是实现动态插拔的效果;
@Configuration
@ConditionalOnBean(StartMark.class)
public class AppConfig {

    public AppConfig(){
        System.out.printf(" 初始化 AppConfig ");
    }

    @Bean
    public DIYTest init(){
        return new DIYTest();
    }

}
② 当我们的项目变成 Start组件时,用户只需要通过注解便可以使用,如下为组件中的自定义注解;
自定义注解中使用@Import进行装载 StartMark,也就是当用户使用该注解时就可以加载到 AppConfig 配置类实现动态插拔效果,StartMark类本身无意义;
@Target({ElementType.TYPE})
@Retention(RetentionPolicy.RUNTIME)
@Import({StartMark.class})
@Documented
@Component
public @interface DIYStart {
}
③ 我们都知道 Start组件 最终会以 jar 包的形式 被用户使用,那 AppConfig 配置类又是什么时候,通过什么方式加载到 用户的Spring容器中的呢?
这就需要我们使用到Springboot 中@EnableAutoConfiguration 自动配置的原理,在 Start组件中定义 META-INF/spring.factories 配置文件,在该文件中注入AppConfig 配置类,Spring Boot 在启动时会默认加载所有 jar 包中的 META-INF/spring.factories 该配置文件,然后解析加载里面配置的类,常用的各 start 组件便是利用自动配置原理实现的;
org.springframework.boot.autoconfigure.EnableAutoConfiguration=\
com.diy.diystart.AppConfig
④ 做完上面的配置后,我们只需要将 start组件进行打包成jar包供 用户项目使用即可。
⑤ 除了 通过 META-INF/spring.factories 配置类以外 还可以通过一种很简单的方式进行注入配置类,那就是直接在自定义注解上引入 start组件的配置类,效果也一样,本人亲测;
@Target({ElementType.TYPE})
@Retention(RetentionPolicy.RUNTIME)
@Import({AppConfig.class})  //直接注入配置类 不需要spring.factories
@Documented
@Component
public @interface DIYStart {
}