MMDetection官网安装步骤:MMdetection Document,安装过程中踩了一些坑,特此记录,希望可以对你有帮助。
一、本地环境
我的环境:
- Ubuntu 20.04.4
- Cuda compilation tools, release 10.1, V10.1.243
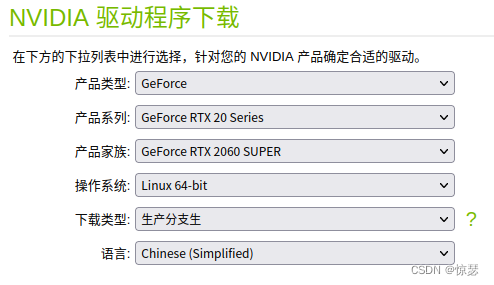
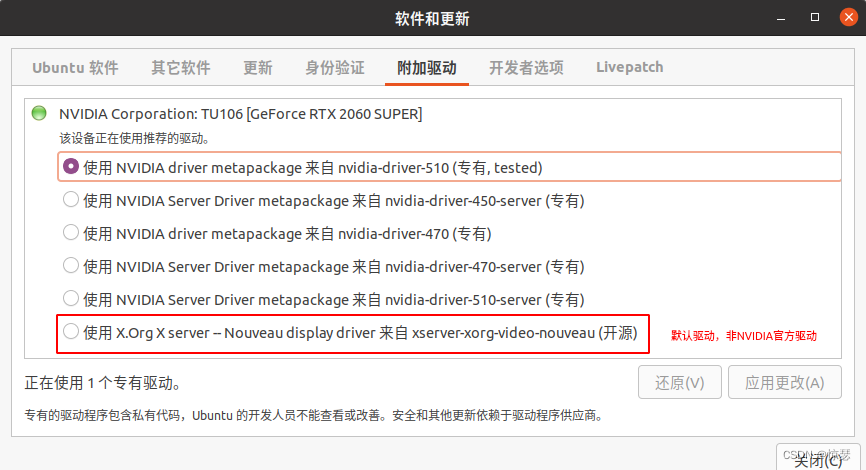
在着手安装前,先确保本地显卡驱动正常,在terminal输入nvidia-smi ,如果正常,则会弹出GPU信息。如果驱动不对,则会弹出错误: NVIDIA-SMI has failed because it couldn’t communicate with the NVIDIA driver,此时需要去“软件和更新”,替换为NVIDIA官方驱动,具体选择哪个,可以根据本地GPU型号去官网查看对应的驱动版本NVIDIA driver,而本地GPU型号可以通过该指令查看lspci|grep NVIDIA,以下为笔者本地环境:
正确安装驱动后,在terminal输入nvidia-smi ,会弹出GPU信息:
+-----------------------------------------------------------------------------+| NVIDIA-SMI510.60.02    Driver Version:510.60.02    CUDA Version:11.6||-------------------------------+----------------------+----------------------+| GPU  Name        Persistence-M| Bus-Id        Disp.A| Volatile Uncorr. ECC|| Fan  Temp  Perf  Pwr:Usage/Cap|         Memory-Usage| GPU-Util  Compute M.||||               MIG M.||===============================+======================+======================||0  NVIDIA GeForce...  Off| 00000000:08:00.0  On|                  N/A||49%   44C    P8    20W / 184W|   1921MiB /  8192MiB|2%      Default||||                  N/A|
+-------------------------------+----------------------+----------------------+
二、安装
- 安装anaconda
比较简单,可以参考Ubuntu下安装Anaconda,安装后在terminal行输入conda,要确保能用。 - 安装MMDetection
如官网所示,两种安装方式,一种全自动,一种手动。我用了全自动的方式,自动安装脚本如下:
conda create-n openmmlab python=3.7 pytorch==1.6.0 cudatoolkit=10.1 torchvision-c pytorch-y
conda activate openmmlab
pip install openmim
mim install mmcv-full
git clone https://github.com/open-mmlab/mmdetection.git
cd mmdetection
pip install-r requirements/build.txt
pip install-v-e.
需要注意的是:
cudatoolkit=10.1需要替换为与本地环境对应的版本- 在你想要的项目目录里面跑这个脚本,因为脚本中要clone代码到当前目录
- 验证
上述步骤执行完毕后,会发现一个mmdection文件夹,cd进去,执行python mmdet/utils/collect_env.py检查环境,确保环境没问题: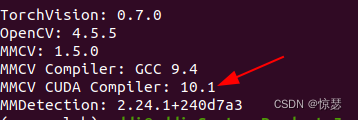
如果MMCV CUDA Compiler: not available,则执行:MMCV_WITH_OPS=1 FORCE_CUDA=1 pip install mmcv-full。
4.跑demo
在mmdection目录下新建py文件,内容如下:
from mmdet.apisimport init_detector, inference_detector, show_result_pyplot
config_file='configs/faster_rcnn/faster_rcnn_r50_fpn_1x_coco.py'# 从 model zoo 下载 checkpoint 并放在 `checkpoints/` 文件下# 网址为: http://download.openmmlab.com/mmdetection/v2.0/faster_rcnn/faster_rcnn_r50_fpn_1x_coco/faster_rcnn_r50_fpn_1x_coco_20200130-047c8118.pth
checkpoint_file='checkpoints/faster_rcnn_r50_fpn_1x_coco_20200130-047c8118.pth'
device='cuda:0'# 初始化检测器
model= init_detector(config_file, checkpoint_file, device=device)# 推理演示图像
res= inference_detector(model,'demo/demo.jpg')
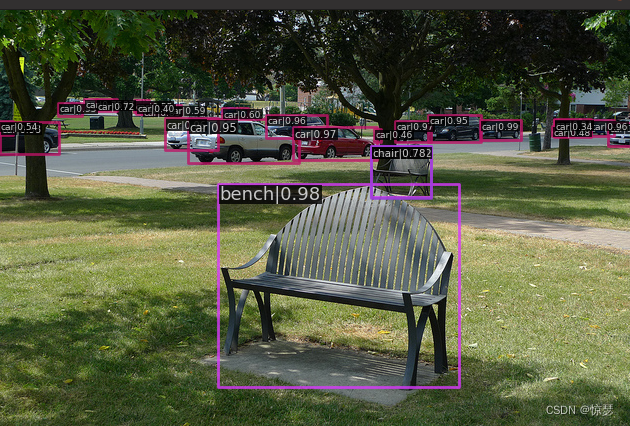
show_result_pyplot(model,img='demo/demo.jpg', result=res)如果一切正常,将看到结果: