在B站上看了shiro的教学视频,觉得讲的挺不错的,根据自己的理解,记录一下学习笔记
应用场景是springboot的单体应用
一、整合思路
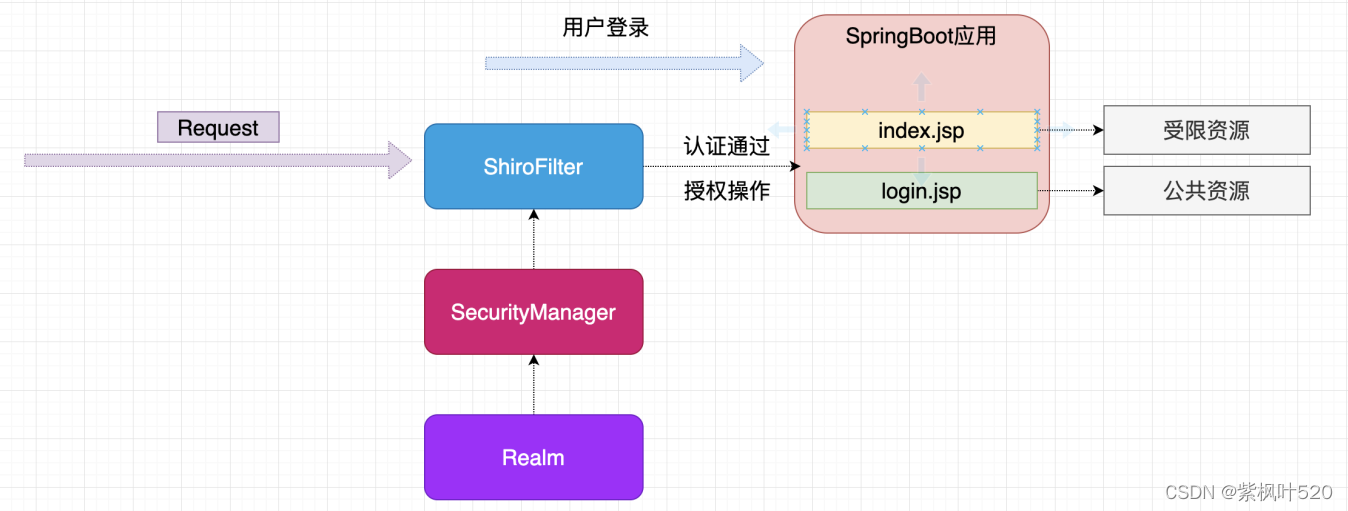
直接从教学视频中,截取的图片:
主要就是在之前认证的基础上,在中间加入了shiro框架,加上shiro过滤器
二、搭建简单的web应用
1、创建应用
创建一个简单的springboot项目,勾选lombok、热部署、和spring web等必要的组件
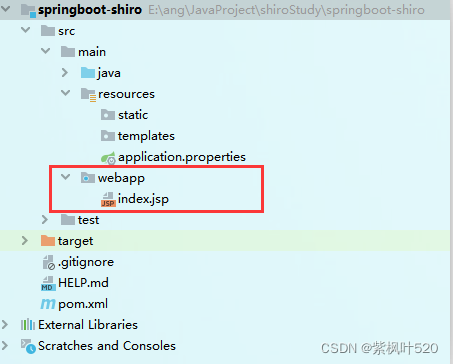
在main目录下添加webapp目录,并新建jsp文件
2、添加jsp依赖
<!--引入JSP解析依赖-->
<dependency>
    <groupId>org.apache.tomcat.embed</groupId>
    <artifactId>tomcat-embed-jasper</artifactId>
</dependency>
3、配置properties
server.port=8888
server.servlet.context-path=/
4、访问页面
启动项目,访问http://localhost:8888/index.jsp

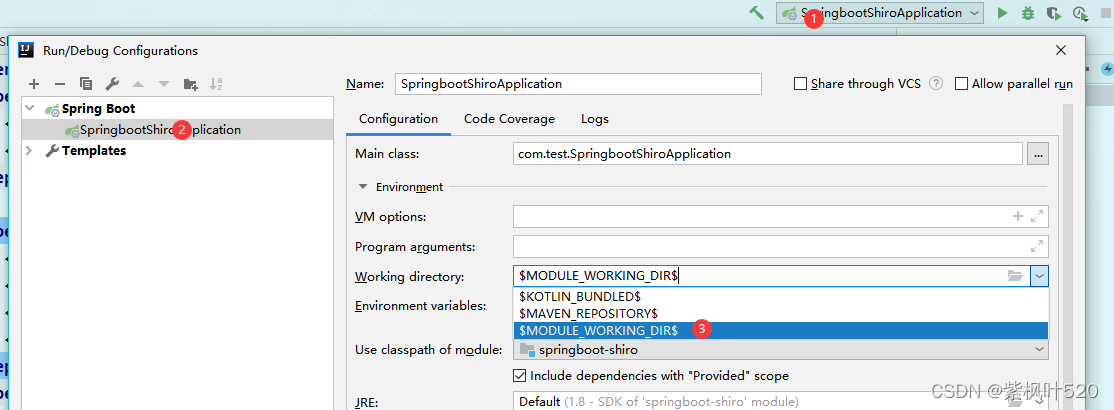
5、如果访问jsp页面报错,进行如下配置
修改一些idea的配置,选择带有module的即可,重启再去访问
三、整合shiro
1、添加整合依赖
<!--整合包-->
<dependency>
    <groupId>org.apache.shiro</groupId>
    <artifactId>shiro-spring-boot-starter</artifactId>
    <version>1.4.0</version>
</dependency>
2、先创建一个自定义的Realm
里面实现的方法,暂时都返回为null,表示认证是授权失败
public class MyRealm extends AuthorizingRealm {
    @Override
    protected AuthorizationInfo doGetAuthorizationInfo(PrincipalCollection principalCollection) {
        return null;
    }

    @Override
    protected AuthenticationInfo doGetAuthenticationInfo(AuthenticationToken authenticationToken) throws AuthenticationException {
        return null;
    }
}
3、创建shiro的过滤器,用来拦截请求
先拦截一个index.jsp页面资源,用来测试整合是否成功
@Configuration
public class ShiroConfig {
    //创建过滤器,拦截所有请求
    @Bean
    public ShiroFilterFactoryBean getShiroFilterFactoryBean(DefaultWebSecurityManager defaultWebSecurityManager){
        ShiroFilterFactoryBean shiroFilterFactoryBean = new ShiroFilterFactoryBean();
        shiroFilterFactoryBean.setSecurityManager(defaultWebSecurityManager);

        //设置角色和资源等权限
        Map map = new HashMap<>();
        map.put("/index.jsp","authc");
        shiroFilterFactoryBean.setLoginUrl("login.jsp");//默认就是login.jsp
        shiroFilterFactoryBean.setFilterChainDefinitionMap(map);

        return shiroFilterFactoryBean;
    }

    //创建安全管理器
    @Bean
    public DefaultWebSecurityManager getSecurityManager(Realm myRealm){
        //要用Web
        DefaultWebSecurityManager securityManager = new DefaultWebSecurityManager();
        securityManager.setRealm(myRealm);
        return securityManager;
    }

    //创建自定义的Realm
    @Bean("myRealm")
    public Realm getRealm(){
        return new MyRealm();
    }
}
4、创建login页面
5、测试
访问http://localhost:8888/index.jsp,会重定向到login页面
因为在realm中,授权的时候,返回的是null,没有完成认证
四、整合mybatis-plus
1、整合步骤
参考:https://blog.csdn.net/zifengye520/article/details/121989659
2、创建测试的数据库表
sql如下:
SET NAMES utf8mb4;
SET FOREIGN_KEY_CHECKS = 0;
-- ----------------------------
-- Table structure for perms
-- ----------------------------
DROP TABLE IF EXISTS `perms`;
CREATE TABLE `perms` (
`id` varchar(64) CHARACTER SET utf8 COLLATE utf8_general_ci NOT NULL,
`name` varchar(255) CHARACTER SET utf8 COLLATE utf8_general_ci DEFAULT NULL,
`url` varchar(255) CHARACTER SET utf8 COLLATE utf8_general_ci DEFAULT NULL,
PRIMARY KEY (`id`) USING BTREE
) ENGINE = InnoDB CHARACTER SET = utf8 COLLATE = utf8_general_ci ROW_FORMAT = Dynamic;
-- ----------------------------
-- Table structure for role
-- ----------------------------
DROP TABLE IF EXISTS `role`;
CREATE TABLE `role` (
`id` varchar(64) CHARACTER SET utf8 COLLATE utf8_general_ci NOT NULL,
`rolename` varchar(255) CHARACTER SET utf8 COLLATE utf8_general_ci DEFAULT NULL,
PRIMARY KEY (`id`) USING BTREE
) ENGINE = InnoDB CHARACTER SET = utf8 COLLATE = utf8_general_ci ROW_FORMAT = Dynamic;
-- ----------------------------
-- Table structure for role_perm
-- ----------------------------
DROP TABLE IF EXISTS `role_perm`;
CREATE TABLE `role_perm` (
`id` varchar(64) CHARACTER SET utf8 COLLATE utf8_general_ci NOT NULL,
`roleid` varchar(64) CHARACTER SET utf8 COLLATE utf8_general_ci DEFAULT NULL,
`permid` varchar(64) CHARACTER SET utf8 COLLATE utf8_general_ci DEFAULT NULL,
PRIMARY KEY (`id`) USING BTREE
) ENGINE = InnoDB CHARACTER SET = utf8 COLLATE = utf8_general_ci ROW_FORMAT = Dynamic;
-- ----------------------------
-- Table structure for user
-- ----------------------------
DROP TABLE IF EXISTS `user`;
CREATE TABLE `user` (
`id` varchar(64) CHARACTER SET utf8 COLLATE utf8_general_ci NOT NULL,
`username` varchar(255) CHARACTER SET utf8 COLLATE utf8_general_ci DEFAULT NULL,
`password` varchar(255) CHARACTER SET utf8 COLLATE utf8_general_ci DEFAULT NULL,
`salt` varchar(255) CHARACTER SET utf8 COLLATE utf8_general_ci DEFAULT NULL,
PRIMARY KEY (`id`) USING BTREE
) ENGINE = InnoDB CHARACTER SET = utf8 COLLATE = utf8_general_ci ROW_FORMAT = Dynamic;
-- ----------------------------
-- Table structure for user_role
-- ----------------------------
DROP TABLE IF EXISTS `user_role`;
CREATE TABLE `user_role` (
`id` varchar(64) CHARACTER SET utf8 COLLATE utf8_general_ci NOT NULL,
`userid` varchar(64) CHARACTER SET utf8 COLLATE utf8_general_ci DEFAULT NULL,
`roleid` varchar(64) CHARACTER SET utf8 COLLATE utf8_general_ci DEFAULT NULL,
PRIMARY KEY (`id`) USING BTREE
) ENGINE = InnoDB CHARACTER SET = utf8 COLLATE = utf8_general_ci ROW_FORMAT = Dynamic;
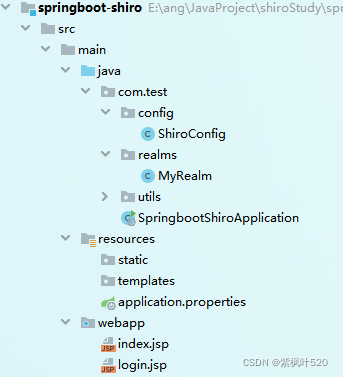
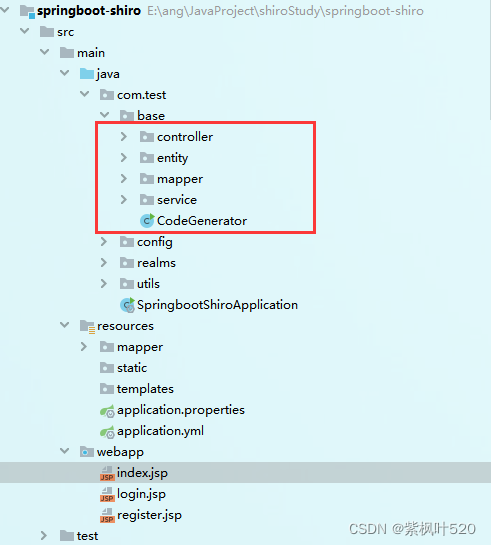
SET FOREIGN_KEY_CHECKS = 1;3、整合之后的项目结构
五、实现注册功能
1、创建注册页面:register.jsp
<%@ page contentType="text/html;charset=UTF-8" language="java" %>
<html>
<head>
    <title>register</title>
</head>
<body>
    <form method="post" action="${pageContext.request.contextPath}/user/register">
        用户名:<input name="username" value="" type="text" /><br/>
        密码:<input name="password" value="" type="password" /><br/>
        <input name="" type="submit" value="注册" />
    </form>
</body>
</html>
2、配置视图
spring.mvc.view.prefix=/
spring.mvc.view.suffix=.jsp
3、创建获取随机盐的工具类
public class SaltUtil {
    private static final String str = "ABCDEFGHIJKLMNOPQRSTUVWXYZ0123456789";

    public static String getRandomSalt(int num){
        StringBuffer salt = new StringBuffer();
        IntStream.range(0,num).forEach(i->{
            Random random = new Random();
            //获取随机下标
            int index = random.nextInt(str.length()+1);
            //获取字符
            char result = str.charAt(index);
            salt.append(result);
        });
        return salt.toString();
    }
}
4、UserController添加注册方法
@PostMapping("/register")
public String register(User user){

    if(StringUtils.isNullOrEmpty(user.getUsername()) || StringUtils.isNullOrEmpty(user.getPassword())){
        return "register";
//            return "redirect:/register.jsp";//跳转页面,注意路径,用绝对路径,否则会加上class的前缀
//            return "redirect:toRegister";//跳转接口
    }

    String salt = SaltUtil.getRandomSalt(5);

    String password = user.getPassword();
    String newPassword = new Md5Hash(password,salt,1024).toHex();
    user.setPassword(newPassword);
    user.setSalt(salt);

    userService.save(user);
    return "login";
}
5、测试
访问页面:http://localhost:8888/user/register.jsp
输入:zhangsan | 1234,并点击按钮
查看数据库,发现注册成功

六、登录认证和退出
一、登录认证
1、修改Realm
首先要修改ShiroConfig中的Realm,因为要登录要用到盐值加密,所以需要修改Realm中的凭证匹配器
//创建自定义的Realm
@Bean("myRealm")
public Realm getRealm(){
    MyRealm myRealm = new MyRealm();

    //设置hashed凭证匹配器
    HashedCredentialsMatcher credentialsMatcher = new HashedCredentialsMatcher();
    credentialsMatcher.setHashAlgorithmName("md5");//加密方式md5
    credentialsMatcher.setHashIterations(1024);//散列次数,1024

    myRealm.setCredentialsMatcher(credentialsMatcher);

    return myRealm;
}
2、创建登录方法
可以直接使用SecurityUtils来获取主体
在ShiroConfig中配置了DefaultWebSecurityManager,会自动注入到SecurityUtils中
@Controller
public class LoginController {
    @RequestMapping("/login")
    public String login(User user){
        UsernamePasswordToken token = new UsernamePasswordToken(user.getUsername(),user.getPassword());
        Subject subject = SecurityUtils.getSubject();

        try{
            subject.login(token);
        }catch (UnknownAccountException e){
            //账号不存在
            System.out.println("账号不存在");
            return "register";
        }catch (IncorrectCredentialsException e){
            //密码不正确
            System.out.println("密码不正确");
            return "login";
        }
        return "index";
    }
}
3、编辑login页面
<%@ page contentType="text/html;charset=UTF-8" language="java" %>
<html>
<head>
    <title>Login</title>
</head>
<body>
    <form method="post" action="${pageContext.request.contextPath}/login">
        用户名:<input name="username" value="" type="text" /><br/>
        密码:<input name="password" value="" type="password" /><br/>
        <input name="" type="submit" value="登录" />
    </form>
</body>
</html>
4、添加工具类,ApplicationContextUtil
添加一个工具类ApplicationContextUtil,用来获取spring容器中的bean,后面的realm中会用到
@Component
public class ApplicationContextUtil implements ApplicationContextAware {

    private static ApplicationContext context;

    @Override
    public void setApplicationContext(ApplicationContext applicationContext) throws BeansException {
        this.context = applicationContext;
    }

    //获取上下文路径
    public static ApplicationContext getContext(){
        return context;
    }

    //获取bean
    public static Object getBean(String beanName){
        return context.getBean(beanName);
    }
}
5、修改Realm
修改自定义的Realm,从数据源获取用户信息,修改doGetAuthenticationInfo方法
@Override
protected AuthenticationInfo doGetAuthenticationInfo(AuthenticationToken authenticationToken) throws AuthenticationException {
    String principal = (String) authenticationToken.getPrincipal();
    if(!StringUtils.isNullOrEmpty(principal)){
        UserService userServiceImpl = (UserService) ApplicationContextUtil.getBean("userServiceImpl");
        QueryWrapper wrapper = new QueryWrapper();
        wrapper.eq("username",principal);

        User user = userServiceImpl.getOne(wrapper);

        if(user!=null){
            SimpleAuthenticationInfo info = new SimpleAuthenticationInfo(user.getUsername(),user.getPassword(),ByteSource.Util.bytes(user.getSalt()),this.getName());
            return info;
        }
    }

    return null;
}
6、测试
1)使用test登录,跳转到register页面,后台打印:账号不存在
2)使用zhangsan登录,随便输入密码,跳转到login页面,后台打印:密码不正确
3)使用zhangsan | 1234登录,进入到index页面
二、退出
1、编辑index页面,添加退出连接
<a href="${pageContext.request.contextPath}/logout">退出登录</a>2、添加退出方法
@RequestMapping("/logout")
public String logout(){
    Subject subject = SecurityUtils.getSubject();
    subject.logout();
    return "login";
}
3、测试
使用zhangsan | 1234登录,进入index页面
点击退出按钮,会进入login页面,测试在URL地址栏输入index.jsp,会发现自动跳转到login页面,因为已经退出成功
七、权限认证
1、数据库
插入测试数据,sql:
-- ----------------------------
-- Records of perms
-- ----------------------------
INSERT INTO `perms` VALUES ('1', 'admin:*:*', NULL);
INSERT INTO `perms` VALUES ('2', 'user:*:*', NULL);
INSERT INTO `perms` VALUES ('3', 'user:find:*', NULL);
INSERT INTO `perms` VALUES ('4', 'product:*:*', NULL);
-- ----------------------------
-- Records of role
-- ----------------------------
INSERT INTO `role` VALUES ('1', 'admin');
INSERT INTO `role` VALUES ('2', 'user');
INSERT INTO `role` VALUES ('3', 'product');
-- ----------------------------
-- Records of role_perm
-- ----------------------------
INSERT INTO `role_perm` VALUES ('1', '1', '1');
INSERT INTO `role_perm` VALUES ('2', '1', '3');
INSERT INTO `role_perm` VALUES ('3', '2', '2');
INSERT INTO `role_perm` VALUES ('4', '3', '3');
-- ----------------------------
-- Records of user
-- ----------------------------
INSERT INTO `user` VALUES ('1', 'admin', '7508cf15e102d437b3d2fd9238d4505e', 'PDTOK');
INSERT INTO `user` VALUES ('2', 'user', '3611dbe2193e0ffd93c2befabfc1d3f9', 'BAMAM');
INSERT INTO `user` VALUES ('3', 'guest', '9697df20425e3d5ac9d0f923f3dcb7f0', 'P6AP8');
-- ----------------------------
-- Records of user_role
-- ----------------------------
INSERT INTO `user_role` VALUES ('1', '1', '1');
INSERT INTO `user_role` VALUES ('2', '2', '2');
INSERT INTO `user_role` VALUES ('3', '3', '3');
2、index页面添加shiro标签
注意:shiro标签的引入
<%@ page contentType="text/html;charset=UTF-8" language="java" %>
<%@ taglib prefix="shiro" uri="http://shiro.apache.org/tags" %>
<html>
<head>
    <title>index</title>
</head>
<body>
    <a href="${pageContext.request.contextPath}/logout">退出登录</a>
    <h5>所有角色都能看</h5>
    <shiro:hasRole name="admin">
        <h5>admin角色才能看</h5>
    </shiro:hasRole>
    <shiro:hasRole name="user">
        <h5>user角色才能看</h5>
    </shiro:hasRole>
    <shiro:hasAnyRoles name="admin,user">
        <h5>admin或者user角色才能看</h5>
    </shiro:hasAnyRoles>
    <shiro:hasPermission name="user:*:*">
        <h5>user:*:*资源才能看</h5>
    </shiro:hasPermission>
    <shiro:hasPermission name="user:find:*">
        <h5>user:find:*资源才能看</h5>
    </shiro:hasPermission>
    <shiro:hasPermission name="admin:*:*">
        <h5>admin:*:*资源才能看</h5>
    </shiro:hasPermission>
    <shiro:hasPermission name="admin:*:*">
        <h5>product:*:*资源才能看</h5>
    </shiro:hasPermission>
</body>
</html>
3、修改role和user对象,添加关联的集合属性
User:
@Data
@NoArgsConstructor
@AllArgsConstructor
public class User extends Model<User> {

    private static final long serialVersionUID = 1L;

    private String id;

    private String username;

    private String password;

    private String salt;

    @TableField(exist = false)
    private List<Role> roleList;
}
Role:
@Data
public class Role extends Model<Role> {

    private static final long serialVersionUID = 1L;

    @TableId(value = "id", type = IdType.AUTO)
    private String id;

    private String rolename;

    @TableField(exist = false)
    private List<Perms> permsList;
}
4、添加查询接口
添加2个查询接口和sql:根据名称查询用户,根据角色查询权限
查询sql:
<!-- 通用查询映射结果 -->
    <resultMap id="BaseResultMap" type="com.test.base.entity.User">
        <id column="userId" property="id" />
        <result column="username" property="username" />
        <result column="password" property="password" />
        <result column="salt" property="salt" />
        <collection property="roleList" ofType="com.test.base.entity.Role">
            <id column="roleId" property="id" />
            <result column="rolename" property="rolename" />
        </collection>
    </resultMap>

    <select id="getUserList" resultMap="BaseResultMap">
        SELECT
            u.id as userId,u.username,r.id as roleId,r.rolename
        FROM
            USER u
        LEFT JOIN user_role ur ON u.id = ur.userid
        LEFT JOIN role r ON r.id = ur.roleid
        WHERE  u.username = #{username}
    </select>

    <select id="getPermByRole" resultType="com.test.base.entity.Perms">
        SELECT
            p.id,p.name,p.url
        FROM
            role r
        LEFT JOIN role_perm rp ON r.id=rp.roleid
        LEFT JOIN perms p ON rp.permid=p.id
        WHERE r.id=#{roleId}
    </select>
mapper接口:
public interface UserMapper extends BaseMapper<User> {
    List<User> getUserList(String username);

    List<Perms> getPermByRole(String roleId);
}
service层省略
5、修改自定义Realm中的授权方法
@Override
protected AuthorizationInfo doGetAuthorizationInfo(PrincipalCollection principalCollection) {
	String primaryPrincipal = (String) principalCollection.getPrimaryPrincipal();
	UserService userServiceImpl = (UserService) ApplicationContextUtil.getBean("userServiceImpl");
	//获取用户
	List<User> userList = userServiceImpl.getUserList(primaryPrincipal);
	if(userList==null || userList.size()==0){
		return null;
	}
	SimpleAuthorizationInfo simpleAuthorizationInfo = new SimpleAuthorizationInfo();
	User user = userList.get(0);
	//遍历用户角色
	user.getRoleList().forEach(role -> {
		//获取角色对应的资源权限
		List<Perms> permsList = userServiceImpl.getPermByRole(role.getId());
		permsList.forEach(perms -> {
			//添加资源权限
			simpleAuthorizationInfo.addStringPermission(perms.getName());
		});
		//添加角色权限
		simpleAuthorizationInfo.addRole(role.getRolename());
	});

	return simpleAuthorizationInfo;
}
6、登录不同账号,进行验证
-----------------------------------------
user登录:角色:user,资源:user:*:*(包含user:find:*)
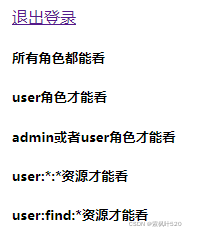
-----------------------------------------
guest登录:没有角色和资源
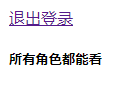
-----------------------------------------
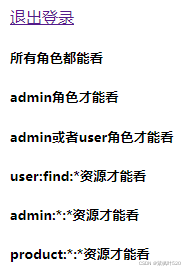
admin登录:角色:admin,资源:admin:*:*、user:find:*
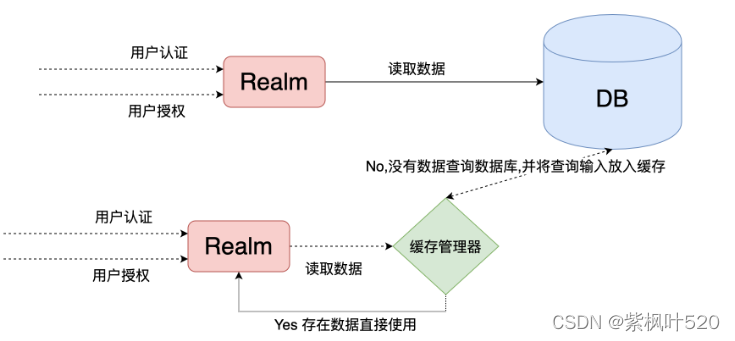
八、缓存的基本使用
前提:
在index页面,每次刷新页面,因为shiro标签,每次都会进行权限认证操作,调用doGetAuthorizationInfo方法会去数据库查询数据
加入页面有N个shiro标签,就会去调用doGetAuthorizationInfo方法N次
加入缓存之后的对比:
一、缓存管理器介绍
1、可以在Realm中定义缓存管理器(见1)
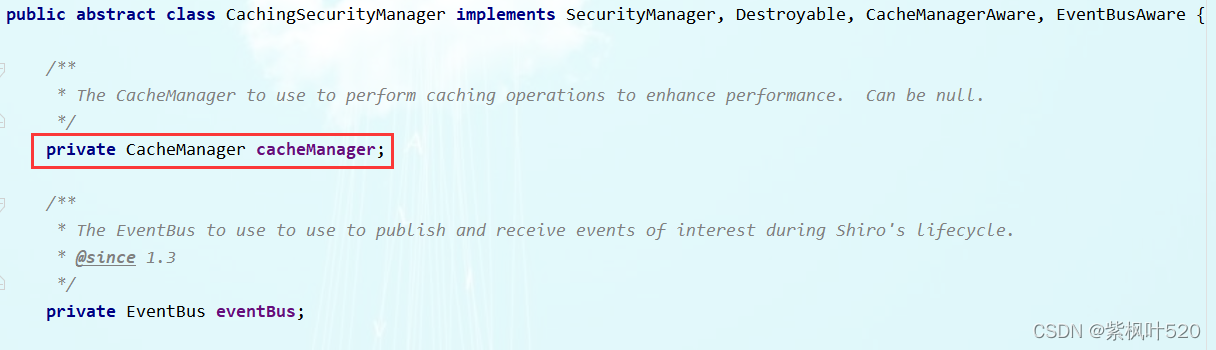
2、可以在SecurityManager中定义缓存管理器(见2)
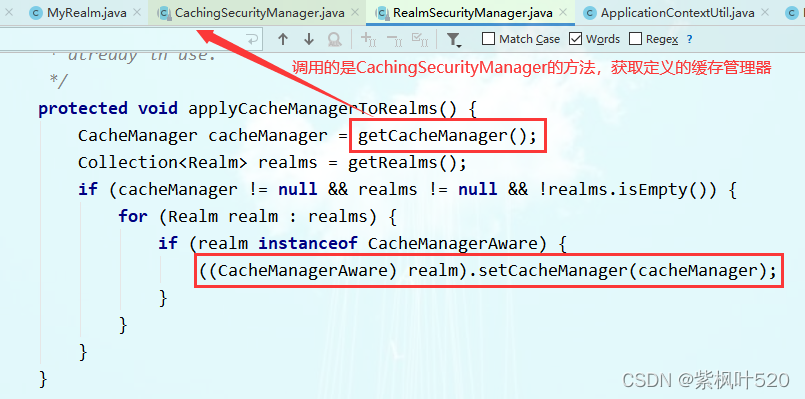
3、一般在Realm中设置,因为在manager中设置,最终还是给realm使用(见3)
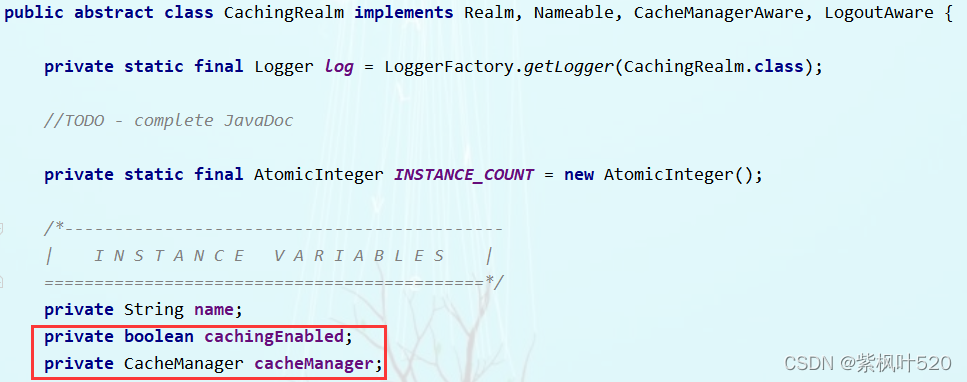
1、查看自定义realm的类图,或者通过点击extends,可以看到MyRealm继承了CachingRealm
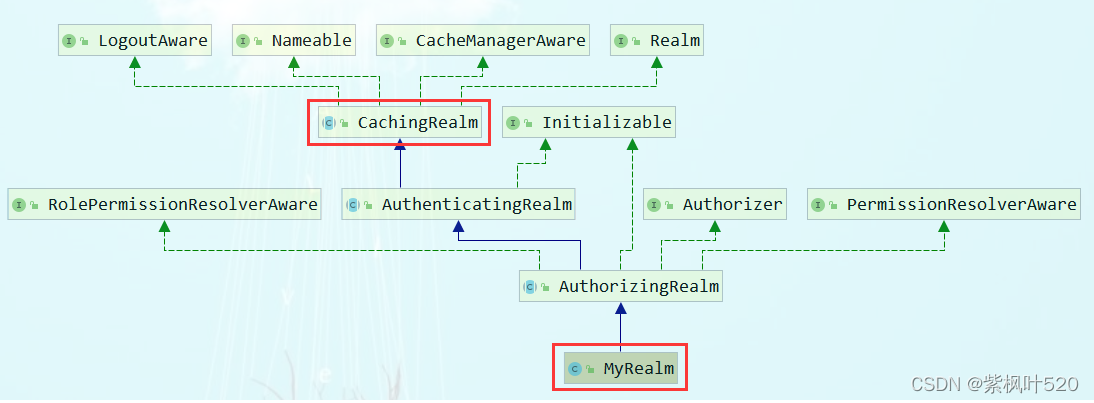
查看CachingRealm的源码,可以看到CacheManager的变量和开关
2、使用的安全管理器DefaultWebSecurityManager,查看其类关系图
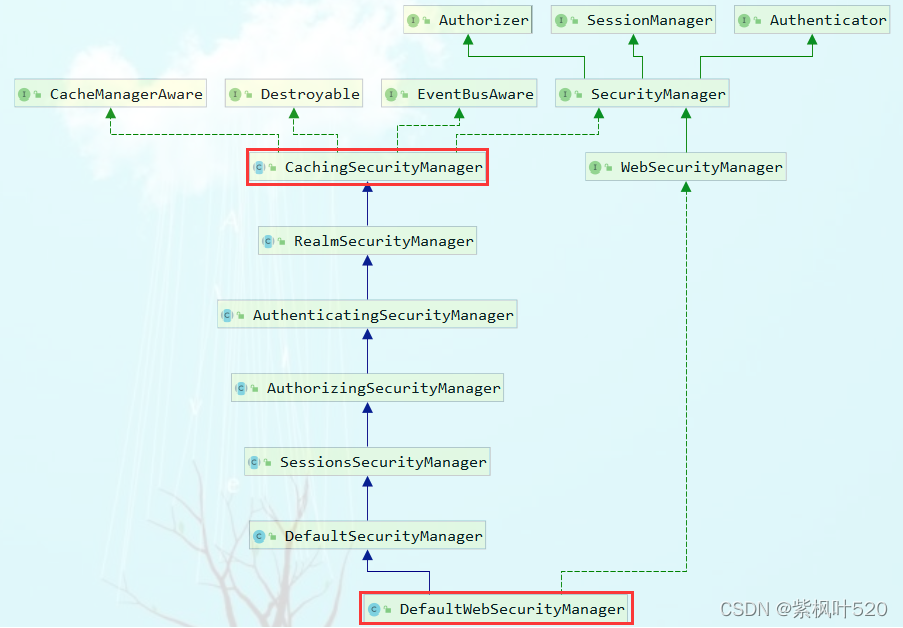
查看CachingSecurityManager源码:
3、看一下org.apache.shiro.mgt.RealmSecurityManage的源码实现:
二、添加缓存管理器
1、添加依赖
<!--引入shiro和ehcache-->
<dependency>
    <groupId>org.apache.shiro</groupId>
    <artifactId>shiro-ehcache</artifactId>
    <version>1.5.3</version>
</dependency>
2、修改ShiroConfig
在shiro配置类中,定义Realm的时候,给自定义的Realm设置缓存管理器
@Bean("myRealm")
public Realm getRealm(){
    MyRealm myRealm = new MyRealm();

    //设置hashed凭证匹配器
    HashedCredentialsMatcher credentialsMatcher = new HashedCredentialsMatcher();
    credentialsMatcher.setHashAlgorithmName("md5");//加密方式md5
    credentialsMatcher.setHashIterations(1024);//散列次数,1024

    myRealm.setCredentialsMatcher(credentialsMatcher);

    //开启缓存,设置缓存管理器
    myRealm.setCachingEnabled(true);
    myRealm.setAuthenticationCachingEnabled(true);
    myRealm.setAuthorizationCachingEnabled(true);
    myRealm.setCacheManager(new EhCacheManager());

    return myRealm;
}
3、测试
此时登录login,访问index,第一次会访问数据库,再次刷新页面的时候,不会再去访问数据库,也不会进去doGetAuthorizationInfo方法
九、使用redis缓存
1、添加依赖
<!--redis整合springboot-->
<dependency>
    <groupId>org.springframework.boot</groupId>
    <artifactId>spring-boot-starter-data-redis</artifactId>
</dependency>
2、配置文件
#redis
spring.redis.port=6379
spring.redis.host=localhost
spring.redis.database=0
3、自定义缓存管理器,实现CacheManager
public class RedisCacheManager implements CacheManager {
    @Override
    public <K, V> Cache<K, V> getCache(String s) throws CacheException {
        //返回自定义的缓存实现
        return new RedisCache<K,V>(s);
    }
}
4、自定义缓存实现类,实现Cache<K,V>
public class RedisCache<K,V> implements Cache<K,V> {
    private String name ;

    public RedisCache(){

    }

    public RedisCache(String name){
        System.out.println("name="+name);
        this.name = name;
    }

    private RedisTemplate getRedisTemplate(){
        RedisTemplate redisTemplate = (RedisTemplate) ApplicationContextUtil.getBean("redisTemplate");
        redisTemplate.setKeySerializer(new StringRedisSerializer());
        redisTemplate.setHashKeySerializer(new StringRedisSerializer());
        return redisTemplate;
    }

    @Override
    public V get(K k) throws CacheException {
        System.out.println("------------------get from "+k.toString());
        return (V) getRedisTemplate().opsForHash().get(name,k.toString());
    }

    @Override
    public V put(K k, V v) throws CacheException {
        System.out.println("------------------put "+ v +" with "+k.toString());
        getRedisTemplate().opsForHash().put(name,k.toString(),v);
        return null;
    }

    @Override
    public V remove(K k) throws CacheException {
        System.out.println("------------------delete "+k.toString());
        getRedisTemplate().opsForHash().delete(name,k.toString());
        return null;
    }

    @Override
    public void clear() throws CacheException {
        System.out.println("------------------clear");
        getRedisTemplate().opsForHash().delete(name);
    }

    @Override
    public int size() {
        return 0;
    }

    @Override
    public Set<K> keys() {
        return getRedisTemplate().opsForHash().keys(this.name);
    }

    @Override
    public Collection<V> values() {
        return getRedisTemplate().opsForHash().values(this.name);
    }
}
5、修改ShiroConfig
在配置类中修改realm的缓存管理器
@Bean("myRealm")
    public Realm getRealm(){
        MyRealm myRealm = new MyRealm();

        //设置hashed凭证匹配器
        HashedCredentialsMatcher credentialsMatcher = new HashedCredentialsMatcher();
        credentialsMatcher.setHashAlgorithmName("md5");//加密方式md5
        credentialsMatcher.setHashIterations(1024);//散列次数,1024

        myRealm.setCredentialsMatcher(credentialsMatcher);

        //开启缓存,设置缓存管理器
        myRealm.setCachingEnabled(true);
        myRealm.setAuthenticationCachingEnabled(true);
        myRealm.setAuthorizationCachingEnabled(true);
//        myRealm.setCacheManager(new EhCacheManager());
        myRealm.setCacheManager(new RedisCacheManager());

        return myRealm;
    }
6、但是此时去login页面登录会报错
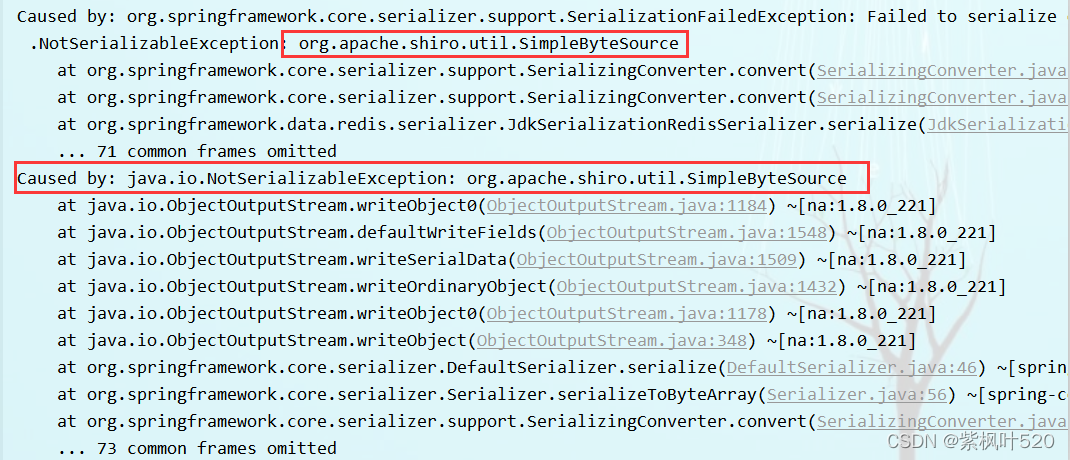
出错原因:由于shiro中提供的simpleByteSource实现,没有实现序列化,所以在认证时出现错误信息
解决方法:自定义salt实现,实现序列化接口
7、自定义salt的实现
有2种方式:
1)实现ByteSource接口和Serializable接口,要实现ByteSource的所有方法,比较麻烦,如下:
public class CustomSimpleByteSource implements ByteSource, Serializable {

    private static final long serialVersionUID = 1L;

    private  byte[] bytes;
    private String cachedHex;
    private String cachedBase64;

    public CustomSimpleByteSource(){

    }

    public CustomSimpleByteSource(byte[] bytes) {
        this.bytes = bytes;
    }

    public CustomSimpleByteSource(char[] chars) {
        this.bytes = CodecSupport.toBytes(chars);
    }

    public CustomSimpleByteSource(String string) {
        this.bytes = CodecSupport.toBytes(string);
    }

    public CustomSimpleByteSource(ByteSource source) {
        this.bytes = source.getBytes();
    }

    public CustomSimpleByteSource(File file) {
        this.bytes = (new com.test.redis.CustomSimpleByteSource.BytesHelper()).getBytes(file);
    }

    public CustomSimpleByteSource(InputStream stream) {
        this.bytes = (new com.test.redis.CustomSimpleByteSource.BytesHelper()).getBytes(stream);
    }

    public static boolean isCompatible(Object o) {
        return o instanceof byte[] || o instanceof char[] || o instanceof String || o instanceof ByteSource || o instanceof File || o instanceof InputStream;
    }

    public byte[] getBytes() {
        return this.bytes;
    }

    public boolean isEmpty() {
        return this.bytes == null || this.bytes.length == 0;
    }

    public String toHex() {
        if (this.cachedHex == null) {
            this.cachedHex = Hex.encodeToString(this.getBytes());
        }

        return this.cachedHex;
    }

    public String toBase64() {
        if (this.cachedBase64 == null) {
            this.cachedBase64 = Base64.encodeToString(this.getBytes());
        }

        return this.cachedBase64;
    }

    public String toString() {
        return this.toBase64();
    }

    public int hashCode() {
        return this.bytes != null && this.bytes.length != 0 ? Arrays.hashCode(this.bytes) : 0;
    }

    public boolean equals(Object o) {
        if (o == this) {
            return true;
        } else if (o instanceof ByteSource) {
            ByteSource bs = (ByteSource)o;
            return Arrays.equals(this.getBytes(), bs.getBytes());
        } else {
            return false;
        }
    }

    private static final class BytesHelper extends CodecSupport {
        private BytesHelper() {
        }

        public byte[] getBytes(File file) {
            return this.toBytes(file);
        }

        public byte[] getBytes(InputStream stream) {
            return this.toBytes(stream);
        }
    }
}
2)自定义一个类,继承SimpleByteSource 和 实现Serializable接口
public class MyByteSource extends SimpleByteSource implements Serializable {
private static final long serialVersionUID = 1L;
public MyByteSource(String string) {
super(string);
}
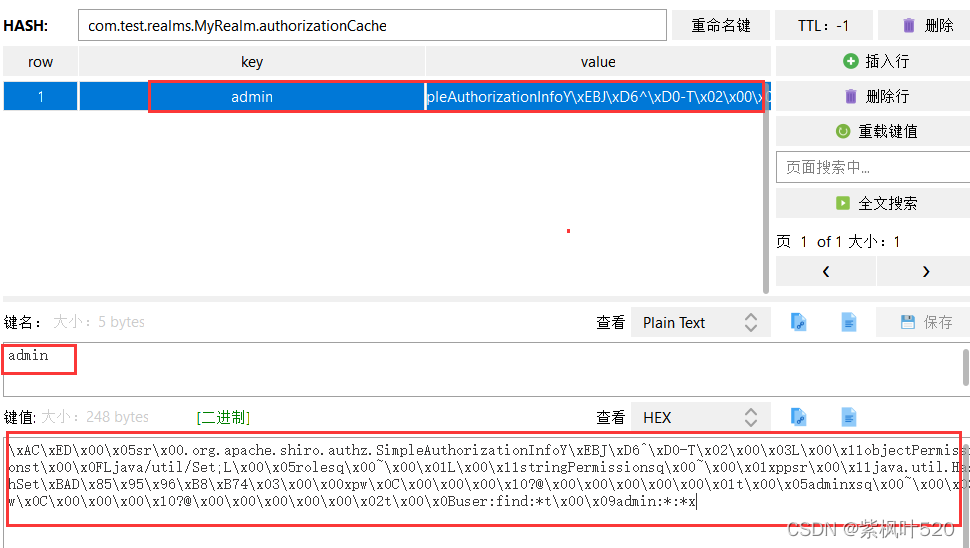
}8、修改认证的实现方法
在自定义Realm中,修改认证的实现方法
@Override
protected AuthenticationInfo doGetAuthenticationInfo(AuthenticationToken authenticationToken) throws AuthenticationException {
    System.out.println("--------------------开始认证--------------------");
    String principal = (String) authenticationToken.getPrincipal();
    if(!StringUtils.isNullOrEmpty(principal)){
        UserService userServiceImpl = (UserService) ApplicationContextUtil.getBean("userServiceImpl");
        QueryWrapper wrapper = new QueryWrapper();
        wrapper.eq("username",principal);
        //查询用户
        User user = userServiceImpl.getOne(wrapper);
        //如果存在,返回
        if(user!=null){
//                SimpleAuthenticationInfo info = new SimpleAuthenticationInfo(user.getUsername(),user.getPassword(),
//                        ByteSource.Util.bytes(user.getSalt()),this.getName());
//                SimpleAuthenticationInfo info = new SimpleAuthenticationInfo(user.getUsername(),user.getPassword(),
//                        new CustomSimpleByteSource(user.getSalt()),this.getName());
            SimpleAuthenticationInfo info = new SimpleAuthenticationInfo(user.getUsername(),user.getPassword(),
                    new MyByteSource(user.getSalt()),this.getName());
            return info;
        }
    }
    return null;
}
此时,再去登录,可以正常登录,也可以正常保存redis缓存
十、添加验证码
1、先创建一个验证码生成工具VerifyCodeUtils
public class VerifyCodeUtils {
    //使用到Algerian字体,系统里没有的话需要安装字体,字体只显示大写,去掉了1,0,i,o几个容易混淆的字符
    public static final String VERIFY_CODES = "23456789ABCDEFGHJKLMNPQRSTUVWXYZ";
    private static Random random = new Random();


    /**
     * 使用系统默认字符源生成验证码
     * @param verifySize    验证码长度
     * @return
     */
    public static String generateVerifyCode(int verifySize){
        return generateVerifyCode(verifySize, VERIFY_CODES);
    }
    /**
     * 使用指定源生成验证码
     * @param verifySize    验证码长度
     * @param sources   验证码字符源
     * @return
     */
    public static String generateVerifyCode(int verifySize, String sources){
        if(sources == null || sources.length() == 0){
            sources = VERIFY_CODES;
        }
        int codesLen = sources.length();
        Random rand = new Random(System.currentTimeMillis());
        StringBuilder verifyCode = new StringBuilder(verifySize);
        for(int i = 0; i < verifySize; i++){
            verifyCode.append(sources.charAt(rand.nextInt(codesLen-1)));
        }
        return verifyCode.toString();
    }

    /**
     * 生成随机验证码文件,并返回验证码值
     * @param w
     * @param h
     * @param outputFile
     * @param verifySize
     * @return
     * @throws IOException
     */
    public static String outputVerifyImage(int w, int h, File outputFile, int verifySize) throws IOException {
        String verifyCode = generateVerifyCode(verifySize);
        outputImage(w, h, outputFile, verifyCode);
        return verifyCode;
    }

    /**
     * 输出随机验证码图片流,并返回验证码值
     * @param w
     * @param h
     * @param os
     * @param verifySize
     * @return
     * @throws IOException
     */
    public static String outputVerifyImage(int w, int h, OutputStream os, int verifySize) throws IOException{
        String verifyCode = generateVerifyCode(verifySize);
        outputImage(w, h, os, verifyCode);
        return verifyCode;
    }

    /**
     * 生成指定验证码图像文件
     * @param w
     * @param h
     * @param outputFile
     * @param code
     * @throws IOException
     */
    public static void outputImage(int w, int h, File outputFile, String code) throws IOException{
        if(outputFile == null){
            return;
        }
        File dir = outputFile.getParentFile();
        if(!dir.exists()){
            dir.mkdirs();
        }
        try{
            outputFile.createNewFile();
            FileOutputStream fos = new FileOutputStream(outputFile);
            outputImage(w, h, fos, code);
            fos.close();
        } catch(IOException e){
            throw e;
        }
    }

    /**
     * 输出指定验证码图片流
     * @param w
     * @param h
     * @param os
     * @param code
     * @throws IOException
     */
    public static void outputImage(int w, int h, OutputStream os, String code) throws IOException{
        int verifySize = code.length();
        BufferedImage image = new BufferedImage(w, h, BufferedImage.TYPE_INT_RGB);
        Random rand = new Random();
        Graphics2D g2 = image.createGraphics();
        g2.setRenderingHint(RenderingHints.KEY_ANTIALIASING,RenderingHints.VALUE_ANTIALIAS_ON);
        Color[] colors = new Color[5];
        Color[] colorSpaces = new Color[] { Color.WHITE, Color.CYAN,
                Color.GRAY, Color.LIGHT_GRAY, Color.MAGENTA, Color.ORANGE,
                Color.PINK, Color.YELLOW };
        float[] fractions = new float[colors.length];
        for(int i = 0; i < colors.length; i++){
            colors[i] = colorSpaces[rand.nextInt(colorSpaces.length)];
            fractions[i] = rand.nextFloat();
        }
        Arrays.sort(fractions);

        g2.setColor(Color.GRAY);// 设置边框色
        g2.fillRect(0, 0, w, h);

        Color c = getRandColor(200, 250);
        g2.setColor(c);// 设置背景色
        g2.fillRect(0, 2, w, h-4);

        //绘制干扰线
        Random random = new Random();
        g2.setColor(getRandColor(160, 200));// 设置线条的颜色
        for (int i = 0; i < 20; i++) {
            int x = random.nextInt(w - 1);
            int y = random.nextInt(h - 1);
            int xl = random.nextInt(6) + 1;
            int yl = random.nextInt(12) + 1;
            g2.drawLine(x, y, x + xl + 40, y + yl + 20);
        }

        // 添加噪点
        float yawpRate = 0.05f;// 噪声率
        int area = (int) (yawpRate * w * h);
        for (int i = 0; i < area; i++) {
            int x = random.nextInt(w);
            int y = random.nextInt(h);
            int rgb = getRandomIntColor();
            image.setRGB(x, y, rgb);
        }

        shear(g2, w, h, c);// 使图片扭曲

        g2.setColor(getRandColor(100, 160));
        int fontSize = h-4;
        Font font = new Font("Algerian", Font.ITALIC, fontSize);
        g2.setFont(font);
        char[] chars = code.toCharArray();
        for(int i = 0; i < verifySize; i++){
            AffineTransform affine = new AffineTransform();
            affine.setToRotation(Math.PI / 4 * rand.nextDouble() * (rand.nextBoolean() ? 1 : -1), (w / verifySize) * i + fontSize/2, h/2);
            g2.setTransform(affine);
            g2.drawChars(chars, i, 1, ((w-10) / verifySize) * i + 5, h/2 + fontSize/2 - 10);
        }

        g2.dispose();
        ImageIO.write(image, "jpg", os);
    }

    private static Color getRandColor(int fc, int bc) {
        if (fc > 255)
            fc = 255;
        if (bc > 255)
            bc = 255;
        int r = fc + random.nextInt(bc - fc);
        int g = fc + random.nextInt(bc - fc);
        int b = fc + random.nextInt(bc - fc);
        return new Color(r, g, b);
    }

    private static int getRandomIntColor() {
        int[] rgb = getRandomRgb();
        int color = 0;
        for (int c : rgb) {
            color = color << 8;
            color = color | c;
        }
        return color;
    }

    private static int[] getRandomRgb() {
        int[] rgb = new int[3];
        for (int i = 0; i < 3; i++) {
            rgb[i] = random.nextInt(255);
        }
        return rgb;
    }

    private static void shear(Graphics g, int w1, int h1, Color color) {
        shearX(g, w1, h1, color);
        shearY(g, w1, h1, color);
    }

    private static void shearX(Graphics g, int w1, int h1, Color color) {

        int period = random.nextInt(2);

        boolean borderGap = true;
        int frames = 1;
        int phase = random.nextInt(2);

        for (int i = 0; i < h1; i++) {
            double d = (double) (period >> 1)
                    * Math.sin((double) i / (double) period
                    + (6.2831853071795862D * (double) phase)
                    / (double) frames);
            g.copyArea(0, i, w1, 1, (int) d, 0);
            if (borderGap) {
                g.setColor(color);
                g.drawLine((int) d, i, 0, i);
                g.drawLine((int) d + w1, i, w1, i);
            }
        }

    }

    private static void shearY(Graphics g, int w1, int h1, Color color) {

        int period = random.nextInt(40) + 10; // 50;

        boolean borderGap = true;
        int frames = 20;
        int phase = 7;
        for (int