Springboot集成com.spotify docker-maven-plugin
Springboot集成com.spotify docker-maven-plugin
当前CI/CD在很大程度上简化了项目的部署流程,奈何项目的GitLab Runner无法投入使用,只能手动构建镜像……因此选择在springboot中使用maven构建docker镜像,简化docker build -t和docker push等相关操作;这里选择对代码无侵入的com.spotify docker-maven-plugin,实现docker镜像的构建和推送。
集成构建插件
可以选择:
1.使用Dockerfile
2.将Docker命令绑定到Maven阶段(主要介绍该方式)
因该插件需要连接到docker server,以客户端的形式与docker server交互,所以需要先开启docker的远程访问。
Centos8:
vi /lib/systemd/system/docker.service
# 修改ExecStart
ExecStart=/usr/bin/dockerd  -H tcp://0.0.0.0:2375  -H unix:///var/run/docker.sock
# 修改完成后reload配置文件
sudo systemctl daemon-reload
# 重启docker服务
sudo systemctl restart docker.service
使用Dockerfile
在pom.xml中添加:
<build>
  <plugins>
    ...
    <plugin>
      <groupId>com.spotify</groupId>
      <artifactId>docker-maven-plugin</artifactId>
      <version>VERSION GOES HERE</version>
      <configuration>
        <imageName>yourImageName</imageName>
        <dockerDirectory>./</dockerDirectory>
        <!-- 复制 jar 包到 docker 容器指定目录配置,也可以写到 Docokerfile 中,Dockerfile中不能访问上级目录 -->
        <resources>
           <resource>
             <targetPath>/</targetPath>
             <directory>${project.build.directory}</directory>
             <include>${project.build.finalName}.jar</include>
           </resource>
        </resources>
      </configuration>
    </plugin>
    ...
  </plugins>
</build>
执行构建命令
mvn clean package docker:build -DskipTests=true -DdockerImageTags=v0.1.0这里只对使用Dockerfile的方式做简单介绍,详细的配置方式参考下文。
将Docker命令绑定到Maven阶段
pom.xml相关配置:
<plugin>
                <groupId>com.spotify</groupId>
                <artifactId>docker-maven-plugin</artifactId>
                <version>0.4.9</version>
                <configuration>
                    <!--关联harbor配置,推送镜像时可在maven的settings.xml中配置认证信息-->
                    <serverId>my-docker-registry</serverId>
                    <!--基础镜像-->
                    <baseImage>harbor.com/project/your-base-image-name</baseImage>
                    <!--build 时,指定 –pull=true 每次都重新拉取基础镜像-->
                    <pullOnBuild>true</pullOnBuild>
                    <maintainer>123@qq.com</maintainer>
                    <workdir>/usr/app</workdir>
                    <entryPoint>["java", "-Dfile.encoding=utf-8", "-jar", "${project.build.finalName}.jar"]</entryPoint>
                    <!--镜像构建完成之后,会重新打tag-->
                    <imageName>harbor.com/project/your-image-name</imageName>
                    <imageTags>
                        <imageTag>${project.version}</imageTag>
                        <imageTag>latest</imageTag>
                    </imageTags>
                    <!-- docker远程服务器地址 -->
                    <dockerHost>http://127.0.0.1:2375</dockerHost>
                    <!-- Dockerfile文件存放目录 -->
                    <!--<dockerDirectory>./</dockerDirectory>-->
                    <!--build 时,指定 –no-cache 不使用缓存-->
                    <noCache>true</noCache>
                    <!--build 时强制覆盖 tag,配合 imageTags 使用-->
                    <forceTags>true</forceTags>
                    <!--build 完成后 push 镜像-->
                    <!--<pushImage>true</pushImage>-->
                    <pushImageTag>true</pushImageTag>
                    <!--push 镜像失败,重试次数 默认5次-->
                    <retryPushCount>1</retryPushCount>
                    <!--push 镜像失败,重试时间 默认10s-->
                    <retryPushTimeout>3</retryPushTimeout>
                    <runs>
                        <runs>ls</runs>
                        <runs>chmod +x /usr/local/bin -R</runs>
                    </runs>
                    <squashRunCommands>true</squashRunCommands>
                    <exposes>8765</exposes>
                    <pushImageTag>true</pushImageTag>
                    <!-- 复制 jar 包到 docker 容器指定目录配置,也可以写到 Docokerfile 中,Dockerfile中不能访问上级目录 -->
                    <resources>
                        <resource>
                            <targetPath>/root/webapp</targetPath>
                            <directory>${project.build.directory}</directory>
                            <include>${project.build.finalName}.jar</include>
                        </resource>
                        <!--可任意添加include或者exclude-->
                        <resource>
                            <targetPath>/root/webapp</targetPath>
                            <directory>./</directory>
                            <include>directory/</include>
                            <include>123</include>
                            <include>456</include>
                            <include>789</include>
                        </resource>
                    </resources>

                </configuration>
                <!--<executions>
                    <execution>
                        <id>build-image</id>
                        <phase>package</phase>
                        <goals>
                            <goal>build</goal>
                        </goals>
                    </execution>
                    <execution>
                        <id>tag-image</id>
                        <phase>package</phase>
                        <goals>
                            <goal>tag</goal>
                        </goals>
                    </execution>
                </executions>-->
            </plugin>
settings.xml配置:
<servers>
        <server>
            <id>my-docker-registry</id>
            <username>admin</username>
            <password>明文/密文(后面介绍密文的配置)</password>
            <configuration>
                <email>你的邮箱(貌似必填)</email>
            </configuration>
        </server>
    </servers>
执行构建命令:
mvn clean package docker:build -DskipTests=true --settings settings.xml -DdockerImageTags=your-tag主要执行流程:package jar —> build images —> push images
maven配置密文
1.创建settings-security.xml文件
${user.home}/.m2/settings-security.xml其中内容如下:
mvn --encrypt-master-password 123456(你的密码)
<settingsSecurity>
  <master>{FRvmADFkJGwHKGlu1H1iQKLl6iqTf+wTUfWi7YuDits=}</master>
</settingsSecurity>
settings.xml中的password的值:
mvn --encrypt-password 123456(你的密码)
{S2f9YsFCm7gHttj9rjhZ+GCV8FZbKi6hkxQLf+4qQzA=}部分源码分析
https://github.com/spotify/docker-maven-plugin/blob/master/src/main/java/com/spotify/docker/BuildMojo.java
runs: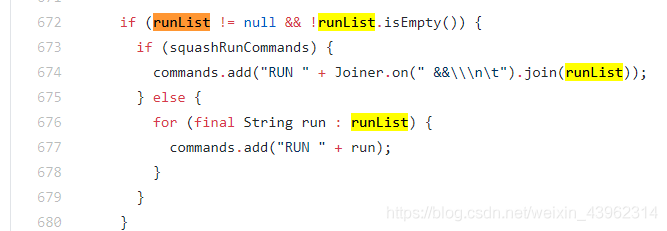
可以看到所有的runs都合成一条了。
resources: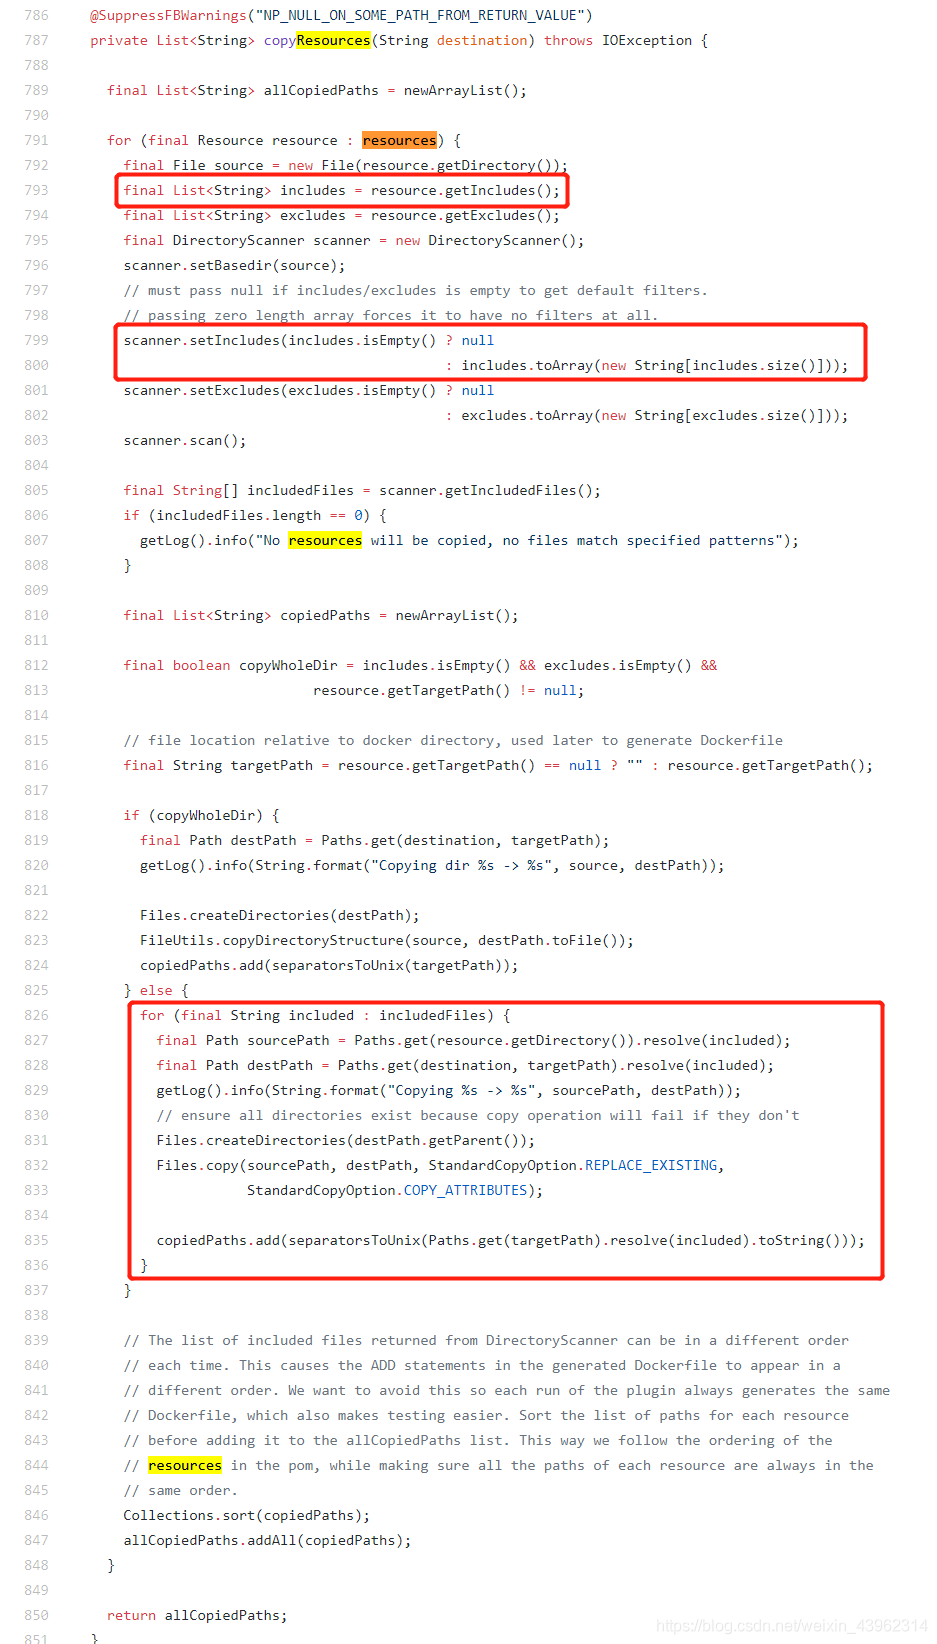
可以看到所有的文件都是单独copy的,这边会产生许多中间镜像。
参考:
https://github.com/spotify/docker-maven-plugin
https://github.com/spotify/docker-maven-plugin/blob/master/src/main/java/com/spotify/docker/BuildMojo.java
https://maven.apache.org/guides/mini/guide-encryption.html