我们在之前已经学习过react 生命周期,但是在16 版本中will 类的生命周期进行了废除,虽然依然可以用,但是需要加上UNSAFE 开头,表示是不安全的。
React16废弃的生命周期有3个will:componentWillMountcomponentWillReceivePropscomponentWillUpdate
废弃的原因,是在React16 的Fiber 架构中,可以中间进行暂停重启操作,调和过程会多次执行will 周期,不再是一次执行,失去了原有的意义。此外,多次执行,在周期中如果有setState 或dom 操作,会触发多次重绘,影响性能,也会导致数据错乱. 因而会有UNSAFE 开头。
新生命周期
更改的生命周期主要发生在更新时
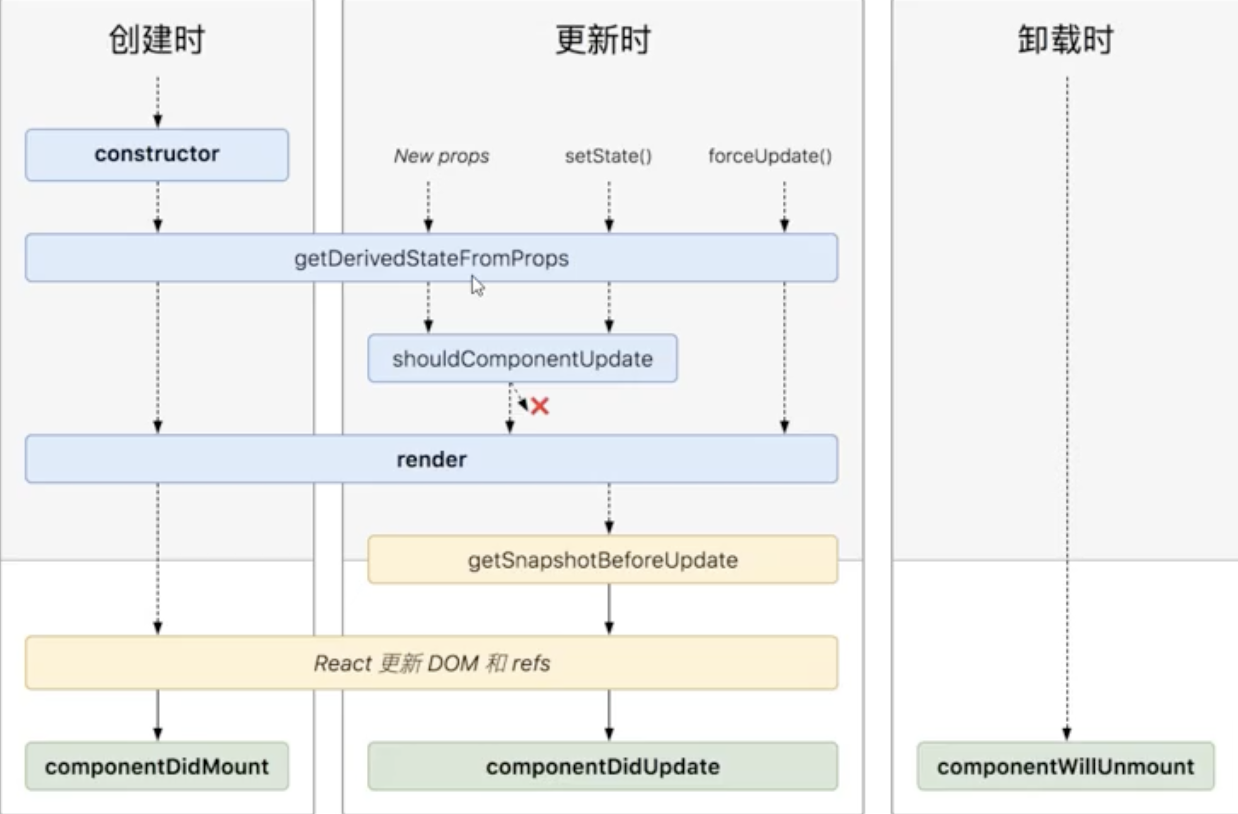
getDerivedStateFromProps
该生命周期是从父获取数据时使用的,返回一个新状态和页面当前状态组合,如下示例:
//  src/index.js
class Child extends React.Component {
  state = {
    count: 0
  }
  // 静态方法
  static getDerivedStateFromProps(nextProps, nextState) {
    return {
      count: nextProps.count * 2
    }
  }
  render() {
    return <div>{this.state.count}</div>;
  }
}
由上可知,函数执行应该在渲染之前执行,这样才能保证数据同步渲染,由上面生命周期图可知,props 和state 和forceupdate 都会触发该生命周期,所以我们在通用方法 forceUpdate 中实现如下:
// src/component.js
forceUpdate() {
    let oldRenderVdom = this.oldRenderVdom;
    let oldDOM = findDOM(oldRenderVdom);
    // 渲染前触发
    if (this.constructor.getDerivedStateFromProps) {
      const newState = this.constructor.getDerivedStateFromProps(this.props, this.state)
      if (newState) {
        this.state = {
          ...this.state,
          ...newState
        }
      }
    }
    ...
这里为什么使用静态方法呢?可能因为在
componentWillReceiveProps中会有人乱用setState,导致形成死循环,所以改成了静态方法
getSnapshotBeforeUpdate
从字面理解在更新前获取当前dom 结构的快照,拿到更新前页面的各种状态。例如你在渲染前浏览器滚动条scrollTop,更新后会变化,你就可以记住当前状态进行计算。
值得注意,getSnapshotBeforeUpdate 方法可以返回一个对象,在componentDidUpdate 第三个参数可以获取。
示例如下:
class ScrollList extends React.Component {
  constructor(props) {
    super(props)
    this.state = {
      messages: []
    }
    this.container = React.createRef()
  }
  componentDidMount() {
    this.timer = setInterval(() => {
      this.addMessage()
    }, 1000)
  }
  componentWillUnmount() {
    clearInterval(this.timer)
  }
  addMessage = () => {
    this.setState({
      messages: [`${this.state.messages.length}`,...this.state.messages, ]
    })
  }
  // 返回值给到 didupdate
  getSnapshotBeforeUpdate() {
    // 记住当前滚动条位置
    return {
      prevScrollTop: this.container.current.scrollTop,
      prevScrollHeight: this.container.current.scrollHeight
    }
  }
  componentDidUpdate(prevProps, prevState, {prevScrollTop ,prevScrollHeight}) {
    this.container.current.scrollTop = prevScrollTop + (this.container.current.scrollHeight - prevScrollHeight)
  }
  render() {
    const style = {
      height: '100px',
      width: '200px',
      border: '1px solid red',
      overflow: 'auto'
    }
    return <div style={style} ref={this.container}>
      {this.state.messages.map(msg => {
        return <div key={msg}>{msg}</div>
      })}
    </div>
  }
}既然也是在渲染前触发该方法,同样我们在forceUpdate 中的render 前实现:
forceUpdate() {
    ...
    // 更新前调用
    const snapShot = this.getSnapshotBeforeUpdate()
    let newRenderVdom = this.render();
    ...
    if (this.componentDidUpdate) {
      this.componentDidUpdate(this.props, this.state, snapShot);// 第三个参数
    }
  }
该生命周期具体使用情况大家根据自己的实际情况使用,文中的小示例仅供大家理解使用情况。
本节概念不是很多,主要是了解了react 为了fiber 提出了两个新生命周期。下一小节我们学习下react 中的context 概念。