目录
目录
5.创建Spring核心配置类(这里就叫Application)名称可以任意起
前言
关于Spring整合Mybatis,本文章使用注解的方式进行整合。在实际开发中大部分使用的是注解开发,主要是效率比配置文件高、简单易懂。ok,接下来看看一步一步如何实现
提示:以下是本篇文章正文内容,下面案例可供参考
一、为什么要整合MyBatis?
Spring框架主要用service层(业务逻辑层),当然也可以用于其他层。那么在service层的时候,大家知道,service层中需要调用dao层去操作数据库,那么在service层中需要创建SqlSession对象等一些列操作。例如:查询所有产品是一个方法,添加产品又是一个方法,那么SqlSession对象等需要创建多次,读取MyBatis核心配置文件也需要多次,就会非常麻烦!
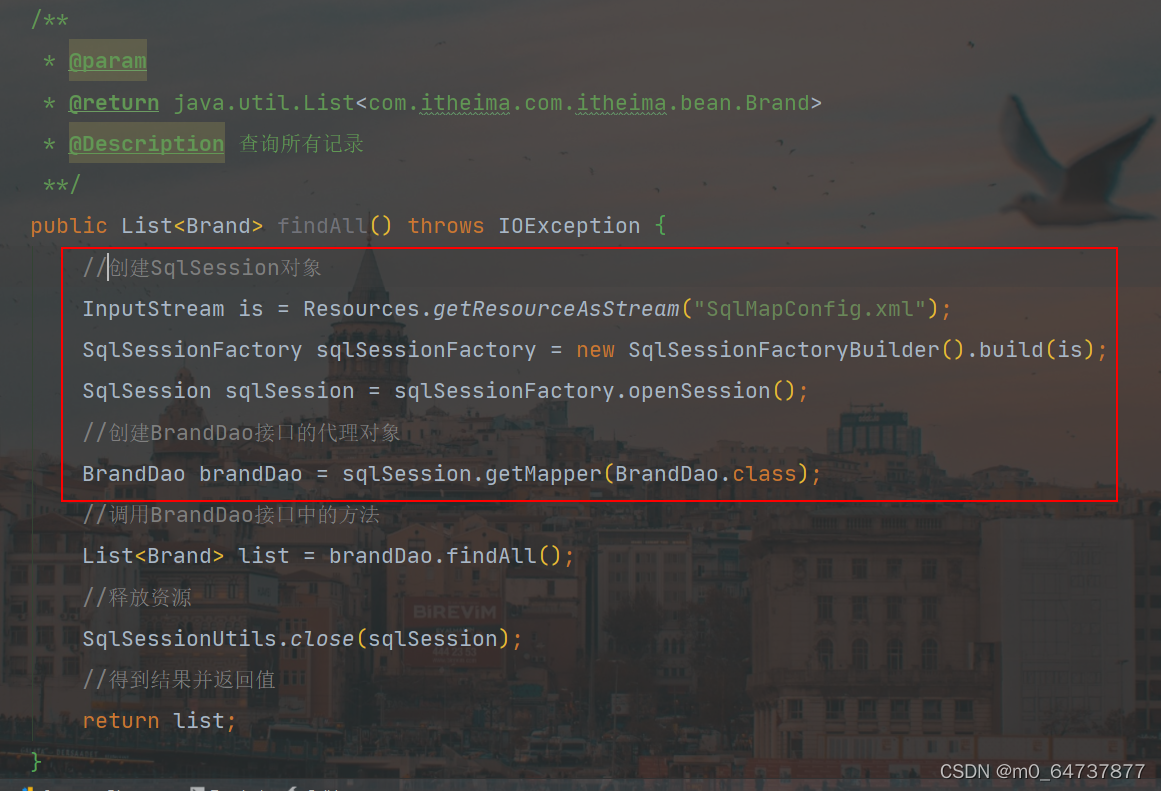

上面就是没有整合的效果,每个操作都需要编写一次相同的代码,特别的烦!!!接下来整合一下
二、使用步骤
1.pom.xml文件中导入依赖,
由于之前的总是使用的是MyBatis中内置的连接池,现在使用Druid连接池。在resources目录下导入properties文件(用于存放数据库信息)
代码如下(示例):
   <!--依赖管理-->
    <dependencies>
        <!--Spring整合junit单元测试依赖-->
        <dependency>
            <groupId>org.springframework</groupId>
            <artifactId>spring-test</artifactId>
            <version>5.1.2.RELEASE</version>
            <scope>test</scope>
        </dependency>
        <!--junit单元测试-->
        <dependency>
            <groupId>junit</groupId>
            <artifactId>junit</artifactId>
            <version>4.12</version>
            <scope>test</scope>
        </dependency>
        <!--Spring核心依赖-->
        <dependency>
            <groupId>org.springframework</groupId>
            <artifactId>spring-context</artifactId>
            <version>5.1.2.RELEASE</version>
        </dependency>

        <!--
            整合MyBatis
                1.数据库驱动依赖
                2.连接池依赖
                3.MyBatis依赖
                4.MyBatis整合Spring
                    mybatis-spring jar
                    spring-jdbc    jar
                5.日志相关jar包
        -->

        <!--整合Mybatis-->
        <!--1. 数据库依赖-->
        <dependency>
            <groupId>mysql</groupId>
            <artifactId>mysql-connector-java</artifactId>
            <version>5.1.47</version>
        </dependency>
        <!--2. 连接池依赖-->
        <dependency>
            <groupId>com.alibaba</groupId>
            <artifactId>druid</artifactId>
            <version>1.1.23</version>
        </dependency>
        <!--3. mybatis本身的依赖-->
        <dependency>
            <groupId>org.mybatis</groupId>
            <artifactId>mybatis</artifactId>
            <version>3.5.6</version>
        </dependency>
        <!--4. 整合mybatis和spring的依赖-->
        <!--MyBatis提供的和Spring进行整合的jar包-->
        <dependency>
            <groupId>org.mybatis</groupId>
            <artifactId>mybatis-spring</artifactId>
            <version>2.0.6</version>
        </dependency>
        <!--spring对jdbc封装的jar包也要导入进来,否则mybatis无法整合-->
        <dependency>
            <groupId>org.springframework</groupId>
            <artifactId>spring-jdbc</artifactId>
            <version>5.1.2.RELEASE</version>
        </dependency>

        <!--5. 日志依赖-->
        <!-- 添加slf4j日志api -->
        <dependency>
            <groupId>org.slf4j</groupId>
            <artifactId>slf4j-api</artifactId>
            <version>1.7.20</version>
        </dependency>
        <!-- 添加logback-classic依赖 -->
        <dependency>
            <groupId>ch.qos.logback</groupId>
            <artifactId>logback-classic</artifactId>
            <version>1.2.3</version>
        </dependency>
        <!-- 添加logback-core依赖 -->
        <dependency>
            <groupId>ch.qos.logback</groupId>
            <artifactId>logback-core</artifactId>
            <version>1.2.3</version>
        </dependency>
    </dependencies>
db.driverClass=com.mysql.jdbc.Driver
db.url=jdbc:mysql://localhost:3306/day32
db.username=root
db.password=1234562.创建AccountDao接口
使用注解方式编写sql语句。这里简单说一句,我觉得写sql语句的时候,使用注解跟xml文件一起使用的编写的效率会比较高,必须需要动态sql的就可以在xml文件中写,哪种简单用哪种!
代码如下(示例):
//创建dao接口
public interface AccountDao {
    //编写sql语句
    @Select("select * from account")
    List<Account> findAll();
}
3.创建AccountService接口
代码如下(示例):
//创建业务逻辑层接口
public interface AccountService {
    //该方法用于去调用dao接口的
    List<Account> findAll();
}
4.创建AccountServiceImpl实现类
/*
    Service层整合dao层:
        1.在AccountServiceImpl类中定义AccountDao属性
        2.使用@Autowired注入进来AccountDao的代理对象
        3.调用方法
 */
@Service
public class AccountServiceImpl implements AccountService {
    //使用注解为accountDao注入数据(使用的set方式)
    @Autowired
    private AccountDao accountDao;

    @Override
    public List<Account> findAll() {
        //调用dao接口中方法并返回
        return accountDao.findAll();
    }
}
5.创建Spring核心配置类(这里就叫Application)名称可以任意起
@Configuration  //声明该类是核心配置类
@ComponentScan("com.itheima")  //开启spring注解扫描
@PropertySource("classpath:db.properties")  //引入properties文件
@MapperScan("com.itheima.dao")   //MyBatis扫描dao接口
public class Application {
    //定义属性 为属性注入数据(数据的来源上面引入的db.properties文件)
    @Value("${db.driverClass}")
    private String driverClass;
    @Value("${db.url}")
    private String url;
    @Value("${db.username}")
    private String username;
    @Value("${db.password}")
    private String password;

    //创建数据源返回数据源,Spring会自动调用该方法,并将该对象交给IOC容器管理
    @Bean
    public DataSource dataSource(){
        DruidDataSource druidDataSource = new DruidDataSource();
        druidDataSource.setDriverClassName(driverClass);
        druidDataSource.setUrl(url);
        druidDataSource.setUsername(username);
        druidDataSource.setPassword(password);
        return druidDataSource;
    }

    //创建SqlSessionFactoryBean对象,设置形参,Spring会自动去调用IOC容器中已有的数据源
    @Bean
    public SqlSessionFactoryBean sqlSessionFactoryBean(DataSource dataSource){
        SqlSessionFactoryBean sqlSessionFactoryBean = new SqlSessionFactoryBean();
        sqlSessionFactoryBean.setDataSource(dataSource);
        return sqlSessionFactoryBean;
    }

}
6.测试(该测试类可以看成servlet层)
三层架构流程:
前端发送请求 --> servlet层接受请求,调用service层的对应方法 --> service层再调用dao层方法 --> dao层就去操作数据库
@RunWith(SpringJUnit4ClassRunner.class)
@ContextConfiguration(classes = Application.class)
public class textMethod {
    //定义类型为AccountService 通过自动装配注入数据(去IOC容器中找)
    @Autowired
    private AccountService accountService;

    @Test
    public void method() {
        //调用serivce中的方法,返回一个集合
        List<Account> all = accountService.findAll();
        for (Account account : all) {
            System.out.println(account);
        }
    }
}
总结
最开始咱们将Spring可以整合MyBatis,可以简化service中的代码, 现在看看已经简化成几句代码了。可以跟之前的比较一下
整合之前
整合之后
/*
    Service层整合dao层:
        1.在AccountServiceImpl类中定义AccountDao属性
        2.使用@Autowired注入进来AccountDao的代理对象
        3.调用方法
 */
@Service
public class AccountServiceImpl implements AccountService {
    //使用注解为accountDao注入数据(使用的set方式)
    @Autowired
    private AccountDao accountDao;

    @Override
    public List<Account> findAll() {
        //调用dao接口中方法并返回
        return accountDao.findAll();
    }
}
基本已经讲完啦!第一次写,有什么不对的地方,可以一起交流!
目录
5.创建Spring核心配置类(这里就叫Application)名称可以任意起
提示:
这里对文章进行总结:以上就是今天要讲的内容,本文仅仅简单介绍了纯注解的简单使用。