❝
最近开发了一个社区网站,网站地址:
https://developer.ppdxzz.org.cn, 其中在注册账号的时候用到了邮箱验证,特此记录一下,记录知识,同时方便大家查阅参考。❞
首先分析一下大体做法,用户使用邮箱注册时,需要向用户邮箱发送一个验证链接,用户点击链接对邮箱进行激活的这样一个操作,由此来完成邮箱的激活。
这里后台向用户发送的链接需要携带一个唯一值用来对用户进行标识,我这里选择用UUID,因为生成唯一也比较好管理,一般的话激活链接是有时效性的,就是说不是一直有效,比如设置24小时激活有效,超过24小时就得重新注册激活。这个可以使用redis来控制,通过UUID键是否存在于redis中来判断是否在有效期,存在即可激活,激活成功后删除这个UUID键,激活失败则是链接时效期可能过了24小时或者其他原因。
1.导入依赖
//发送邮箱依赖
<dependency>
    <groupId>org.springframework.boot</groupId>
    <artifactId>spring-boot-starter-mail</artifactId>
</dependency>
//redis依赖
<dependency>
    <groupId>org.springframework.boot</groupId>
    <artifactId>spring-boot-starter-data-redis</artifactId>
</dependency>
//thymeleaf模板引擎依赖,注册邮箱发送以及激活模板
<dependency>
    <groupId>org.springframework.boot</groupId>
    <artifactId>spring-boot-starter-thymeleaf</artifactId>
</dependency>
//hutool工具包
<dependency>
    <groupId>cn.hutool</groupId>
    <artifactId>hutool-core</artifactId>
    <version>5.1.2</version>
</dependency>
2.邮件信息配置application.properties
#这里我使用163邮箱主机,其他同理
spring.mail.host=smtp.163.com
spring.mail.default-encoding=UTF-8
# 发送账号,用户名,也就是使用哪个邮箱发送
spring.mail.username=xxx@163.com
# 密码,这里密码一般指的是授权密码,开启POP3/SMTP服务
spring.mail.password=xxxxxx
# 邮箱验证链接前缀,到时候拼接uuid
my-config-mail.ip=http://127.0.0.1:8088/verifyMail/
3.发送邮件逻辑
@Autowired
private RedisTemplate<String, String> redisTemplate;

@Autowired
private JavaMailSender javaMailSender;

@Autowired
private TemplateEngine templateEngine;

@Value("${spring.mail.username}")
private String from;

@Value("${my-config-mail.ip}")
private String prefixIp;

//生成用户唯一标识uuid,redis设置过期时间24小时
String uuid = IdUtil.simpleUUID();
redisTemplate.opsForValue().set(uuid,request.getEmail(),24,TimeUnit.HOURS);
try {
    //获取邮箱接受者,根据你自己逻辑获取
    String email = request.getEmail();
    Context context = new Context();
    context.setVariable("email",email);
    context.setVariable("activeUrl",prefixIp+uuid);
    //调用邮件发送模板页面,渲染email接收者、activeUrl激活链接
    String emailTemplate = templateEngine.process("emailTemplate", context);
    //创建可以HTML发送的邮件
    MimeMessage message = javaMailSender.createMimeMessage();
    MimeMessageHelper helper = new MimeMessageHelper(message, true);
    helper.setFrom("Cloud云社区 <"+from+">");
    helper.setTo(email);
    helper.setSubject("Cloud社区官方激活邮件");
    //true代表使用html渲染
    helper.setText(emailTemplate,true);
    javaMailSender.send(message);
} catch (Exception e) {
    throw new BizException(ErrorCodeEn.FAILED_CREATE_MAIL);
}
发送邮件模板emailTemplate.html
<!DOCTYPE html>
<html lang="en" xmlns:th="http://www.thymeleaf.org">
<head>
<meta charset="UTF-8">
<meta name="viewport"
content="width=device-width, user-scalable=no, initial-scale=1.0, maximum-scale=1.0, minimum-scale=1.0">
<meta http-equiv="X-UA-Compatible" content="ie=edge">
</head>
<body>
<div>
<includetail>
<div align="center">
<div class="open_email" style="margin-left: 8px; margin-top: 8px; margin-bottom: 8px; margin-right: 8px;">
<div>
<br>
<span class="genEmailContent">
<div id="cTMail-Wrap" style="word-break: break-all;box-sizing:border-box;text-align:center;min-width:320px; max-width:660px; border:1px solid #f6f6f6; background-color:#f7f8fa; margin:auto; padding:20px 0 30px; font-family:'helvetica neue',PingFangSC-Light,arial,'hiragino sans gb','microsoft yahei ui','microsoft yahei',simsun,sans-serif">
<div class="main-content" style="">
<table style="width:100%;font-weight:300;margin-bottom:10px;border-collapse:collapse">
<tbody>
<tr style="font-weight:300">
<td style="width:3%;max-width:30px;"></td>
<td style="max-width:600px;">
<!-- LOGO -->
<div id="cTMail-logo" style="width:92px; height:25px;">
<!-- 替换跳转链接 -->
<a href="">
<!-- 替换LOGO图片 -->
<img border="0" src="https://oss.ppdxzz.org.cn/img/yuan-logo.png"
style="width:92px; height:34px;display:block">
</a>
</div>
<!-- 页面上边的蓝色分割线 -->
<p style="height:2px;background-color: #00a4ff;border: 0;font-size:0;padding:0;width:100%;margin-top:20px;"></p>
<div id="cTMail-inner" style="background-color:#fff; padding:23px 0 20px;box-shadow: 0px 1px 1px 0px rgba(122, 55, 55, 0.2);text-align:left;">
<table style="width:100%;font-weight:300;margin-bottom:10px;border-collapse:collapse;text-align:left;">
<tbody>
<!--第一个单元格 -->
<tr style="font-weight:300">
<!--左侧表格,设置左边距用的 -->
<td style="width:3.2%;max-width:30px;"></td>
<!--中间表格,正文使用 -->
<td style="max-width:480px;text-align:left;">
<!-- 以下是正文-->
<!-- 可以是标题 -->
<h1 id="cTMail-title" style="font-size: 20px; line-height: 36px; margin: 0px 0px 22px;">
【Cloud云社区】欢迎注册云社区
</h1>
<p id="cTMail-userName" style="font-size:14px;color:#333; line-height:24px; margin:0;">
<span th:text="${email}"></span>,您好!
</p>
<p class="cTMail-content" style="line-height: 24px; margin: 6px 0px 0px; overflow-wrap: break-word; word-break: break-all;">
<span style="color: rgb(51, 51, 51); font-size: 14px;">
  欢迎注册Cloud云社区,云社区旨在为更多的开发者提供一个开放式的交流平台,欢迎你的加入!
</span>
</p>
<p class="cTMail-content" style="line-height: 24px; margin: 6px 0px 0px; overflow-wrap: break-word; word-break: break-all;">
<span style="color: rgb(51, 51, 51); font-size: 14px;">  您已完成注册,请点击下面按钮验证邮箱。
<span style="font-weight: bold;">非本人操作可忽略。</span>
</span>
</p>
<!-- 按钮 -->
<p class="cTMail-content" style="font-size: 14px; color: rgb(51, 51, 51); line-height: 24px; margin: 6px 0px 0px; word-wrap: break-word; word-break: break-all;">
<!-- 下面替换成自己的链接 -->
<a id="cTMail-btn" th:href="${activeUrl}" title="" style="font-size: 16px; line-height: 45px; display: block; background-color: rgb(0, 164, 255); color: rgb(255, 255, 255); text-align: center; text-decoration: none; margin-top: 20px; border-radius: 3px;">
点击此处验证邮箱
</a>
</p>
<p class="cTMail-content" style="line-height: 24px; margin: 6px 0px 0px; overflow-wrap: break-word; word-break: break-all;">
<span style="color: rgb(51, 51, 51); font-size: 14px;">
<br>
无法正常显示?请复制以下链接至浏览器打开:
<br>
<a href="" title="" style="color: rgb(0, 164, 255); text-decoration: none; word-break: break-all; overflow-wrap: normal; font-size: 14px;">
<span th:text="${activeUrl}">这里是激活账号的链接</span>
</a>
</span>
</p>
<!-- 来个署名 -->
<dl style="font-size: 14px; color: rgb(51, 51, 51); line-height: 18px;">
<dd style="margin: 0px 0px 6px; padding: 0px; font-size: 12px; line-height: 22px;">
<p id="cTMail-sender" style="font-size: 14px; line-height: 26px; word-wrap: break-word; word-break: break-all; margin-top: 32px;">
此致
<br>
<strong>Cloud云社区</strong>
</p>
</dd>
</dl>
</td>
<!-- 右侧表格,设置右边距用的 -->
<td style="width:3.2%;max-width:30px;"></td>
</tr>
</tbody>
</table>
</div>
<!-- 页面底部的推广 -->
<div id="cTMail-copy" style="text-align:center; font-size:12px; line-height:18px; color:#999">
<table style="width:100%;font-weight:300;margin-bottom:10px;border-collapse:collapse">
<tbody>
<tr style="font-weight:300">
<!-- 左,左边距 -->
<td style="width:3.2%;max-width:30px;"></td>
<!-- 中,正文 -->
<td style="max-width:540px;">
<p style="text-align:center; margin:20px auto 14px auto;font-size:12px;color:#999;">
此为系统邮件,请勿回复。
<!--可以加个链接-->
<!-- <a href="" style="text-decoration:none;word-break:break-all;word-wrap:normal; color: #333;" target="_blank">
取消订阅
</a> -->
</p>
<!--可以加个图片,公众号二维码之类的 -->
<p id="cTMail-rights" style="max-width: 100%; margin:auto;font-size:12px;color:#999;text-align:center;line-height:22px;">
<img border="0" src="https://oss.ppdxzz.org.cn/img/wxgzh.png"
style="width:64px; height:64px; margin:0 auto;">
<br>
关注公众号,Cloud云社区官方账号
<br>
Copyright ©2020-2021 Cloud云社区 All Rights Reserved.
</p>
</td>
<!-- 右,右边距 -->
<td style="width:3.2%;max-width:30px;"></td>
</tr>
</tbody>
</table>
</div>
</td>
<td style="width:3%;max-width:30px;"></td>
</tr>
</tbody>
</table>
</div>
</div>
</span>
<br>
</div>
</div>
</div>
</includetail>
</div>
</body>
</html>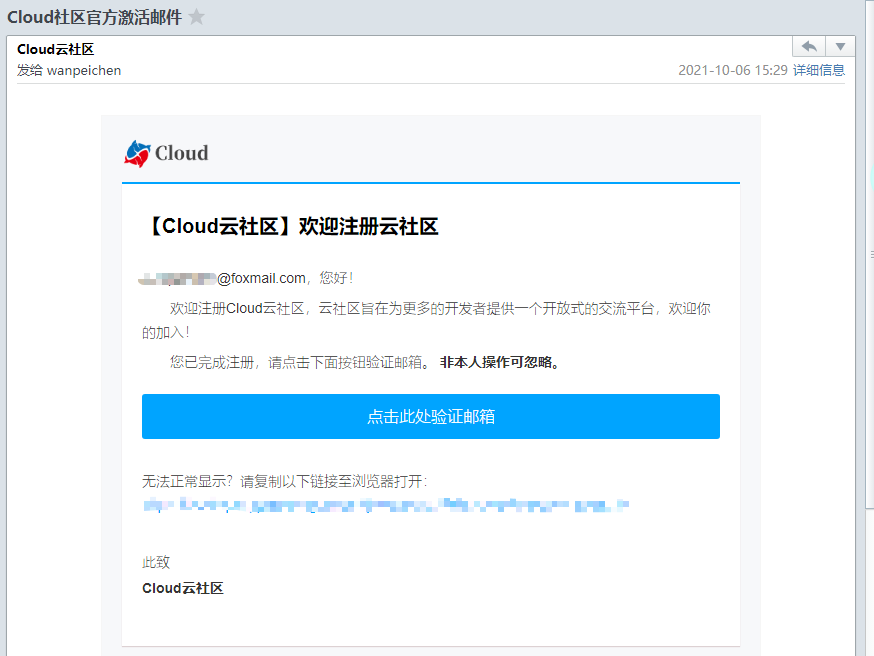
邮箱验证邮件
4.邮箱链接验证是否激活
@RequestMapping("/verifyMail/{uuid}")
public String changeUserStatus(@PathVariable String uuid) {
    if (Boolean.TRUE.equals(redisTemplate.hasKey(uuid))) {
        String email = redisTemplate.opsForValue().get(uuid);
        //邮箱激活更新账号状态为激活,没有激活时就是未激活状态
        userApiService.changeUserStatus(email, UserStateEn.ENABLE.getValue());
        redisTemplate.delete(uuid);
        return "active_success";
    } else {
        return "active_fail";
    }
}
邮箱激活提醒
结语
好啦,到这里的话,SpringBoot发送邮箱激活就已经完成了,感谢阅读与支持,一起进步,一起加油。个人能力有限,如果有不对或者有误的地方,欢迎指正。