Python虚拟环境详解
一、什么是虚拟环境
1. 什么是Python环境
要搞清楚什么是虚拟环境,首先要清楚Python的环境指的是什么。当我们在执行python test.py时,思考如下问题:
- python哪里来?这个主要归功于配置的系统环境变量
PATH,当我们在命令行中运行程序时,系统会根据PATH配置的路径列表依次查寻是否有可执行文件python(在windows中,省略了后缀.exe),当查寻到该文件时,执行该文件; 如果在所有路径列表中都查找不到,就会报报错:'python' 不是内部或外部命令,也不是可运行的程序或批处理文件。 - test.py代码中import的模块在哪里找?import的模块包含两类,一类称为标准库,随着python的安装而安装;另一类称为第三方库,使用
pip工具或者自己手动安装的包。模块的搜索路径可通过sys.path查看,主要由可执行文件python所在的位置所决定。
Python环境主要包括以下内容:
解释器
python.exeLib目录- 标准库
site-pakages目录,默认安装第三方库所在的目录
Scripts目录,包含一些执行文件- 包安装管理工具
pip.exe - 打包工具
pyinstaller.exe(需要自己安装) - …
- 包安装管理工具
其他
- 主要包括python解释器运行时需要的相关依赖文件,文档说明等
Python环境主要由运行python解释器的位置所决定。
2. 什么是虚拟环境
理解了什么是python环境,思考下为什么有虚拟环境的说法。思考以下问题:
- 有两个项目A和B,如果A和B都要用到某一模块,但版本不相同怎么办?
- 在使用pip安装包时,会发现在安装的时候会安装其它的依赖包,但当我们用pip移除一个包时,却只移除了指定的包
为了解决上面的问题,python使用了虚拟环境这个概念,你可以认为是python环境的多个副本,只是在不同的副本中安装了不同的包。既然叫虚拟环境,总得有点不一样:虚拟环境中一般不包含标准库;不包含python解释器运行时所需的依赖文件;可执行文件全部放于Scripts目录等。
3. 常用工具
知道了什么是虚拟环境,就应该清楚如何去管理虚拟环境,这就离不开虚拟环境管理工具,下面列出了一些常用的工具,并在稍后的内容中对部分工具的使用作简单的介绍。
Virtualenv
virtualenv 是非常流行的 python 虚拟环境配置工具。它不仅同时支持 python2 和 python3,而且可以为每个虚拟环境指定 python 解释器,并选择不继承基础版本的包。
venv
考虑到虚拟环境的重要性,Python 从3.3 版本开始,自带了一个虚拟环境模块venv,关于该模块的详细介绍,可参考PEP-405 。它的很多操作都和 virtualenv 类似。如果你使用的是python3.3之前版本或者是python2,则不能使用该功能,依赖需要利用virtualenv进行虚拟环境管理。
pipenv
pipenv 是Kenneth Reitz(requests的作者)大神的作品。它结合了 Pipfile,pip,和virtualenv,能够有效管理Python多个环境,各种包。并且windows视为一等公民。
Pipfile是社区拟定的依赖管理文件,用于替代过于简陋的 requirements.txt 文件。Pipfile 文件是 TOML 格式而不是 requirements.txt 这样的纯文本。
virtualenv能够很好的完成虚拟环境的搭建和python版本的管理,但是跨平台的使用不太一致,且有时候处理包之间的依赖总存在问题
pip能够很好的完成包的管理,但是仍然推荐pipenv,相当于virtualenv和pip的合体,且更加强大。
conda
支持Python、R、Java、JavaScript、C等多种开发语言的包、依赖和环境管理工具,能运行在Windows、MacOS、Linux多个平台,可以在本地轻松创建、保存、切换环境。当安装anaconda时,会自动安装conda工具。
Python Launcher for Windows
Python 从3.3版本开始,在 Windows 系统中自带了一个py.exe 启动工具。如果你是使用 Python.org 官网下载的安装包安装的 Python 3.3(或更新版本)环境,那么可以直接在命令提示符中使用这个工具(在windows中,py.exe会安装在
C:\Windows目录)。py可以打开默认的 python 提示符;py -2.7和py -3打开对应的 Python 版本,py -0将列出系统中安装了哪些版本的python
二、pipenv
pipenv创建虚拟环境后,会在工程目录生成如下两个文件:
- Pipfile:用于保存项目的python版本、依赖包等相关信息。该文件可以单独移放到其他项目内,用于项目虚拟环境的建立和依赖包的安装
- Pipfile.lock:用于对Pipfile的锁定
1. 安装pipenv
pipinstall pipenv -i https://pypi.tuna.tsinghua.edu.cn/simple-i选项指定库的安装源,安装源要满足PEP 503的描述,国内常用的源:
- 清华大学:https://pypi.tuna.tsinghua.edu.cn/simple
- 中国科学技术大学 : https://pypi.mirrors.ustc.edu.cn/simple
- 豆瓣:http://pypi.douban.com/simple/
- 阿里:https://mirrors.aliyun.com/pypi/simple/
2. 命令概览
学习使用工具/命令的万能大法 – 查看帮助信息。
pipenv -hUsage: pipenv [OPTIONS] COMMAND [ARGS]...
Options:
--where Output project home information.
--venv Output virtualenv information.
--py Output Python interpreter information.
--envs Output Environment Variable options.
--rm Remove the virtualenv.
--bare Minimal output.
--man Display manpage.
--support Output diagnostic information for use in
GitHub issues.
--site-packages / --no-site-packages
Enable site-packages for the virtualenv.
[env var: PIPENV_SITE_PACKAGES]
--python TEXT Specify which version of Python virtualenv
should use.
--three / --two Use Python 3/2 when creating virtualenv.
--clear Clears caches (pipenv, pip). [env var:
PIPENV_CLEAR]
-v, --verbose Verbose mode.
--pypi-mirror TEXT Specify a PyPI mirror.
--version Show the version and exit.
-h, --help Show this message and exit.
Usage Examples:
Create a new project using Python 3.7, specifically:
$ pipenv --python 3.7
Remove project virtualenv (inferred from current directory):
$ pipenv --rm
Install all dependencies for a project (including dev):
$ pipenv install --dev
Create a lockfile containing pre-releases:
$ pipenv lock --pre
Show a graph of your installed dependencies:
$ pipenv graph
Check your installed dependencies for security vulnerabilities:
$ pipenv check
Install a local setup.py into your virtual environment/Pipfile:
$ pipenv install -e .
Use a lower-level pip command:
$ pipenv run pip freeze
Commands:
check Checks for PyUp Safety security vulnerabilities and against PEP
508 markers provided in Pipfile.
clean Uninstalls all packages not specified in Pipfile.lock.
graph Displays currently-installed dependency graph information.
install Installs provided packages and adds them to Pipfile, or (if no
packages are given), installs all packages from Pipfile.
lock Generates Pipfile.lock.
open View a given module in your editor.
run Spawns a command installed into the virtualenv.
scripts Lists scripts in current environment config.
shell Spawns a shell within the virtualenv.
sync Installs all packages specified in Pipfile.lock.
uninstall Uninstalls a provided package and removes it from Pipfile.
update Runs lock, then sync.3. pipenv基本使用
1)创建虚拟环境
创建工程目录,并进入工程目录
mkdirtestcdtest创建虚拟环境
pipenvinstall`--python3.8`
如果在该工程不录中没有Pipfile文件,则会自动创建Pipfile和Pipfile.lock两个文件;如果该工程目录中有Pipfile,将安装Pipfile列出的相应依赖包,安装完成后生成Pipfile.lock
可以使用如下参数来定义环境:
--python 3.8将指定该虚拟环境的python使用3.8的最新版本,有以下两种情况
- 如果系统已经安装了python3.8,则使用系统已经安装的python3.8版本
- 如果系统中没有python3.8版本
- 如果已经安装pyenv或者asdf,会提示是否需要使用pyenv或者asdf安装对应版本的python
- 如果没有安装pyenv和asdf,则创建环境失败
- 此外,–python后面跟的参数可以不是版本号,而是安装的python解释器的路径
--three/--two使用 Python 3或者2创建虚拟环境--pypi-mirror指定安装源--site-packages/--no-site-packages是否使用python基础环境中的site-packages路径
查看虚拟环境相关信息
#查看工程根目录信息
 pipenv --where#查看当前虚拟环境的信息
 pipenv --venv#查看python解释器的信息
 pipenv --py#查看环境变量选项
 pipenv --envs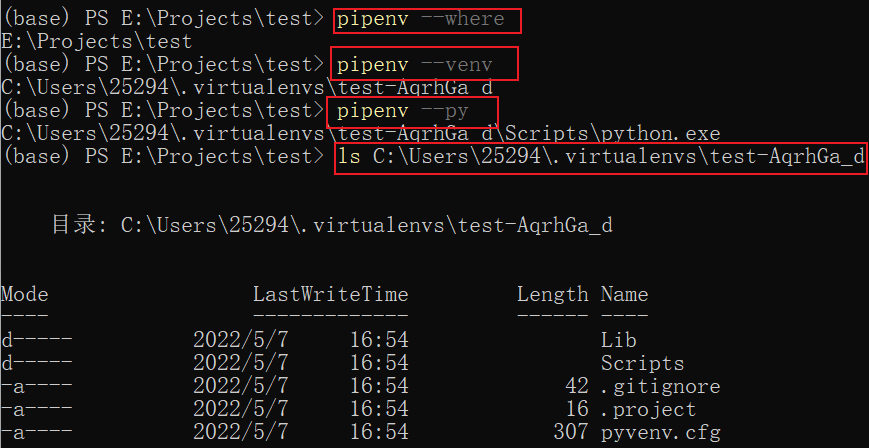
观察虚拟环境目录的文件
pyvenv.cfg
home = d:\programdata\anaconda3
implementation = CPython
version_info = 3.8.5.final.0
virtualenv = 20.10.0
include-system-site-packages = false
base-prefix = d:\programdata\anaconda3
base-exec-prefix = d:\programdata\anaconda3
base-executable = d:\programdata\anaconda3\python.exe
prompt = (test)
这是虚拟环境的配置文件,包含了python环境的相关信息。
.project
E:\Projects\test指定了该虚拟环境对应的工程目录
2)激活虚拟环境
pipenv shell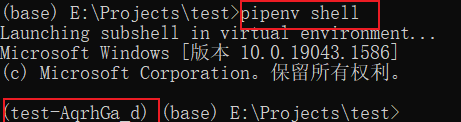
注意:
- 在激活虚拟环境时,如果在windows上使用powershell,可能在命令行的前面不能显示虚拟环境的名称,比如显示如下信息,但不影响正常使用
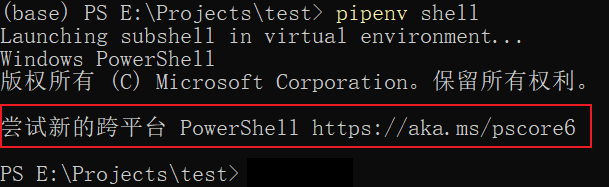
- 进入工程目录后,如果直接使用上面的命令激活虚拟环境,而不是使用
pipenv install创建虚拟环境,这时pipenv会自动创建相应的虚拟环境。
3)虚拟环境包的管理
包的安装
pipenvinstall -hUsage: pipenv install [OPTIONS] [PACKAGES]...
Installs provided packages and adds them to Pipfile, or (if no packages are
given), installs all packages from Pipfile.
Options:
--system System pip management. [env var:
PIPENV_SYSTEM]
-c, --code TEXT Install packages automatically discovered
from import statements.
--deploy Abort if the Pipfile.lock is out-of-date, or
Python version is wrong.
--site-packages / --no-site-packages
Enable site-packages for the virtualenv.
[env var: PIPENV_SITE_PACKAGES]
--skip-lock Skip locking mechanisms and use the Pipfile
instead during operation. [env var:
PIPENV_SKIP_LOCK]
-e, --editable TEXT An editable Python package URL or path,
often to a VCS repository.
--ignore-pipfile Ignore Pipfile when installing, using the
Pipfile.lock. [env var:
PIPENV_IGNORE_PIPFILE]
--selective-upgrade Update specified packages.
-r, --requirements TEXT Import a requirements.txt file.
--extra-index-url TEXT URLs to the extra PyPI compatible indexes to
query for package look-ups.
-i, --index TEXT Target PyPI-compatible package index url.
--sequential Install dependencies one-at-a-time, instead
of concurrently. [env var:
PIPENV_SEQUENTIAL]
-d, --dev Install both develop and default packages
[env var: PIPENV_DEV]
--keep-outdated Keep out-dated dependencies from being
updated in Pipfile.lock. [env var:
PIPENV_KEEP_OUTDATED]
--pre Allow pre-releases.
--python TEXT Specify which version of Python virtualenv
should use.
--three / --two Use Python 3/2 when creating virtualenv.
--clear Clears caches (pipenv, pip). [env var:
PIPENV_CLEAR]
-v, --verbose Verbose mode.
--pypi-mirror TEXT Specify a PyPI mirror.
-h, --help Show this message and exit.常用参数示例:
#使用清华源安装numpy包
pipenvinstall numpy -i https://pypi.tuna.tsinghua.edu.cn/simple#如果有requirements.txt文件,可以使用下面命令安装requirements.txt列出的包
pipenvinstall -r path/to/requirements.txt#安装指定版本的numpy
pipenvinstall numpy~=1.22.3#等价于 numpy==1.22.3#注意,包的版本号可以使用~=、==、>=、 <=、 >、 <、 != 等方式来限制#在pipenv中,提倡使用 ~= 标识符而不是 == 标识符,因为后者会阻止 pipenv 更新包
思考:在虚拟环境中,使用pip和pipenv都可以安装包,区别在哪里?
使用pipenv安装的包会将相关信息写入Pipfile和Pipfile.lock,而使用pip安装包后,只在虚拟环境的site-packages目录安装了相应包,而不会将信息写入Pipfile和Pipfile.lock
查看虚拟环境中安装的包信息
pipenv graph包的删除
pipenv uninstall numpy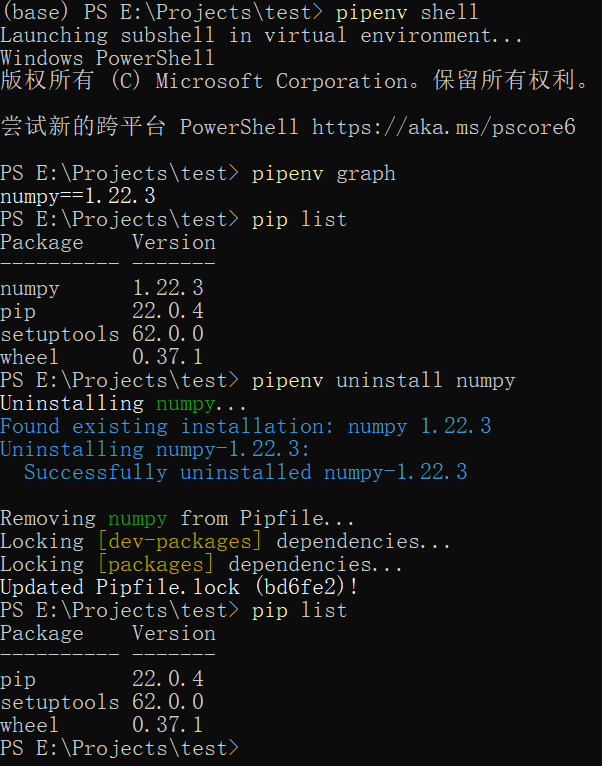
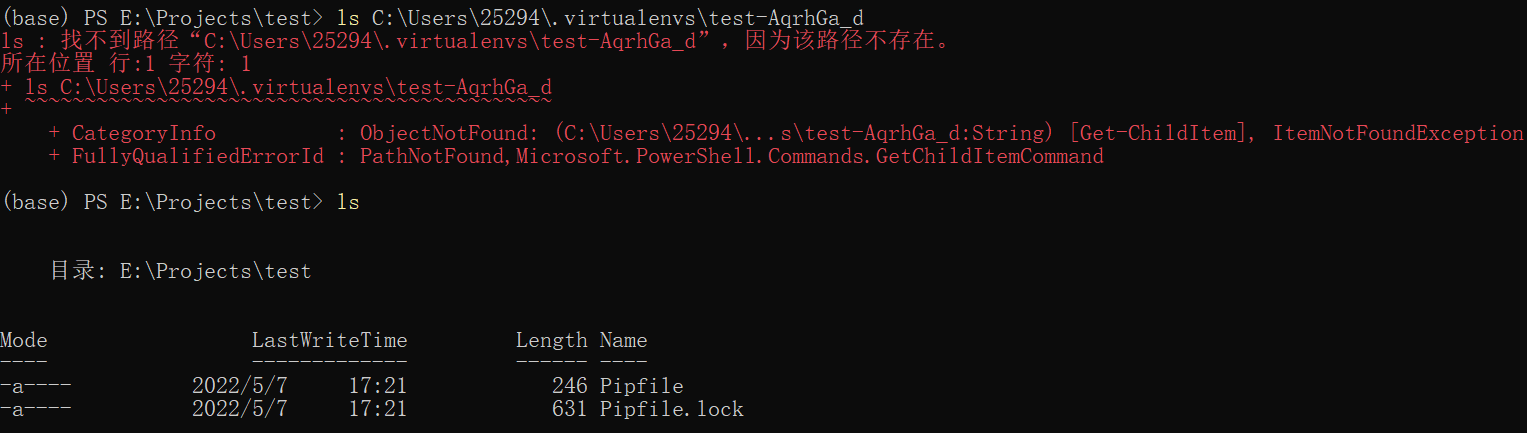
注意,如果没有激活虚拟环境,即没有运行
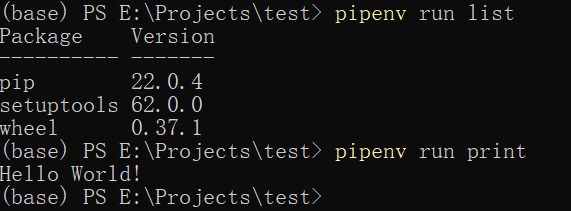
pipenv shell,若想使用pip list查看虚拟环境中所安装的包时,可以使用pipenv run pip list
4)退出虚拟环境
exit5)删除虚拟环境
pipenv --rm
当退出虚拟环境,删除虚拟环境后,对应的虚拟环境目录会删除掉,但工程目录下的Pipfile.lock和Pipfile两个文件依然存在。
6)其他
如果已经删除了虚拟环境,可以使用pipenv --python 3.8 install重新创建虚拟环境以完成下面的示例。
需要共享项目环境时,共享Pipfile文件即可
想要在虚拟环境中执行脚本,比如执行main.py文件,可以使用命令
pipenv run python main.py可以在Pipfile文件中自定义命令,比如在Pipfile末尾添加如下内容,则添加了两个自定义命令
print和list,分别打印Hello World!和列出虚拟环境中所装的包:[scripts] print = "python -c \"print('Hello World!')\"" list = "pip list"则可以使用如下方式运行代码
其他
pipenv lock#生成Pipfile.lock.
pipenvsync#安装Pipfile.lock文件中指定的所有包
pipenv update#等价于先lock, 后 sync.
4. 虚拟环境的本质
虚拟环境的本质就是修改了sys.path的值,下面分别查看在虚拟环境和不在虚拟环境中的sys.path值
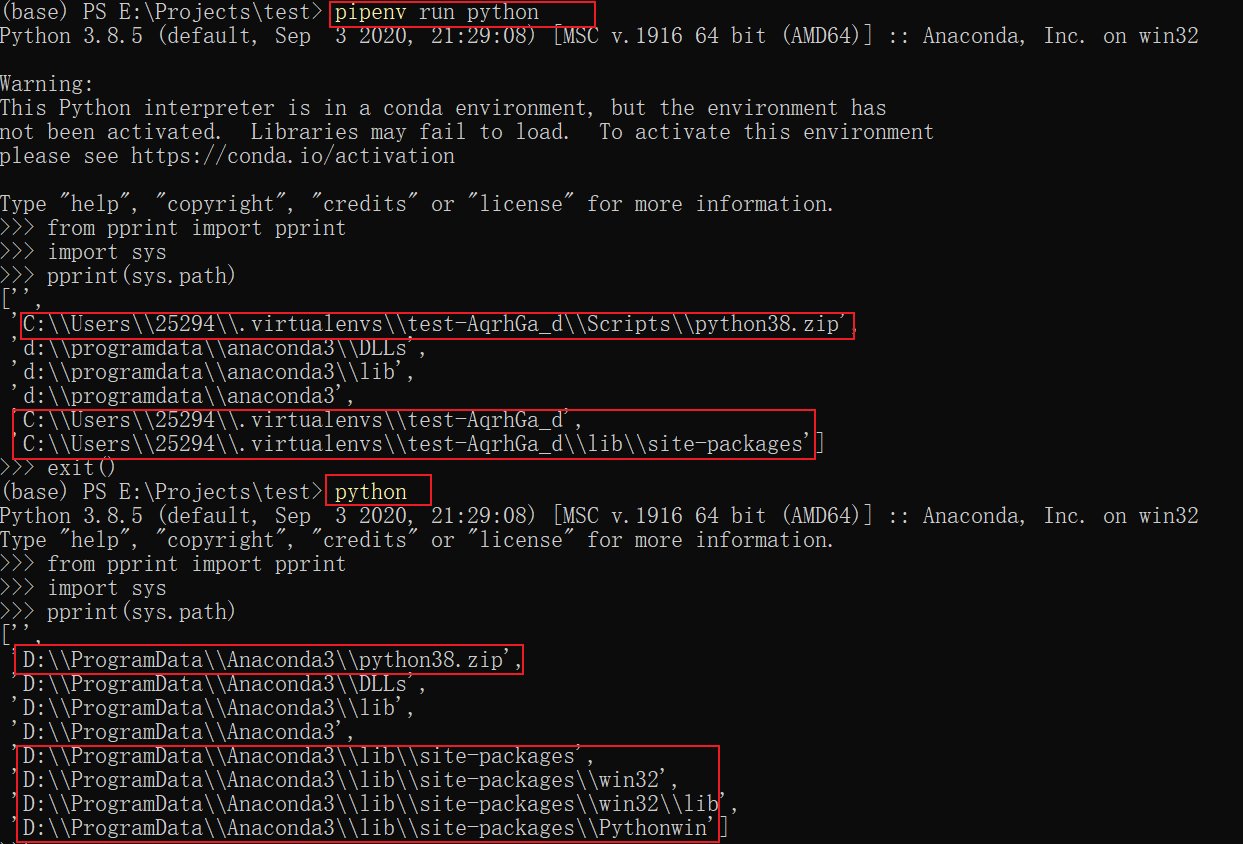
在主要的区别在于第三方包的路径时,一个用的是虚拟环境的site-packages,而另一个是使用的python环境中的site-packages。
三、venv
Python 从3.3 版本开始,自带了一个虚拟环境模块venv,关于该模块的详细介绍,可参考PEP-405 和。
1. 命令概览
查看venv帮助信息:
python -m venv -husage: venv [-h] [--system-site-packages] [--symlinks | --copies] [--clear] [--upgrade] [--without-pip] [--prompt PROMPT] ENV_DIR [ENV_DIR ...]
Creates virtual Python environments in one or more target directories.
positional arguments:
ENV_DIR A directory to create the environment in.
optional arguments:
-h, --help show this help message and exit
--system-site-packages
Give the virtual environment access to the system site-packages dir.
--symlinks Try to use symlinks rather than copies, when symlinks are not the default for the platform.
--copies Try to use copies rather than symlinks, even when symlinks are the default for the platform.
--clear Delete the contents of the environment directory if it already exists, before environment creation.
--upgrade Upgrade the environment directory to use this version of Python, assuming Python has been upgraded in-place.
--without-pip Skips installing or upgrading pip in the virtual environment (pip is bootstrapped by default)
--prompt PROMPT Provides an alternative prompt prefix for this environment.
Once an environment has been created, you may wish to activate it, e.g. by sourcing an activate script in its bin directory.2. 创建虚拟环境
python -m venv venv_demo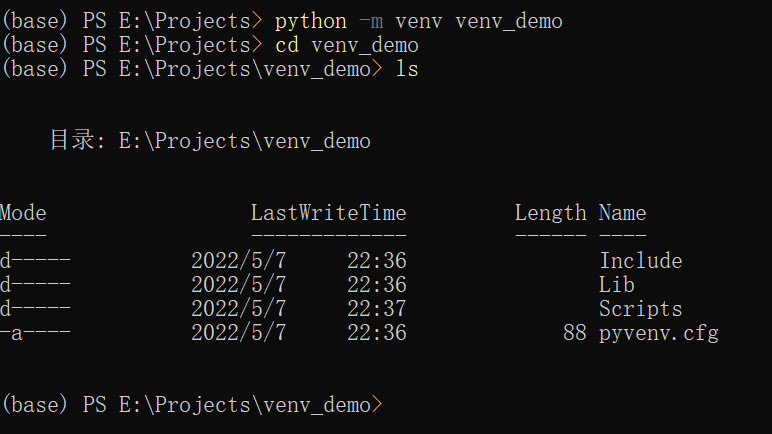
这里使用得最多的两个选项为:
- ·
--system-site-packages:是否包含Python系统的site-packages,添加这个选项后,会在sys.path的末尾添加上系统的site-packages相关目录。不添加这个选项时,将不会包含系统的site-packages--without-pip:虚拟环境中是否包含pip.exe
3. 虚拟环境的激活
在虚拟环境的Scripts目录中有两个脚本文本activate.bat和deactivate.bat,分别用于激活虚拟环境和退出虚拟环境。
注意:
- 在pipenv创建的虚拟环境中同样有这两个脚本文件
- activate文件有多个版本,当在windows系统时,如果用CMD时,使用activate.bat;如果用PowerShell时使用activate.psl
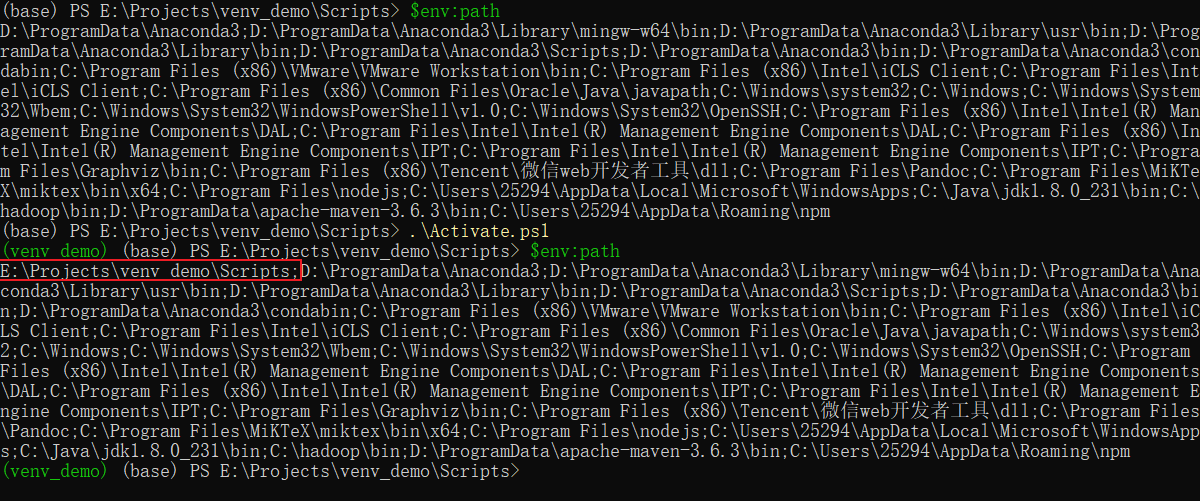
当我们激活虚拟环境后,系统的PATH路径的最前面添加了虚拟环境的Scripts目录,该目录下包含了pip.exe和python.exe。可以得到如下结论:
- 如果不激活虚拟环境,直接运行虚拟环境的Scripts目录下的python.exe,则此时的交互环境也将是在此虚拟环境下
- 如果不激活虚拟环境,直接运行虚拟环境的Scripts目录下的pip.exe进行包的安装,则安装的包同样安装在虚拟环境中
注意,这里使用的PowerShell,所以查看path环境变量时使用的
$env:path,如果是CMD,查看环境变量可以使用echo %PATH%
4. 虚拟环境包的管理
使用pip工具进行虚拟环境中包的管理,有两种方式
- 第一种方式,使用虚拟环境中的activate激活虚拟环境
- 第二种方式,不激活虚拟环境,但是运行的Pip指定为虚拟环境中Scripts目录下的pip.exe
pip命令的基本使用将在文末介绍。
四、conda
conda支持Python、R、Java、JavaScript、C等多种开发语言的包、依赖和环境管理工具,能运行在Windows、MacOS、Linux多个平台,可以在本地轻松创建、保存、切换环境。当安装anaconda时,会自动安装conda工具。
conda与pipenv,venv等虚拟环境管理工具的最大的不同在于:conda虚拟环境是独立于操作系统解释器环境的,即无论操作系统解释器什么版本(哪怕2.7),我也可以指定虚拟环境python版本为3.6,而venv是依赖主环境的。
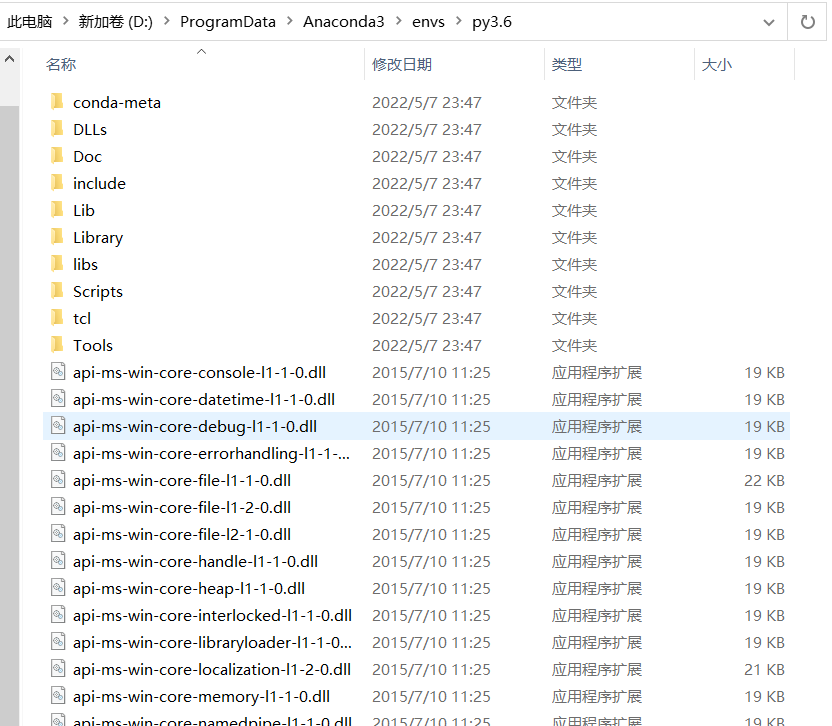
1. 创建虚拟环境
conda create --name py3.6python=3.6创建好虚拟环境后,你会发现虚拟环境py3.6的内容与一个实体python环境是一样的。所以,conda的环境管理更像是实体环境的一个拷贝,而不像是一个虚拟环境
2. 环境的激活和退出
conda activate py3.6
conda deactivate
3. 包的管理
#安装numpy模块
condainstall numpy#查看已安装的模块
conda list#搜索模块信息
conda search numpy#删除模块
conda remove numpy#更新模块
conda update numpy#更新全部模块:
conda update --all#更新conda
conda update conda#更新python
conda update python
使用conda安装包往往很慢,需要设置conda的国内源,具体做法如下:
生成.condarc配置文件
conda config --set show_channel_urlsyes修改.condarc
channels:
 - https://mirrors.tuna.tsinghua.edu.cn/anaconda/pkgs/main
 - https://mirrors.tuna.tsinghua.edu.cn/anaconda/pkgs/r
 - https://mirrors.tuna.tsinghua.edu.cn/anaconda/pkgs/msys2
 - https://mirrors.tuna.tsinghua.edu.cn/anaconda/pkgs/free
 - https://mirrors.tuna.tsinghua.edu.cn/anaconda/pkgs/pro
 - https://mirrors.tuna.tsinghua.edu.cn/anaconda/cloud/conda-forge
 - https://mirrors.tuna.tsinghua.edu.cn/anaconda/cloud/msys2
 - https://mirrors.tuna.tsinghua.edu.cn/anaconda/cloud/bioconda
 - https://mirrors.tuna.tsinghua.edu.cn/anaconda/cloud/menpo
 - https://mirrors.tuna.tsinghua.edu.cn/anaconda/cloud/pytorch
 - https://mirrors.tuna.tsinghua.edu.cn/anaconda/cloud/simpleitk
 - defaults
show_channel_urls: true
ssl_verify: true
也可以使用如下命令添加源
conda config --add channels'https://mirrors.tuna.tsinghua.edu.cn/anaconda/pkgs/free/'查看设置的源
conda --show channels也可以使用
conda info查看基本信息
4. 环境的删除
conda remove --name py3.6 --all5. 查看所有环境
condaenv listps1:pip基本使用
查看帮助:
pip -hUsage:
pip <command> [options]
Commands:
install Install packages.
download Download packages.
uninstall Uninstall packages.
freeze Output installed packages in requirements format.
list List installed packages.
show Show information about installed packages.
check Verify installed packages have compatible dependencies.
config Manage local and global configuration.
search Search PyPI for packages.
cache Inspect and manage pip's wheel cache.
wheel Build wheels from your requirements.
hash Compute hashes of package archives.
completion A helper command used for command completion.
debug Show information useful for debugging.
help Show help for commands.
General Options:
-h, --help Show help.
--isolated Run pip in an isolated mode, ignoring environment variables and user configuration.
-v, --verbose Give more output. Option is additive, and can be used up to 3 times.
-V, --version Show version and exit.
-q, --quiet Give less output. Option is additive, and can be used up to 3 times (corresponding to
WARNING, ERROR, and CRITICAL logging levels).
--log <path> Path to a verbose appending log.
--no-input Disable prompting for input.
--proxy <proxy> Specify a proxy in the form [user:passwd@]proxy.server:port.
--retries <retries> Maximum number of retries each connection should attempt (default 5 times).
--timeout <sec> Set the socket timeout (default 15 seconds).
--exists-action <action> Default action when a path already exists: (s)witch, (i)gnore, (w)ipe, (b)ackup,
(a)bort.
--trusted-host <hostname> Mark this host or host:port pair as trusted, even though it does not have valid or any
HTTPS.
--cert <path> Path to alternate CA bundle.
--client-cert <path> Path to SSL client certificate, a single file containing the private key and the
certificate in PEM format.
--cache-dir <dir> Store the cache data in <dir>.
--no-cache-dir Disable the cache.
--disable-pip-version-check
Don't periodically check PyPI to determine whether a new version of pip is available for
download. Implied with --no-index.
--no-color Suppress colored output
--no-python-version-warning
Silence deprecation warnings for upcoming unsupported Pythons.
--use-feature <feature> Enable new functionality, that may be backward incompatible.
--use-deprecated <feature> Enable deprecated functionality, that will be removed in the future.1. 安装
1)安装requirements.txt文件列出的包
pipinstall -r requriements.txt2)安装指定包
pipinstall numpy3)安装whl文件
pipinstall wheel
pipinstall xxxx.whl
常用参数主要包括:
-i <url>或者--index-url <url>:指定安装源,通常设为国内源会更快
2. 更新
pipinstall --upgrade 包名称如果要指定升级到某个版本,可以使用
pip install --upgrade 包名称==版本号注意:不要使用
pip install --upgrade pip更新pip自身,否则会在更新pip的时候删除掉pip,然后出现No module named 'pip’的情况 ,可运行如下命令安装pip:python -m ensurepip如果要更新pip自身,可以使用如下命令:
python -m pipinstall --upgrade pip
3. 删除
删除指定的包
pip uninstall 包名删除requriements.txt文件中列出的包
pip uninstall -r requriements.txt4. 查看
列出安装的所有包:
pip list查看某一个包的具体信息
pip show 包名5. 导出安装包列表
pip freeze> requirements.txt导出pip所在环境中所安装的所有包,将其输出到requirements.txt文件中
ps2:如何在pycharm使用虚拟环境
在创建pycharm工程时,记得指定python解释器为虚拟环境中Scripts目录下的python.exe即可