本文主要介绍@ComponentScan注解的使用以及spring boot如何通过该注解来进行自动装配。代码基于spring的5.1.2.RELEASE和spring boot 2.1.0.RELEASE分析,本文演示代码地址:https://github.com/amapleleaf/springboot-code.git
1.@ComponentScan注解作用
@ComponentScan用于类或接口上主要是指定扫描路径,spring会把指定路径下带有指定注解的类自动装配到bean容器里。会被自动装配的注解包括@Controller、@Service、@Component、@Repository等等。其作用等同于<context:component-scan base-package="com.maple.learn" />配置
2.@ComponentScan使用
常用属性如下:
- basePackages、value:指定扫描路径,如果为空则以@ComponentScan注解的类所在的包为基本的扫描路径
- basePackageClasses:指定具体扫描的类
- includeFilters:指定满足Filter条件的类
- excludeFilters:指定排除Filter条件的类
includeFilters和excludeFilters 的FilterType可选:ANNOTATION=注解类型 默认、ASSIGNABLE_TYPE(指定固定类)、ASPECTJ(ASPECTJ类型)、REGEX(正则表达式)、CUSTOM(自定义类型),自定义的Filter需要实现TypeFilter接口
@ComponentScan的常见的配置如下:
@ComponentScan(value="com.maple.learn",
   excludeFilters = {@ComponentScan.Filter(type = FilterType.CUSTOM, classes = TypeExcludeFilter.class)},
   includeFilters = {@ComponentScan.Filter(type=FilterType.ANNOTATION,classes={Controller.class})}
        )
public class SampleClass{
   ……
}
3.spring boot处理@ComponentScan源码分析
spring创建bean对象的基本流程是先创建对应的BeanDefinition对象,然后在基于BeanDefinition对象来创建bean对象,spring boot也是如此,只不过通过注解创建BeanDefinition对象的时机和解析方式不同而已。spring boot是通过ConfigurationClassPostProcessor这个BeanFactoryPostProcessor类来处理。
本演示的demo涉及到5个演示类:SpringbootCodeMain为启动类带有@SpringBootApplication注解,SampleAction类带有@RestController注解,ServcieConfigure类带有@Configuration注解且有通过@Bean注解来创建PeopleService的方法,PeopleService无任何注解,本文的最后会贴出所有代码。 先从启动类为入口,spring boot启动类如下:
@SpringBootApplication
public class SpringbootCodeMain {
    public static void main(String[] args) {
        SpringApplication.run(SpringbootCodeMain.class, args);
    }
}
从SpringApplication.run(SpringbootCodeMain.class, args)一路断点到核心方法SpringApplication.ConfigurableApplicationContext run(String... args)方法
public ConfigurableApplicationContext run(String... args) {
……
ApplicationArguments applicationArguments = new DefaultApplicationArguments(args);
ConfigurableEnvironment environment = this.prepareEnvironment(listeners, applicationArguments);
this.configureIgnoreBeanInfo(environment);
Banner printedBanner = this.printBanner(environment);
//重点方法一,本法实现的重点功能:
//1、本demo是web工程,springboot通过反射创建上下文context:AnnotationConfigServletWebServerApplicationContext 类
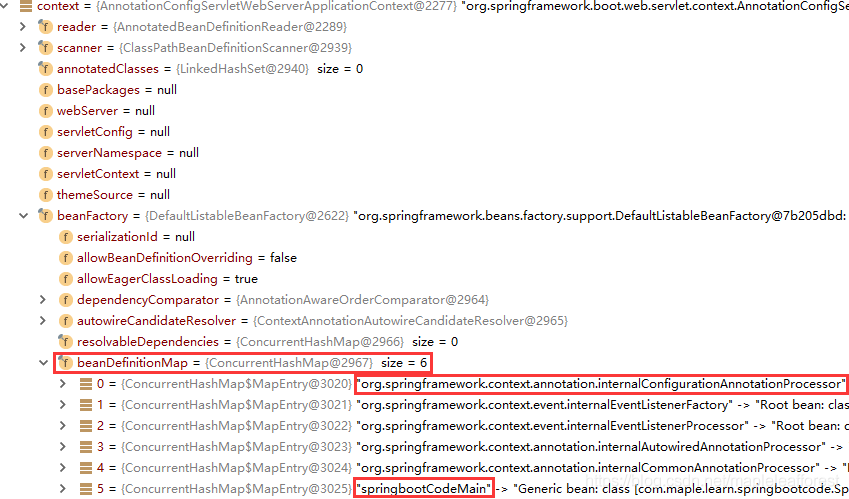
//2、在构建context的无参构造方法中构建成员变量reader=new AnnotatedBeanDefinitionReader(this),在AnnotatedBeanDefinitionReader的无参构造方法中会beanFactory对象,并向beanFactory中注册5个BeanDefinition对象,重点关注ConfigurationClassPostProcessor。
context = this.createApplicationContext();
exceptionReporters = this.getSpringFactoriesInstances(SpringBootExceptionReporter.class, new Class[]{ConfigurableApplicationContext.class}, context);
//重点方法二,本法实现的重点功能:
1、本方法会构建启动类SpringbootCodeMain对应的BeanDefinition对象,并注册到beanFactory中,此时的context对象可见下图
this.prepareContext(context, environment, listeners, applicationArguments, printedBanner);
//重点方法三,该方法实际调用applicationContext的refresh方法,代码分析详见我的另一篇博客《spring初始化源码浅析之代码浅析》,本文后面只会分析ConfigurationClassPostProcessor对象的创建和postProcessBeanDefinitionRegistry方法的执行
this.refreshContext(context);
this.afterRefresh(context, applicationArguments);
……
} catch (Throwable var10) {
……
}
……
}
this.prepareContext(context, environment, listeners, applicationArguments, printedBanner);代码执行后的截图如下:

ConfigurationClassPostProcessor实现BeanFactoryPostProcessor,关于BeanFactoryPostProcessor扩展接口的作用在《spring初始化源码浅析之关键类和扩展接口》一文中有详细介绍。
ConfigurationClassPostProcessor对象的创建和方法执行的断点如下:
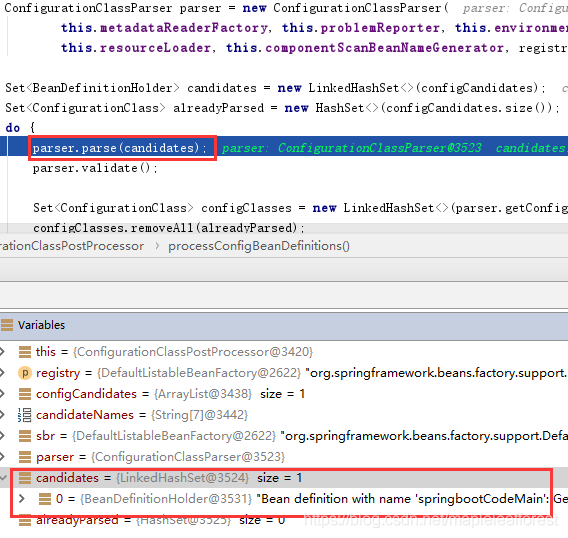
this.refreshContext(context);--> AbstractApplicationContext.refresh() --> invokeBeanFactoryPostProcessors() -->PostProcessorRegistrationDelegate.invokeBeanFactoryPostProcessors()->invokeBeanDefinitionRegistryPostProcessors()
下面重点看ConfigurationClassPostProcessor类的postProcessBeanDefinitionRegistry()方法如何处理@ComponentScan注解:

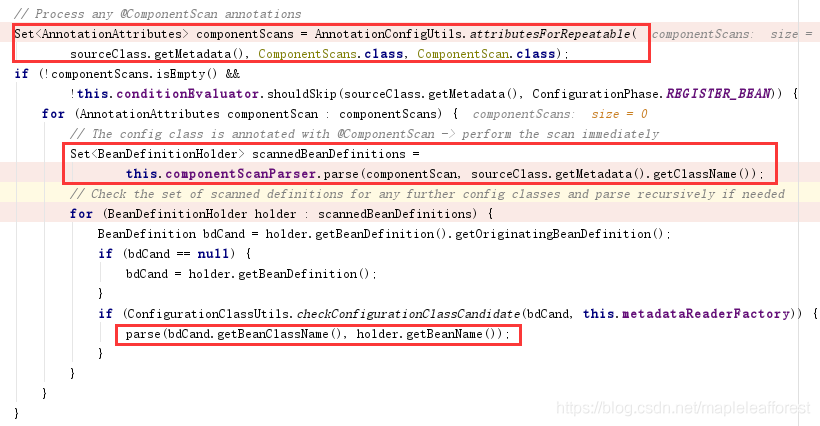
同过源代码发现最终是由ConfigurationClassParser的解析类来处理,继续查看ConfigurationClassParser.doProcessConfigurationClass方法:
原来在这里对@ComponentScan注解做了判断,上面一段代码做了核心的几件事:
1、扫描@ComponentScan注解包下面的所有的可自动装备类,生成BeanDefinition对象,并注册到beanFactory对象中
2、通过DeferredImportSelectorHandler处理@EnableAutoConfiguration注解,后续会有专文介绍
3、将带有@Configuration 注解的类解析成ConfigurationClass对象并缓存,后面创建@Bean注解的Bean对象所对应的BeanDefinition时会用到
到此为止serviceConfigure和sampleAction对应的BeanDefinition已创建完毕,如下图:
peopleService已有@Bean注解,为哈还是没有注册对应的BeanDefinition对象?后面会在讲解@EnableAutoConfiguration注解的文章中详细说明