文章目录
SpringCloud Config Server
官方参考文档 : https://cloud.spring.io/spring-cloud-config/reference/html/
demo: JavaAdvancedTrain/springcloud-config/**
按照下面的步骤一次接入相关组件
SpringCloud-Config配置Maven引用
服务端pom.xml
<dependency><groupId>org.springframework.cloud</groupId><artifactId>spring-cloud-config-server</artifactId><exclusions><exclusion><groupId>org.bouncycastle</groupId><artifactId>bcprov-jdk15on</artifactId></exclusion><exclusion><groupId>org.bouncycastle</groupId><artifactId>bcpkix-jdk15on</artifactId></exclusion></exclusions></dependency>如果是SpringBoot环境加入**@EnableConfigServer**注解
客户端pom.xml
<dependency><groupId>org.springframework.cloud</groupId><artifactId>spring-cloud-starter-config</artifactId><exclusions><exclusion><groupId>org.bouncycastle<]/groupId><artifactId>bcprov-jdk15on</artifactId></exclusion><exclusion><groupId>org.bouncycastle</groupId><artifactId>bcpkix-jdk15on</artifactId></exclusion></exclusions></dependency>SpringCloud-Config配置方式
SpringCloud-config配置方式有三种:
- git
- svn
- native
可以使用compose三种同时使用,根据优先级进行覆盖,或者单独配置
native
服务端
application.yaml文件
server:port:8888spring:application:name: config-server# 如果添加了devtools,需要按照这个处理 Devtools property defaults active! Set 'spring.devtools.add-properties' to 'false' to disable# 不使用默认属性devtools:add-properties:falseprofiles:#active: nativeactive: compositecloud:config:## You can change the priority of all overrides in the client to be more like default values, letting applications supply their own values in environment variables or System propertieoverrideNone:trueserver:composite:-type: native# target目录下的文件search-locations: classpath:/conf/# 本地磁盘配置#search-locations: D:/temp/springcloud-config-native/conf/bootstrap:trueconf/config-info-dev.yaml 文件
testnihao: testNo55555客户端
bootstrap.yaml
server:port:8082spring:application:name: config-clientprofiles:active: devcloud:config:enabled:true#如果连接不上获取配置有问题,快速响应失败fail-fast:truerequest-read-timeout:10000request-connect-timeout:10000uri: http://localhost:8888/name: config-infoprofile: dev# 本地多了一层文件夹 : 根目录/demo/config-info-dev.yamllabel: demo# 重试retry:#下一间隔时间的乘数,默认是 1.1multiplier:1.1#默认重试的间隔时间,默认 1000msinitial-interval:1000#最大重试次数,默认 6 次max-attempts:6#最大间隔时间,最大 2000msmax-interval:2000URL与配置文件的映射关系
/{application}/{profile}[/{label}]
/{application}-{profile}.yml
/{label}/{application}-{profile}.yml
/{application}-{profile}.properties
/{label}/{application}-{profile}.propertiesgit方式
服务端
application.yaml文件
server:port:8888spring:application:name: config-server# 如果添加了devtools,需要按照这个处理 Devtools property defaults active! Set 'spring.devtools.add-properties' to 'false' to disable# 不使用默认属性devtools:add-properties:falsecloud:config:## You can change the priority of all overrides in the client to be more like default values, letting applications supply their own values in environment variables or System propertieoverrideNone:trueserver:bootstrap:truegit:basedir: C:\temp\springcloud-configuri: https://gitee.com/nydia/spring-cloud-config-repo.gitsearch-paths: confusername:*******password:**********conf/config-info-dev.yaml 文件
testnihao: testNo55555客户端
bootstrap.yaml
server:port:8082spring:application:name: config-clientprofiles:active: devcloud:config:enabled:true#如果连接不上获取配置有问题,快速响应失败fail-fast:truerequest-read-timeout:10000request-connect-timeout:10000uri: http://localhost:8888/name: config-infoprofile: dev# git仓库的branchlabel: master# 重试retry:#下一间隔时间的乘数,默认是 1.1multiplier:1.1#默认重试的间隔时间,默认 1000msinitial-interval:1000#最大重试次数,默认 6 次max-attempts:6#最大间隔时间,最大 2000msmax-interval:2000URL与配置文件的映射关系
/{application}/{profile}[/{label}]
/{application}-{profile}.yml
/{label}/{application}-{profile}.yml
/{application}-{profile}.properties
/{label}/{application}-{profile}.propertiessvn方式
svn方式同git方式,目前使用较少,暂不做介绍
compose结合native,git,svn
服务端
application.yaml文件
server:port:8888spring:application:name: config-server# 如果添加了devtools,需要按照这个处理 Devtools property defaults active! Set 'spring.devtools.add-properties' to 'false' to disable# 不使用默认属性devtools:add-properties:falseprofiles:#active: nativeactive: compositecloud:config:## You can change the priority of all overrides in the client to be more like default values, letting applications supply their own values in environment variables or System propertieoverrideNone:trueserver:composite:# 根据优先级,自上而下覆盖-type: native# target目录下的文件search-locations: classpath:/conf/# 本地磁盘配置#search-locations: D:/temp/springcloud-config-native/conf/-type: gituri: file:///path/to/rex/git/repo-type: svnuri: file:///path/to/svn/repobootstrap:trueconf/config-info-dev.yaml 文件
testnihao: testNo55555客户端
bootstrap.yaml
server:port:8082spring:application:name: config-clientprofiles:active: devcloud:config:enabled:true#如果连接不上获取配置有问题,快速响应失败fail-fast:truerequest-read-timeout:10000request-connect-timeout:10000uri: http://localhost:8888/name: config-infoprofile: dev# 本地多了一层文件夹 : 根目录/demo/config-info-dev.yamllabel: demo# 重试retry:#下一间隔时间的乘数,默认是 1.1multiplier:1.1#默认重试的间隔时间,默认 1000msinitial-interval:1000#最大重试次数,默认 6 次max-attempts:6#最大间隔时间,最大 2000msmax-interval:2000URL与配置文件的映射关系
/{application}/{profile}[/{label}]
/{application}-{profile}.yml
/{label}/{application}-{profile}.yml
/{application}-{profile}.properties
/{label}/{application}-{profile}.properties刷新配置
环境的配置默认是不会自动刷新到程序中的,可使用的刷新方式:
1) 、服务器重启
2)、actuator方式手动刷新
3)、集成消息总线(spring-cloud-bus)自动刷新 / WebHooks
手动刷新和自动刷新都不需要重启服务器,在公司使用中不建议自动刷新,因为对性能不是很好,还是 建议使用手动刷新。(但是自动刷新怕配置是有必要性的)
自动刷新配置的途径:
1、WebHooks动态刷新(git仓库里面调用刷新接口)
2、spring-cloud-bus消息总线动态刷新
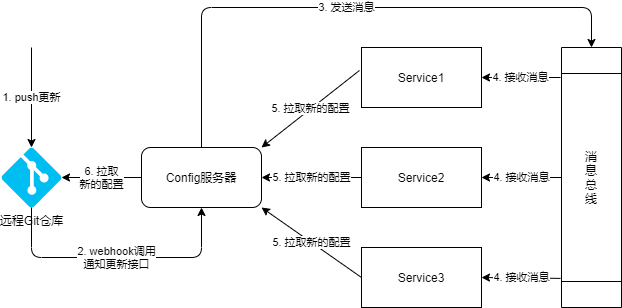
spring-cloud-bus动态刷新
springcloud-bus消息总线 + springcloud actuator组件 + rabbitmq 实现动态刷新,可以调用config配置中心的刷新接口(…/actuator/refresh)刷新配置中心后发送mq消息,所有的client端接受到刷新消息会同步更新所有的配置,好处是不用调用每个client的刷新接口刷新配置。
坏处是原来如果没有用rabbitmq那单独为了刷新消息去搞个消息中心,得不偿失。
服务端
pom.xml添加
<dependency><groupId>org.springframework.boot</groupId><artifactId>spring-boot-starter-actuator</artifactId></dependency><dependency><groupId>org.springframework.cloud</groupId><artifactId>spring-cloud-starter-bus-amqp</artifactId></dependency>application.yaml添加
springcloud:bus:trace:enabled:true#rabbitmq for auto reflesh configrabbitmq:host: 127.0.0.1port:5672username: guestpassword: guestvirtual-host: /#是否开启基本的鉴权,默认为truesecurity:basic:enabled:falsemanagement:endpoints:web:exposure:include:"*"endpoint:health:show-details: ALWAYS客户端
pom.xml文件
<dependency><groupId>org.springframework.boot</groupId><artifactId>spring-boot-starter-actuator</artifactId></dependency><dependency><groupId>org.springframework.cloud</groupId><artifactId>spring-cloud-starter-bus-amqp</artifactId></dependency>application-dev.yaml文件
spring:#rabbitmq for auto reflesh configrabbitmq:host: 192.168.23.147port:5672username: guestpassword: guestvirtual-host: /#打开info,health等断点,所以需要添加management.endpoints.web.exposure.include=*配置,其他的不变management:endpoints:web:exposure:include:'*'endpoint:health:show-details: always使用配置类的java文件
@RefreshScopeWebHooks动态刷新
暂不做介绍,后续补充
接入Eureka注册中心
Eureka注册中心
pom.xml
<properties><java.version>1.8</java.version><spring-cloud.version>2020.0.1</spring-cloud.version></properties><dependencies><dependency><groupId>org.springframework.cloud</groupId><artifactId>spring-cloud-starter-netflix-eureka-server</artifactId></dependency><dependency><groupId>org.springframework.boot</groupId><artifactId>spring-boot-starter-test</artifactId><scope>test</scope></dependency></dependencies><dependencyManagement><dependencies><dependency><groupId>org.springframework.cloud</groupId><artifactId>spring-cloud-dependencies</artifactId><version>${spring-cloud.version}</version><type>pom</type><scope>import</scope></dependency></dependencies></dependencyManagement>application.yaml
server:port:8761spring:application:name: cloud-servereureka:server:shouldUseReadOnlyResponseCache:true#eureka是CAP理论种基于AP策略,为了保证强一致性关闭此切换CP 默认不关闭 false关闭enable-self-preservation:false#关闭服务器自我保护,客户端心跳检测15分钟内错误达到80%服务会保护,导致别人还认为是好用的服务eviction-interval-timer-in-ms:60000#清理间隔(单位毫秒,默认是60\*1000)5秒将客户端剔除的服务在服务注册列表中剔除#response-cache-update-interval-ms:3000#eureka server刷新readCacheMap的时间,注意,client读取的是readCacheMap,这个时间决定了多久会把readWriteCacheMap的缓存更新到readCacheMap上 #eureka server刷新readCacheMap的时间,注意,client读取的是readCacheMap,这个时间决定了多久会把readWriteCacheMap的缓存更新到readCacheMap上默认30sresponse-cache-auto-expiration-in-seconds:180#eureka server缓存readWriteCacheMap失效时间,这个只有在这个时间过去后缓存才会失效,失效前不会更新,过期后从registry重新读取注册服务信息,registry是一个ConcurrentHashMap。client:register-with-eureka:true#false:不作为一个客户端注册到注册中心fetch-registry:false#为true时,可以启动,但报异常:Cannot execute request on any known serverinstance-info-replication-interval-seconds:10service-url:defaultZone: http://127.0.0.1:8761/eurekainstance:prefer-ip-address:trueip-address: 127.0.0.1instance-id: ${spring.application.name}:${eureka.instance.ip-address}:${server.port}lease-renewal-interval-in-seconds:30# 续约更新时间间隔(默认30秒)lease-expiration-duration-in-seconds:90# 续约到期时间(默认90秒)ribbon:ServerListRefreshInterval:1000Application.java
packagecom.server.eureka;importorg.springframework.boot.SpringApplication;importorg.springframework.boot.autoconfigure.SpringBootApplication;importorg.springframework.cloud.netflix.eureka.server.EnableEurekaServer;@EnableEurekaServer@SpringBootApplicationpublicclassEurekaServerApplication{publicstaticvoidmain(String[] args){SpringApplication.run(EurekaServerApplication.class, args);}}Config服务端
application.yaml
eureka:client:serviceUrl:defaultZone: http://127.0.0.1:8761/eureka/register-with-eureka:truefetch-registry:falseinstance:prefer-ip-address:trueip-address: 127.0.0.1instance-id: ${spring.application.name}:${eureka.instance.ip-address}:${server.port}Config客户端
bootstrap.yaml
spring:cloud:config:discovery:enabled:true# config server's application nameservice-id: config-serverapplication-dev.yaml
eureka:client:serviceUrl:defaultZone: http://127.0.0.1:8761/eureka/instance:prefer-ip-address:trueip-address: 127.0.0.1instance-id: ${spring.application.name}:${eureka.instance.ip-address}:${server.port}参考
- 本地配置官方参考 https://cloud.spring.io/spring-cloud-config/reference/html/#_file_system_backend
- 本地配置自动刷新参考 https://blog.csdn.net/goodcto/article/details/102615901
- spring cloud actuator 、spring cloud bus 、webhook https://www.cnblogs.com/spec-dog/p/12371899.html
配置刷新的接口变更
- 服务端的请求刷新的页面由原来1.5.x的localhost:8888/bus/refresh变成:http://localhost:8888/actuator/bus-refresh。
- 老的版本中用 /actuator/bus-flesh , 后来变成了 /actuator/busflesh
问题
-
If you are using the git profile, you need to set a Git URI in your configuration. If you have set spring.cloud.config.server.bootstrap=true, you need to use a composite configuration.
-
spring-boot的application.yml文件,其中spring.cloud.config.name默认值就是spring.application.name
-
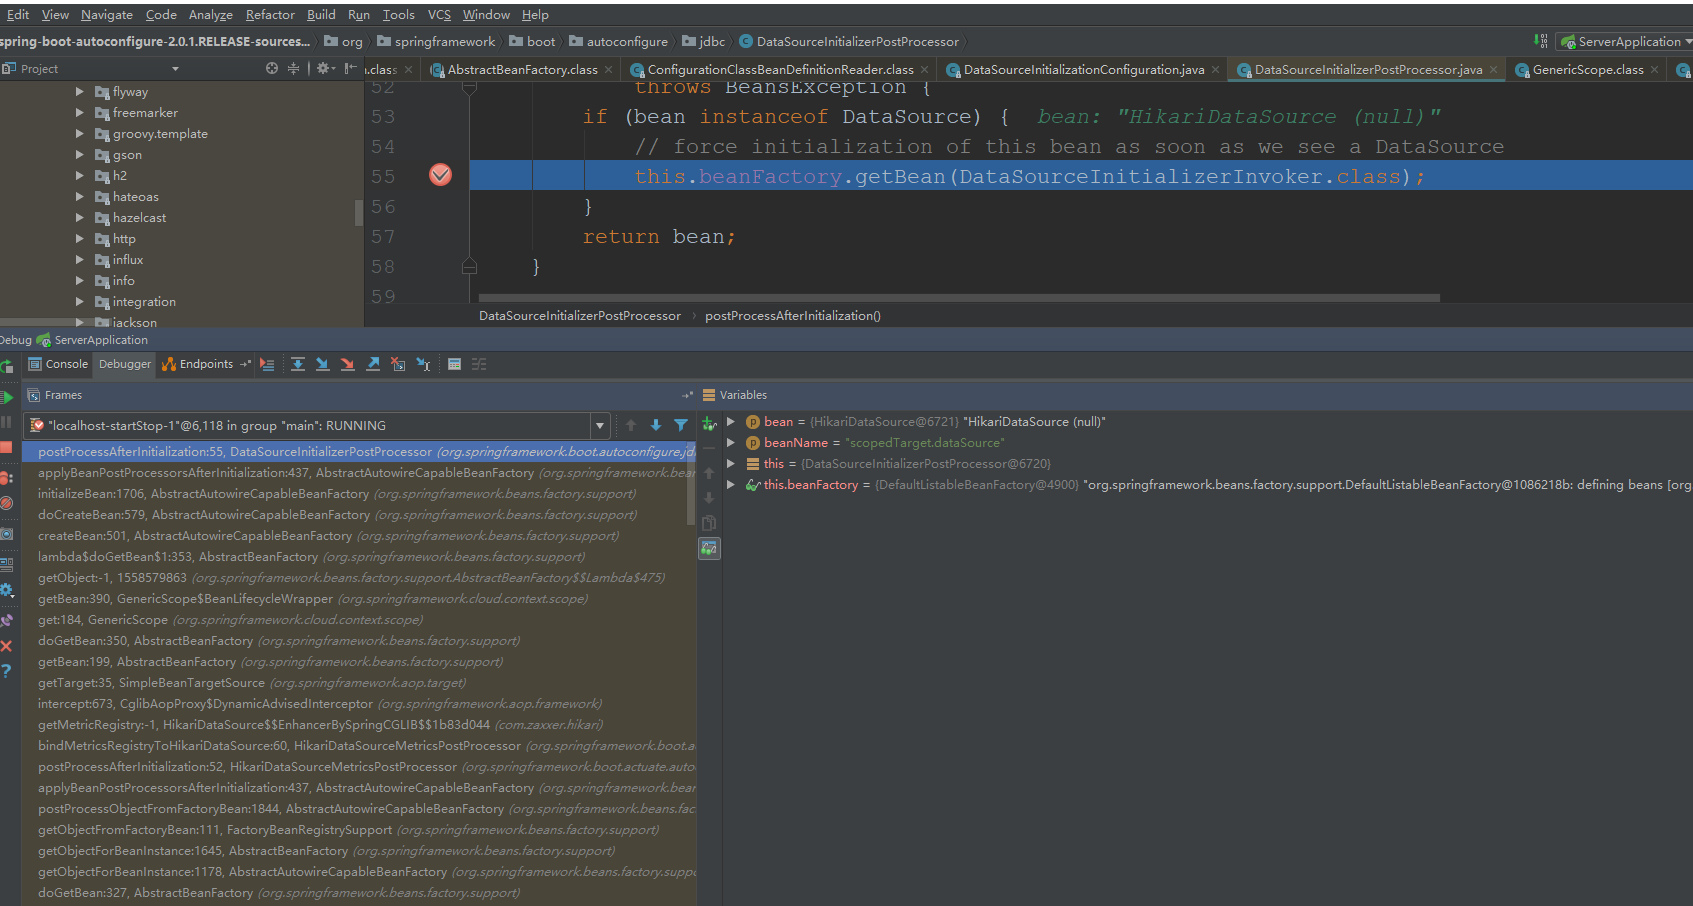
springboot2.0.1和springcloud Finchley.SR1 启动遇到的循环依赖问题
问题现象
The dependencies of some of the beans in the application context form a cycle:

   servletEndpointRegistrar defined inclass path resource[org/springframework/boot/actuate/autoconfigure/endpoint/web/ServletEndpointManagementContextConfiguration.class]
      ↓
   healthEndpoint defined inclass path resource[org/springframework/boot/actuate/autoconfigure/health/HealthEndpointConfiguration.class]
      ↓org.springframework.boot.actuate.autoconfigure.jdbc.DataSourceHealthIndicatorAutoConfiguration
┌─────┐|  dataSource
↑     ↓|  scopedTarget.dataSource defined inclass path resource[org/springframework/boot/autoconfigure/jdbc/DataSourceConfiguration$Hikari.class]
↑     ↓|org.springframework.boot.autoconfigure.jdbc.DataSourceInitializerInvoker
└─────┘
问题原因:
DataSourceHealthIndicatorAutoConfiguration

->  DataSourceAutoConfiguration
-> DataSourceInitializationConfiguration
-> DataSourceInitializationConfiguration -> Registrar # registerBeanDefinitions
-> DataSourceInitializerPostProcessor # postProcessAfterInitialization
-> DataSourceInitializerInvoker # DataSourceInitializerInvoker(dataSource)
调试的时候可以参考下面的流程:
参考; curl -X POST http://localhost:8888/actuator/busrefresh
