SpringBoot集成SpringMVC的CRUD项目实例
(1)默认访问首页
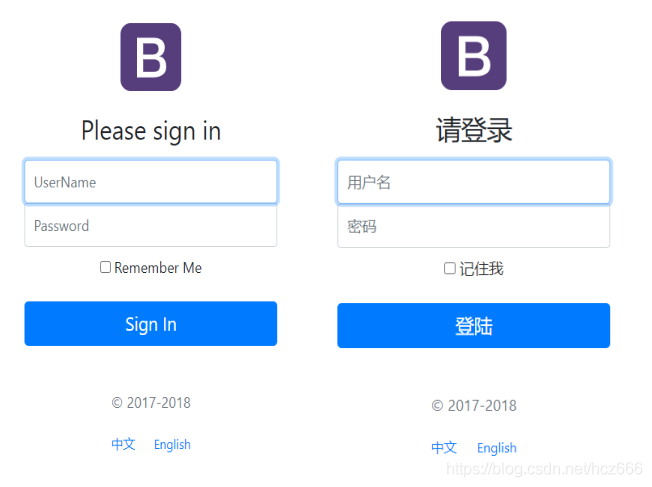
1)创建首页login.html
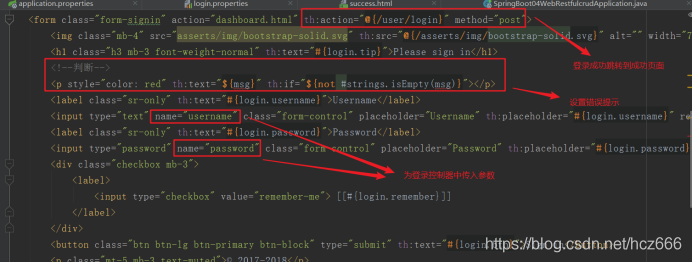
<!DOCTYPEhtml><htmllang="en"xmlns:th="http://www.thymeleaf.org"><head><metahttp-equiv="Content-Type"content="text/html; charset=UTF-8"><metaname="viewport"content="width=device-width, initial-scale=1, shrink-to-fit=no"><metaname="description"content=""><metaname="author"content=""><title>Signin Template for Bootstrap</title><!-- Bootstrap core CSS --><linkhref="asserts/css/bootstrap.min.css"rel="stylesheet"><!-- Custom styles for this template --><linkhref="asserts/css/signin.css"rel="stylesheet"></head><bodyclass="text-center"><formclass="form-signin"action="dashboard.html"><imgclass="mb-4"src="asserts/img/bootstrap-solid.svg"alt=""width="72"height="72"><h1class="h3 mb-3 font-weight-normal">Please sign in</h1><labelclass="sr-only">Username</label><inputtype="text"class="form-control"placeholder="Username"required=""autofocus=""><labelclass="sr-only">Password</label><inputtype="password"class="form-control"placeholder="Password"required=""><divclass="checkbox mb-3"><label><inputtype="checkbox"value="remember-me"> Remember me</label></div><buttonclass="btn btn-lg btn-primary btn-block"type="submit">Sign in</button><pclass="mt-5 mb-3 text-muted">© 2017-2018</p><aclass="btn btn-sm">中文</a><aclass="btn btn-sm">English</a></form></body></html>2)创建自定义配置类MyMvcConfig
/**
* 使用WebMvcConfigurerAdapter可以来扩展SpringMVC的功能
* @EnableWebMvc:这里不使用该注解,因为它会使SpringMVC自动配置失效
*/@ConfigurationpublicclassMyMvcConfigextendsWebMvcConfigurerAdapter{/**
* 所有的WebMvcConfigurerAdapter组件都会一起起作用
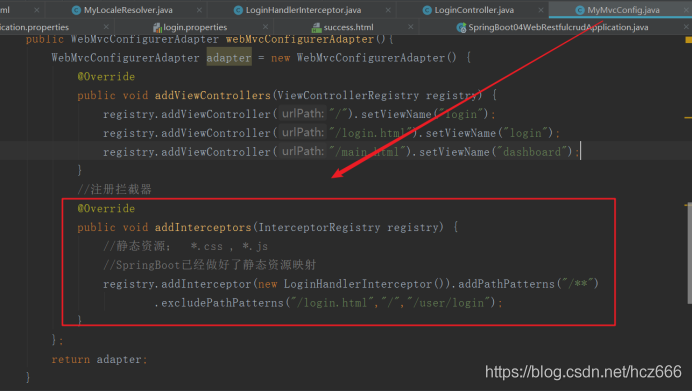
*/@Bean//将组件注册到容器中publicWebMvcConfigurerAdapterwebMvcConfigurerAdapter(){WebMvcConfigurerAdapter adapter=newWebMvcConfigurerAdapter(){@OverridepublicvoidaddViewControllers(ViewControllerRegistry registry){
registry.addViewController("/").setViewName("login");
registry.addViewController("login.html").setViewName("login");}};return adapter;}}(2)设置国际化功能
1)编写国际化配置文件,抽取页面需要显示的国际化资源文件
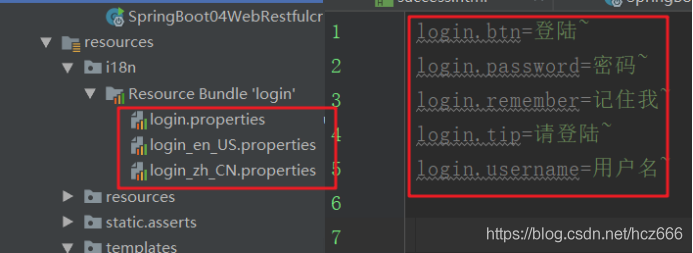

2)SpringBoot自动帮我们配置好了管理国际化资源文件的组件
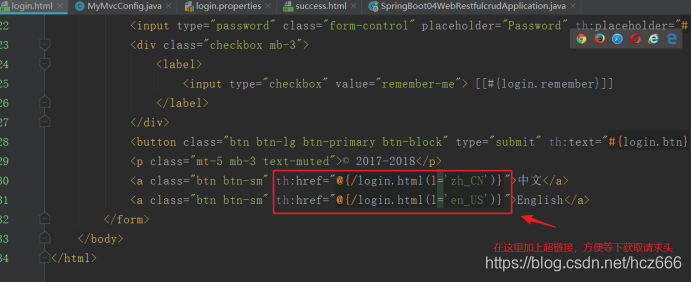
3)通过页面获取配置文件中的国际化值
<bodyclass="text-center"><formclass="form-signin"action="dashboard.html"><imgclass="mb-4"src="asserts/img/bootstrap-solid.svg"th:src="@{/asserts/img/bootstrap‐solid.svg}"alt=""width="72"height="72"><h1class="h3 mb-3 font-weight-normal"th:text="#{login.tip}">Please sign in</h1><labelclass="sr-only"th:text="#{login.username}">Username</label><inputtype="text"class="form-control"placeholder="Username"th:placeholder="#{login.username}"required=""autofocus=""><labelclass="sr-only"th:text="#{login.password}">Password</label><inputtype="password"class="form-control"placeholder="Password"th:placeholder="#{login.password}"required=""><divclass="checkbox mb-3"><label><inputtype="checkbox"value="remember-me"> [[#{login.remember}]]</label></div><buttonclass="btn btn-lg btn-primary btn-block"type="submit"th:text="#{login.btn}">Sign in</button><pclass="mt-5 mb-3 text-muted">© 2017-2018</p><aclass="btn btn-sm">中文</a><aclass="btn btn-sm">English</a></form></body>原理:
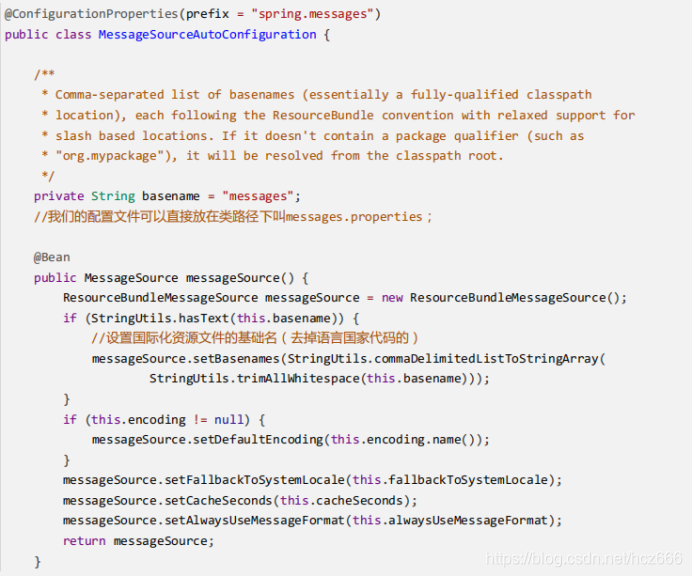
国际化Locale(区域信息对象);LocaleResolver(获取区域信息对象);默认的就是根据请求头带来的区域信息获取Locale进行国际化 。
@Bean@ConditionalOnMissingBean@ConditionalOnProperty(prefix="spring.mvc", name="locale")publicLocaleResolverlocaleResolver(){if(this.mvcProperties.getLocaleResolver()==WebMvcProperties.LocaleResolver.FIXED){returnnewFixedLocaleResolver(this.mvcProperties.getLocale());}AcceptHeaderLocaleResolver localeResolver=newAcceptHeaderLocaleResolver();
    localeResolver.setDefaultLocale(this.mvcProperties.getLocale());return localeResolver;}
4)点击链接切换国际化
/**
 * 获取区域信息对象
 * 可以在链接上携带区域信息
 */publicclassMyLocaleResolverimplementsLocaleResolver{@OverridepublicLocaleresolveLocale(HttpServletRequest request){String l= request.getParameter("l");//获取请求头信息的参数Locale locale=Locale.getDefault();//当没有获取到的时候使用默认的if(!StringUtils.isEmpty(l)){String[] split= l.split("_");
            locale=newLocale(split[0],split[1]);}return locale;}@OverridepublicvoidsetLocale(HttpServletRequest httpServletRequest,HttpServletResponse httpServletResponse,Locale locale){}}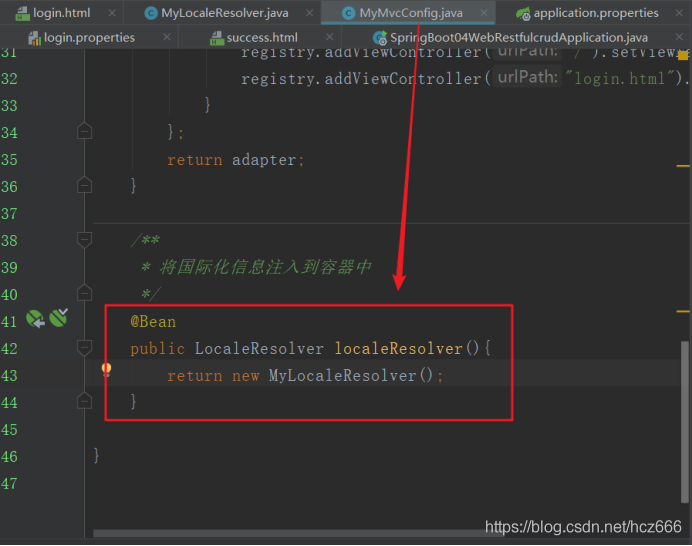
5)点击切换中英文
(3)拦截器登录功能
1)创建登录控制器类LoginController
这里只是设置了登录名不为空并且密码为“123456”即可登录,并没有做过多的验证
/**
* 登录控制器类
*/@ControllerpublicclassLoginController{@PostMapping(value="/user/login")publicStringlogin(@RequestParam("username")String username,@RequestParam("password")String password,Map<String,Object> map,HttpSession session){if(!StringUtils.isEmpty(username)&&"123456".equals(password)){//登录成功,重定向到主页
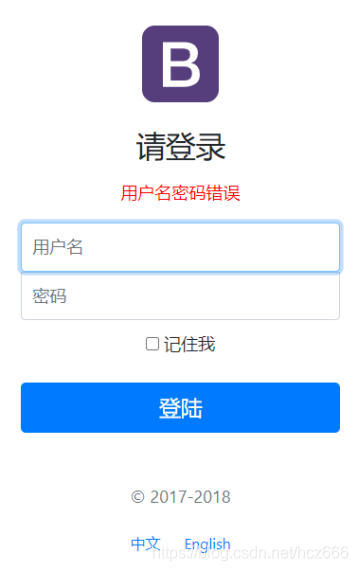
session.setAttribute("loginUser",username);return"redirect:/main.html";}else{//登录失败return"login";}}}2)在登录页面设置错误提示
3)创建登录拦截器类LoginHandlerInterceptor
/**
* 登录拦截器
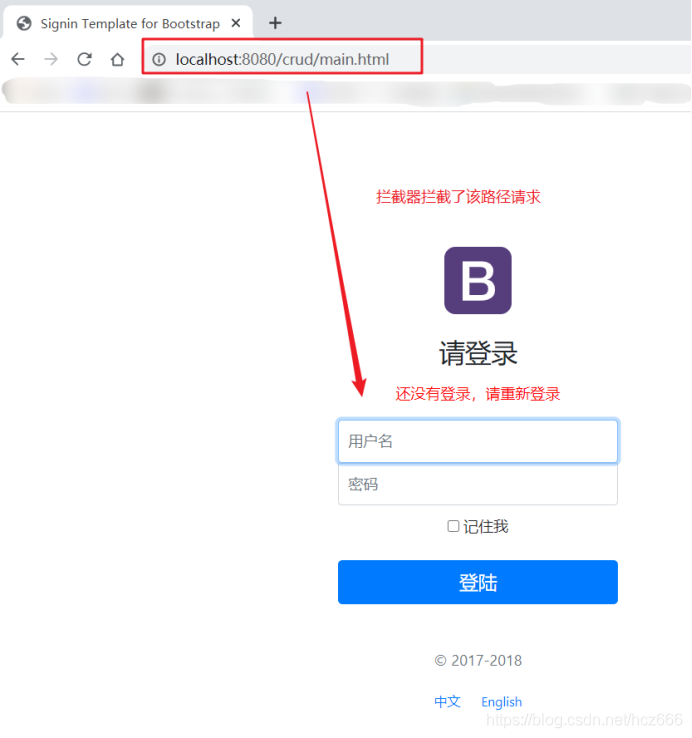
*/publicclassLoginHandlerInterceptorimplementsHandlerInterceptor{//在目标方法之前执行@OverridepublicbooleanpreHandle(HttpServletRequest request,HttpServletResponse response,Object o)throwsException{Object user= request.getSession().getAttribute("loginUser");if(user==null){//没有登录
request.setAttribute("msg","还没有登录,请重新登录");
request.getRequestDispatcher("/login.html").forward(request,response);returnfalse;}else{//已登陆,放行请求returntrue;}}@OverridepublicvoidpostHandle(HttpServletRequest httpServletRequest,HttpServletResponse httpServletResponse,Object o,ModelAndView modelAndView)throwsException{}@OverridepublicvoidafterCompletion(HttpServletRequest httpServletRequest,HttpServletResponse httpServletResponse,Object o,Exception e)throwsException{}}4)注册登录拦截器到SpringMVC容器中
5)运行结果
(4)员工信息查询
注意:
这里并没有使用连接数据库的操作,只是通过集合来进行数据的增删改
1)创建员工操作控制类EmployeeController,并添加查询方法
/**
 * 员工管理控制器类
 */@ControllerpublicclassEmployeeController{@AutowiredEmployeeDao employeeDao;@AutowiredDepartmentDao departmentDao;//查询所有员工返回列表页面@GetMapping("/emps")publicStringselectAllEmp(Model model){//查询所有员工信息Collection<Employee> employees= employeeDao.getAll();//将查询到的集合放入请求域中
        model.addAttribute("emps",employees);//转发到emp目录下的list.html页面return"emp/list";}}
2)创建展示所有员工信息页面list.html(这里页面将公共部分抽取出去另外一个页面,当需要的时候将其引入进来即可,比如页面的上边栏和侧边栏)
<body><!--引入抽取的topbar--><!--模板名:会使用thymeleaf的前后缀配置规则进行解析--><divth:replace="commons/bar::topbar"></div><divclass="container-fluid"><divclass="row"><!--引入侧边栏--><divth:replace="commons/bar::#sidebar(activeUri='emps')"></div><mainrole="main"class="col-md-9 ml-sm-auto col-lg-10 pt-3 px-4"><h2><aclass="btn btn-sm btn-success"href="emp"th:href="@{/emp}">员工添加</a></h2><divclass="table-responsive"><tableclass="table table-striped table-sm"><thead><tr><th>#</th><th>lastName</th><th>email</th><th>gender</th><th>department</th><th>birth</th><th>操作</th></tr></thead><tbody><trth:each="emp:${emps}"><tdth:text="${emp.id}"></td><td>[[${emp.lastName}]]</td><tdth:text="${emp.email}"></td><tdth:text="${emp.gender}==0?'女':'男'"></td><tdth:text="${emp.department.departmentName}"></td>