VUE3.0和VUE2.0语法上的不同
前言:本篇文章只做VUE3.0和VUE2.0语法上的不同分析,不做性能和源码架构等的分析。
一、VUE3.0和VUE2.0代码结构不同
- VUE3.0代码实例🌰
<template><div><span>count is{{ count}}</span><span>plusOne is{{ plusOne}}</span><button @click="increment">count++</button></div></template><script>import{ value, computed, watch, onMounted, ref}from'vue'exportdefault{setup(){// ref stateconst count=ref(0)// computed stateconst plusOne=computed(()=> count.value+1)// methodconstincrement=()=>{ count.value++}// watchwatch(()=> count.value*2,val=>{
      console.log(`count * 2 is${val}`)})// lifecycleonMounted(()=>{
      console.log(`mounted`)})// expose bindings on render contextreturn{
      count,
      plusOne,
      increment}}}</script>
也可以不用写setup函数,可以直接把setup写到script标签上
- VUE3.0代码实例🌰
<template><div><span>count is{{ count}}</span><span>plusOne is{{ plusOne}}</span><button @click="increment">count++</button></div></template><script setup lang="ts">import{ computed, watch, onMounted, ref}from'vue'// ref stateconst count=ref(0)// computed stateconst plusOne=computed(()=> count.value+1)// methodconstincrement=()=>{ count.value++}// watchwatch(()=> count.value*2,val=>{
  console.log(`count * 2 is${val}`)})// lifecycleonMounted(()=>{
  console.log(`mounted`)})</script>
- 相应的VUE2.0代码实例🌰
<template><div><span>count is{{ count}}</span><span>plusOne is{{ plusOne}}</span><button @click="increment">count++</button></div></template><script>exportdefault{data(){return{count:0};},methods:{increment:function(){this.count++;}},computed:{plusOne:function(){returnthis.count+1;}},watch:{count:function(val){
                console.log(`count * 2 is${val*2}`)}},mounted(){
            console.log(`mounted`);}};</script>
VUE2.0和VUE3.0的代码对比一下:
VUE2.0是将mounted、data、computed、watch之类的方法作为VUE对象的属性进行导出。
VUE3.0新增了一个名为setup的入口函数,value, computed, watch, onMounted等方法都需要从外部import。
evernotecid://CA5E4AF5-56FE-42CC-9E43-67CF1FF3C17E/appyinxiangcom/27675019/ENResource/p130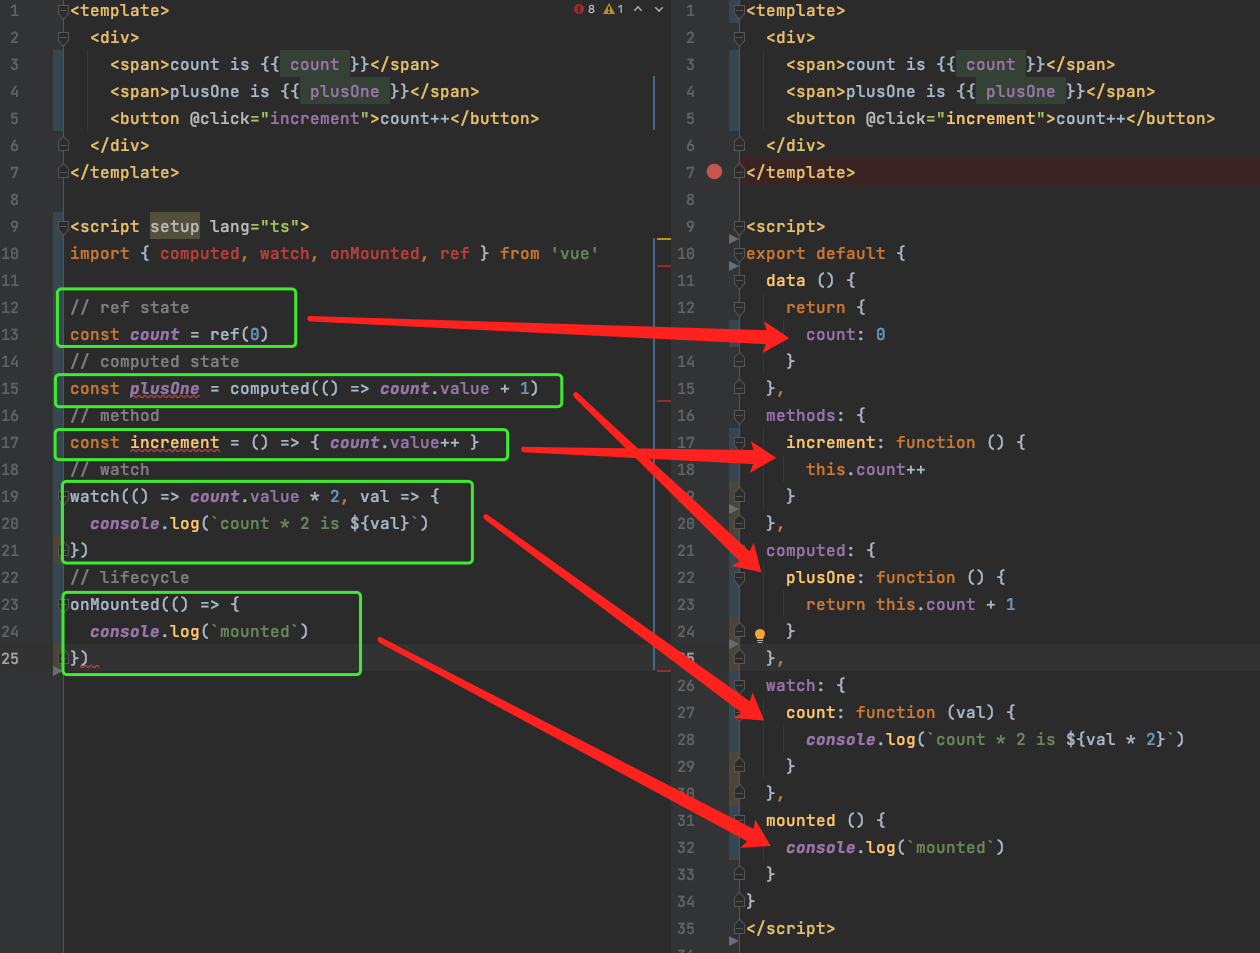
二、关于VUE3.0和VUE2.0生命周期
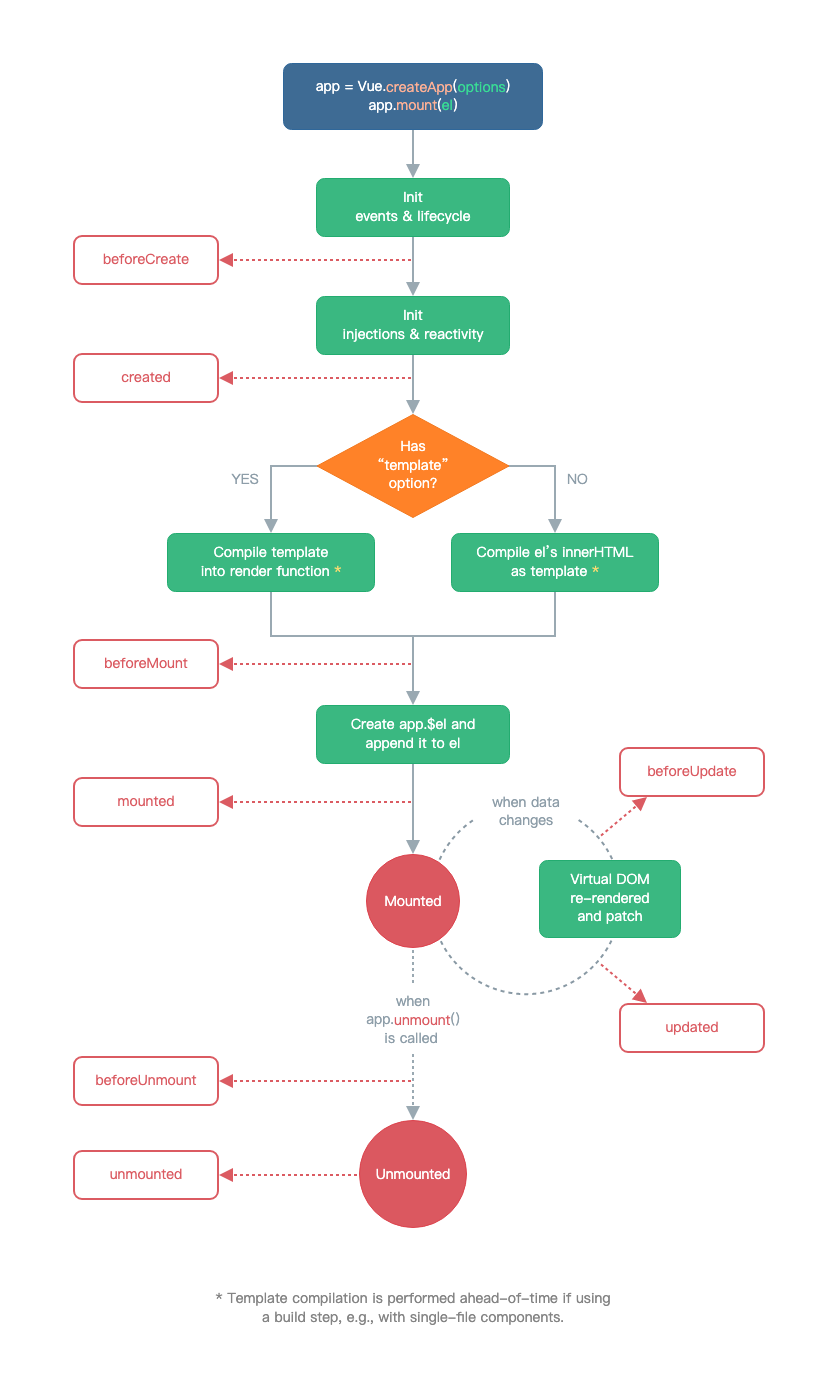
- VUE2.0生命周期
1、beforeCreate:在实例初始化之后、进行数据侦听和事件/侦听器的配置之前同步调用
2、created:在实例创建完成后被立即同步调用。在这一步中,实例已完成对选项的处理,意味着以下内容已被配置完毕:数据侦听、计算属性、方法、事件/侦听器的回调函数。然而,挂载阶段还没开始,且 $el property 目前尚不可用。
3、beforeMount:在挂载开始之前被调用:相关的 render 函数首次被调用。
4、mounted:在实例挂载完成后被调用。
5、beforeUpdate:在数据发生改变后,DOM 被更新之前被调用。这里适合在现有 DOM 将要被更新之前访问它,比如移除手动添加的事件监听器。
6、updated:在数据更改导致的虚拟 DOM 重新渲染和更新完毕之后被调用。
7、activated:被 keep-alive 缓存的组件激活时调用。
8、deactivated:被 keep-alive 缓存的组件失活时调用。
9、beforeUnmount:在卸载组件实例之前调用。在这个阶段,实例仍然是完全正常的。
10、unmounted:卸载组件实例后调用。调用此钩子时,组件实例的所有指令都被解除绑定,所有事件侦听器都被移除,所有子组件实例被卸载。
- VUE3.0生命周期
1、setup: 同VUE2.0的beforeCreate和created。
2、onBeforeMount:同VUE2.0的beforeMount。
3、onMounted:同VUE2.0的mounted。
4、onBeforeUpdate:同VUE2.0的beforeMount。
5、onUpdated:同VUE2.0的updated。
6、onBeforeUnmount:同VUE2.0的beforeUnmount。
7、onUnmounted:同VUE2.0的unmounted。
8、onMounted:同VUE2.0的beforeMount。
9、onActivated:同VUE2.0的activated。
10、onDeactivated:同VUE2.0的deactivated。
evernotecid://CA5E4AF5-56FE-42CC-9E43-67CF1FF3C17E/appyinxiangcom/27675019/ENResource/p132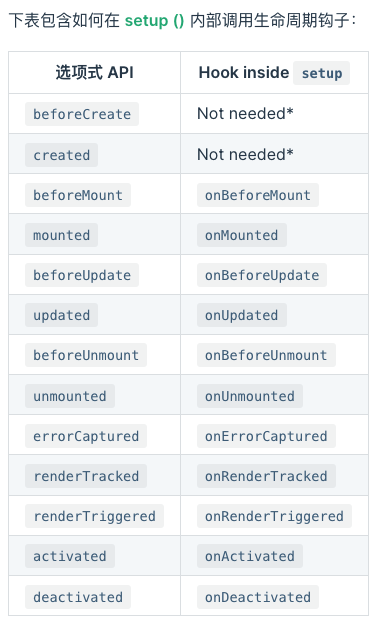
VUE3.0和VUE2.0响应式
- VUE3.0响应数据
1、ref():让简单类型的数据变成响应式数据。这种数据是Number或者String等基本类型数据,这种数据是通过值而非引用传递的类型。
import{ ref}from'vue'const count=ref(0)
console.log(count.value)// 0

count.value++
console.log(count.value)// 1
2、reactive(): 让复杂类型数据变成响应式,不需要.value包裹。
import{ reactive}from'vue'// 响应式状态const state=reactive({count:0})

state.count.value++
console.log(state.count)// 1
注意:当ref作为响应式对象的值被更改时,ref的内部值也会发生改变。
const count=ref(0)const state=reactive({
  count})

console.log(state.count)// 0

state.count=1
console.log(count.value)// 1
注意:使用ES6解构响应式对象时,响应式会丢失。
import{ reactive}from'vue'const book=reactive({author:'Vue Team',year:'2020',title:'Vue 3 Guide',description:'You are reading this book right now ;)',price:'free'})let{ author, title}= book对于这种情况,我们需要将我们的响应式对象转换为一组 ref。这些 ref 将保留与源对象的响应式关联,使用toRefs():
import{ reactive, toRefs}from'vue'const book=reactive({author:'Vue Team',year:'2020',title:'Vue 3 Guide',description:'You are reading this book right now ;)',price:'free'})let{ author, title}=toRefs(book)

title.value='Vue 3 Detailed Guide'// 我们需要使用 .value 作为标题,现在是 ref
console.log(book.title)// 'Vue 3 Detailed Guide'
watch监听属性
- VUE3.0 watch监听
import{ ref, watch}from'vue'const counter=ref(0)watch(counter,(newValue, oldValue)=>{
  console.log('The new counter value is: '+ counter.value)})
- VUE2.0 watch监听
exportdefault{data(){return{counter:0}},watch:{counter(newValue, oldValue){
      console.log('The new counter value is: '+this.counter)}}}
computed计算属性
- VUE3.0 computed计算
import{ ref, computed}from'vue'const counter=ref(0)const twiceTheCounter=computed(()=> counter.value*2)

counter.value++
console.log(counter.value)// 1
console.log(twiceTheCounter.value)// 2
- VUE2.0 computed计算
Vue.createApp({data(){return{counter:0}},computed:{twiceTheCounter(){return counter*2}}}).mount('#demo')父子组件通过props传递值
- VUE3.0 props
// MyBook.vueexportdefault{props:{title: String},setup(props){
    console.log(props.title)}}
或者
<script setup>const props=defineProps({title:{type: String}})</script>
- VUE2.0 props
exportdefault{name:'Demo',props:{count:{type: Number,default:1},arrValue:{type: Array,default(){return[]}}},mounted(){
    console.log(this.count)}}
emit子组件向父组件抛出事件
- VUE2.0
VUE2.0可以通过this.$emit()向父组件抛出事件
- VUE3.0
setup(props,{ emit}){constclose=()=>{emit("change")}return{
        close}}
或者
<script setup>const emit=defineEmits(["change"])constclose=()=>{emit("change")}</script>$refs
- VUE2.0
vue2.0可以直接通过this.$refs.访问子组件
- VUE3.0
<template><div ref="refDemo"/></template><script setup>const refDemo=ref()
console.log(refDemo.value)</script>
注意:1、通过变量的命名要和ref相同。
2、通过ref来访问子组件的方法,子组件要通过expose将事件和变量暴露出来,这样父组件才能访问到
VUE3.0 context
- VUE2.0
VUE2.0可以通过this来访问VUE实例上的方法和变量。例如this. e m i t 、 t h i s . emit、this.emit、this.refs、this.$slots.
- VUE3.0
context 是一个普通 JavaScript 对象,暴露了其它可能在 setup 中有用的值:
exportdefault{setup(props, context){// Attribute (非响应式对象,等同于 $attrs)
    console.log(context.attrs)// 插槽 (非响应式对象,等同于 $slots)
    console.log(context.slots)// 触发事件 (方法,等同于 $emit)
    console.log(context.emit)// 暴露公共 property (函数)
    console.log(context.expose)}}
**注意:在setup时,你只能访问props、attrs、slots、emit。无法访问data、computed、methods、refs (模板 ref)
更多细节可看VUE官方文档:https://v3.cn.vuejs.org/guide/composition-api-setup.html