1,类继承结构
理解AnnotationConfigApplicationContext的实例化过程之前先看一下它的类继承结构: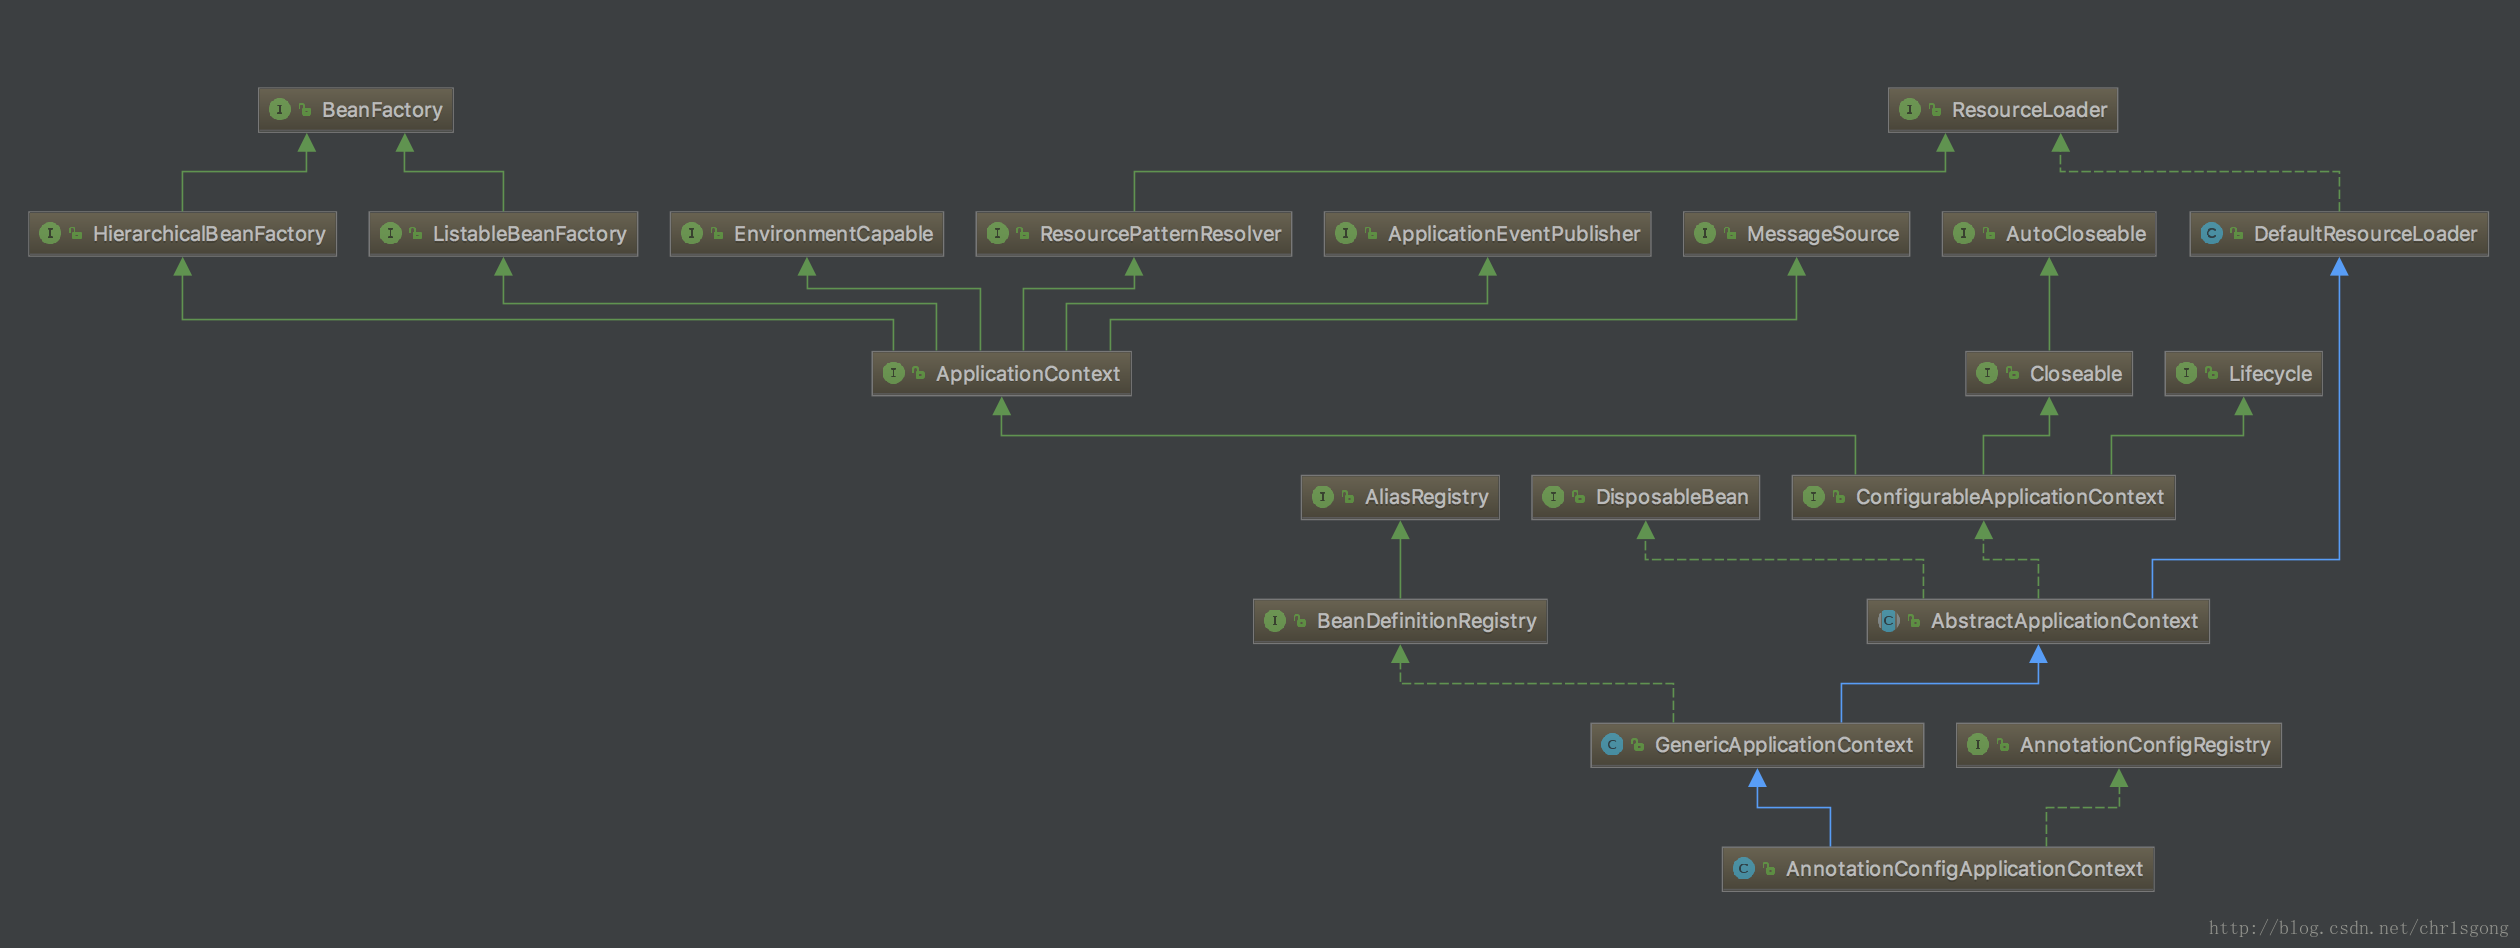
主要涉及到的类或接口有以下几个:
GenericApplicationContext——通用应用上下文,内部持有一个DefaultListableBeanFactory实例,这个类实现了BeanDefinitionRegistry接口,可以在它身上使用任意的bean definition读取器。典型的使用案例是:通过BeanFactoryRegistry接口注册bean definitions,然后调用refresh()方法来初始化那些带有应用上下文语义(org.springframework.context.ApplicationContextAware)的bean,自动探测org.springframework.beans.factory.config.BeanFactoryPostProcessor等。关于这两个接口,在介绍bean的生命周期时进行详细讲解。BeanDefinitionRegistry——用于持有像RootBeanDefinition和ChildBeanDefinition实例的bean definitions的注册表接口。DefaultListableBeanFactory实现了这个接口,因此可以通过相应的方法向beanFactory里面注册bean。GenericApplicationContext内置一个DefaultListableBeanFactory实例,它对这个接口的实现实际上是通过调用这个实例的相应方法实现的。AbstractApplicationContext——ApplicationContext接口的抽象实现,没有强制规定配置的存储类型,仅仅实现了通用的上下文功能。这个实现用到了模板方法设计模式,需要具体的子类来实现其抽象方法。自动通过registerBeanPostProcessors()方法注册BeanFactoryPostProcessor,BeanPostProcessor和ApplicationListener的实例用来探测bean factory里的特殊bean——对比1分析AnnotationConfigRegistry——注解配置注册表。用于注解配置应用上下文的通用接口,拥有一个注册配置类和扫描配置类的方法。
2,构造方法
/**
 * Create a new AnnotationConfigApplicationContext that needs to be populated
 * through {@link #register} calls and then manually {@linkplain #refresh refreshed}.
 */publicAnnotationConfigApplicationContext() {this.reader =new AnnotatedBeanDefinitionReader(this);this.scanner =new ClassPathBeanDefinitionScanner(this);
}/**
 * Create a new AnnotationConfigApplicationContext with the given
 * DefaultListableBeanFactory.
 * @param beanFactory the DefaultListableBeanFactory instance to use for this context
 */publicAnnotationConfigApplicationContext(DefaultListableBeanFactory beanFactory) {super(beanFactory);this.reader =new AnnotatedBeanDefinitionReader(this);this.scanner =new ClassPathBeanDefinitionScanner(this);
}/**
 * Create a new AnnotationConfigApplicationContext, deriving bean definitions
 * from the given annotated classes and automatically refreshing the context.
 * @param annotatedClasses one or more annotated classes,
 * e.g. {@link Configuration @Configuration} classes
 */publicAnnotationConfigApplicationContext(Class<?>... annotatedClasses) {this();
   register(annotatedClasses);
   refresh();
}/**
 * Create a new AnnotationConfigApplicationContext, scanning for bean definitions
 * in the given packages and automatically refreshing the context.
 * @param basePackages the packages to check for annotated classes
 */publicAnnotationConfigApplicationContext(String... basePackages) {this();
   scan(basePackages);
   refresh();
}第一个构造器是最基本的无参数构造器,需要通过调用register()方法填充注解类,并进行手动刷新。在这个构造器里初始化了一个读取器和扫描器。
第二个构造器能手动指定beanFactory。
第三个构造器能手动指定注解类。
第四个通过指定包名进行自动扫描并刷新。
由于AnnotationConfigApplicationContext是GenericApplicationContext的子类,在调用它的构造器之前会先调用父类的构造器,父类构造器会实例化一个DefaultListableBeanFactory实例,这个就是基于注解配置的应用上下文的IoC容器。SpringBoot默认调用第一个无参数构造器。
3,SpringApplication类
首先,用户的Application类是被@SpringBootApplication注解的。有必要对@SpringBootApplication进行了解。
@SpringBootApplication可以认为是@SpringBootConfiguration,@EnableAutoConfiguration和@ComponentScan三个注解的组合。下面进行详细分析。
3.1,@SpringBootConfiguration
@SpringBootConfiguration只是对@Configuration做了一下包装,说明编写的类是一个配置类。
3.2,@EnableAutoConfiguration
@EnableAutoConfiguration注解使能了自动配置功能。这个注解由@Import(EnableAutoConfigurationImportSelector.class)注解。在目前的版本中EnableAutoConfigurationImportSelector被废弃了,反而用了它的基类AutoConfigurationImportSelector。
AutoConfigurationImportSelector用于处理@EnableAutoConfiguration注解—未完待续!!!
3.3,@ComponentScan
开启组件扫描,和xml配置的<context:component-scan>效果一样
3.4,SpringApplication的执行过程
SpringApplication的静态run()方法通过主类构造一个新的SpringApplication实例,然后运行真正的run()方法。
SpringApplication类的初始化
在SpringApplication的构造器中调用了一个initialize()方法,这个方法的代码如下:
privatevoidinitialize(Object[] sources) {if (sources !=null && sources.length >0) {this.sources.addAll(Arrays.asList(sources));
  }//推断是否是web环境,如果是会专门针对web上下文进行设置this.webEnvironment = deduceWebEnvironment();//设置初始化器
  setInitializers((Collection) getSpringFactoriesInstances(
    ApplicationContextInitializer.class));//设置监听器
  setListeners((Collection) getSpringFactoriesInstances(ApplicationListener.class));this.mainApplicationClass = deduceMainApplicationClass();
}
初始化方法主要做了三件事情:
判断上下文环境,web还是非web?后面会根据上下文环境进行针对性的设置
设置初始化器,这里只获取
ApplicationContextInitializer(应用上下文初始化器)。这里主要执行的代码是获取初始化器对应的工厂实例,代码如下:private <T> Collection<? extends T>getSpringFactoriesInstances(Class<T> type, Class<?>[] parameterTypes, Object... args) { ClassLoader classLoader = Thread.currentThread().getContextClassLoader();// Use names and ensure unique to protect against duplicates Set<String> names =new LinkedHashSet<String>( SpringFactoriesLoader.loadFactoryNames(type, classLoader)); List<T> instances = createSpringFactoriesInstances(type, parameterTypes, classLoader, args, names); AnnotationAwareOrderComparator.sort(instances);return instances; }这里用到了
SpringFactoriesLoader类。这个类主要用于装载工厂,工厂资源位于META-INF/spring.factories文件中,这个文件可能在类路径的多个jar文件中。然后调用createSpringFactoriesInstances()方法对工厂进行实例化并根据注解进行排序。设置监听器,具体过程同2.
run()方法的执行
run()的代码如下:
public ConfigurableApplicationContextrun(String... args) {
  StopWatch stopWatch =new StopWatch();
  stopWatch.start();
  ConfigurableApplicationContext context =null;
  FailureAnalyzers analyzers =null;
  configureHeadlessProperty();// 获取启动监听器
  SpringApplicationRunListeners listeners = getRunListeners(args);
  listeners.starting();try {// 构建应用参数
    ApplicationArguments applicationArguments =new DefaultApplicationArguments(
                    args);// 准备应用环境
    ConfigurableEnvironment environment = prepareEnvironment(listeners,
                                                        applicationArguments);
    Banner printedBanner = printBanner(environment);// 创建ApplicationContext
    context = createApplicationContext();
    analyzers =new FailureAnalyzers(context);// 准备context
    prepareContext(context, environment, listeners, applicationArguments,
                   printedBanner);// 刷新context-----!!!很重要
    refreshContext(context);// 后置工作
    afterRefresh(context, applicationArguments);
    listeners.finished(context,null);
    stopWatch.stop();if (this.logStartupInfo) {new StartupInfoLogger(this.mainApplicationClass)
                    .logStarted(getApplicationLog(), stopWatch);
    }return context;
  }catch (Throwable ex) {
    handleRunFailure(context, listeners, analyzers, ex);thrownew IllegalStateException(ex);
  }
}
获取启动监听器。具体实现与获取初始化器的方式一样。实际上获取的是一个
EventPublishingRunListener对象,这个类能通过一个SimpleApplicationEventMulticaster对象广播事件,用到了Executor多线程异步执行框架,复习!!!!构建应用参数。保存命令行参数。
准备应用环境。
prepareEnvironment()的代码如下:private ConfigurableEnvironmentprepareEnvironment( SpringApplicationRunListeners listeners, ApplicationArguments applicationArguments) {// Create and configure the environment ConfigurableEnvironment environment = getOrCreateEnvironment();// 配置环境 configureEnvironment(environment, applicationArguments.getSourceArgs()); listeners.environmentPrepared(environment);if (!this.webEnvironment) { environment =new EnvironmentConverter(getClassLoader()) .convertToStandardEnvironmentIfNecessary(environment); }return environment; }在构造environment的时候,会根据前面推断的web环境创建相应的
Environment对象,如果是web环境,则创建StandardServletEnvironment对象,否则创建StandardEnvironment对象,StandardEnvironment的构造器会先对属性源进行定制(将系统属性和系统环境添加到一个MutablePropertySources维护的list中)。这个对象的主要工作包括property分析、profile相关操作、获取系统属性和系统环境等。参考相关类结构。接着是配置环境,
configureEnvironment()的实现如下:protectedvoidconfigureEnvironment(ConfigurableEnvironment environment, String[] args) {// 配置属性源 configurePropertySources(environment, args);// 配置profile configureProfiles(environment, args); }SpringApplication#configurePropertySources()的实现如下:protectedvoidconfigurePropertySources(ConfigurableEnvironment environment, String[] args) { MutablePropertySources sources = environment.getPropertySources();// 添加默认属性if (this.defaultProperties !=null && !this.defaultProperties.isEmpty()) { sources.addLast(new MapPropertySource("defaultProperties",this.defaultProperties)); }// 添加命令行属性if (this.addCommandLineProperties && args.length >0) { String name = CommandLinePropertySource.COMMAND_LINE_PROPERTY_SOURCE_NAME;if (sources.contains(name)) { PropertySource<?> source = sources.get(name); CompositePropertySource composite =new CompositePropertySource(name); composite.addPropertySource(new SimpleCommandLinePropertySource( name +"-" + args.hashCode(), args)); composite.addPropertySource(source); sources.replace(name, composite); }else { sources.addFirst(new SimpleCommandLinePropertySource(args)); } } }在现在这个阶段的配置主要是添加默认属性(defaultProperties)和命令行属性。
SpringApplication#configureProfiles()的实现如下:protectedvoidconfigureProfiles(ConfigurableEnvironment environment, String[] args) {// 获取激活的profiles environment.getActiveProfiles();// ensure they are initialized// But these ones should go first (last wins in a property key clash) Set<String> profiles =new LinkedHashSet<String>(this.additionalProfiles); profiles.addAll(Arrays.asList(environment.getActiveProfiles())); environment.setActiveProfiles(profiles.toArray(new String[profiles.size()])); }AbstractEnvironment#getActiveProfiles()解析spring.profile.active属性,添加到activeProfiles这个集合中。后面的代码是为了实现“last win”策略。此时应用环境也准备完毕,它包括系统属性、系统环境和激活的profile。之后,通过发布环境准备完毕事件,这里,启动监听器会继续对environment进行配置,参考启动监听器!!。
创建应用上下文。
SpringApplication#createApplicationContext()方法通过反射构造应用上下文。AnnotationConfigApplicationContext的默认构造器会构造一个AnnotationBeanDefinitionReader对象和ClassPathBeanDefinitionScanner对象,在构造AnnotationBeanDefinitionReader对象的过程中会向bean factory添加注解处理器和事件监听处理器BeanDefinition,为后续的配置解析作准备。这样,就能通过JavaConfig构建BeanDefinition并实现自动扫描。AnnotationConfigApplicationContext的父类GenericApplicationContext的默认构造器会构造一个DefaultListableBeanFactory对象,这样应用上下文持有一个bean factory的引用,大部分应用只需与应用上下文提供的接口打交道就是因为它对bean factory进行了一层封装。至此,一个Spring容器已经构造出来了,但是目前这个容器还什么都没有,需要根据用户的配置文件进行配置才能按照用户逻辑进行工作。准备应用上下文。
SpringApplication#prepareContext()的实现如下:privatevoidprepareContext(ConfigurableApplicationContext context, ConfigurableEnvironment environment, SpringApplicationRunListeners listeners, ApplicationArguments applicationArguments, Banner printedBanner) {// 使context持有应用环境的引用,同时将应用环境的引用赋给reader和scanner context.setEnvironment(environment);// 实现应用上下文的后置处理 postProcessApplicationContext(context);// 应用初始化器--添加监听器、logger、warnning等组件 applyInitializers(context); listeners.contextPrepared(context);if (this.logStartupInfo) { logStartupInfo(context.getParent() ==null); logStartupProfileInfo(context); }// 添加启动相关的bean context.getBeanFactory().registerSingleton("springApplicationArguments", applicationArguments);if (printedBanner !=null) { context.getBeanFactory().registerSingleton("springBootBanner", printedBanner); }// Load the sources Set<Object> sources = getSources(); Assert.notEmpty(sources,"Sources must not be empty");// 将source bean装载到应用上下文 load(context, sources.toArray(new Object[sources.size()]));// 日志配置---参考具体实现 listeners.contextLoaded(context); }上下文后置处理
SpringApplication#postProcessApplicationContext()代码如下:protectedvoidpostProcessApplicationContext(ConfigurableApplicationContext context) {if (this.beanNameGenerator !=null) { context.getBeanFactory().registerSingleton( AnnotationConfigUtils.CONFIGURATION_BEAN_NAME_GENERATOR,this.beanNameGenerator); }if (this.resourceLoader !=null) {if (contextinstanceof GenericApplicationContext) { ((GenericApplicationContext) context) .setResourceLoader(this.resourceLoader); }if (contextinstanceof DefaultResourceLoader) { ((DefaultResourceLoader) context) .setClassLoader(this.resourceLoader.getClassLoader()); } } }这段后置处理代码主要是注册
BeanNameGenerator类型的bean并设置应用上下文的资源加载器和类加载器。SpringApplication#load()方法会实例化一个BeanDefinitionLoader对象loader, 然后调用它的load()方法装载bean,这里完成的工作就是将用户编写的主类作为bean进行注册。刷新应用上下文。刷新上下文实际上是调用
AbstractApplicationContext#refresh()方法,这个方法很复杂,执行完毕后整个应用上下文也就完成了配置。下一节对这个方法进行详细讲解。后置工作。后置工作等分析完了步骤6之后再写。