记 Spring Cloud Fegin 实现MultipartFile上传文件功能,报not a type supported by this encoder解决方案
项目是用Spring Cloud搭的微服务,使用了eureka,FeignClient。今天在做上传文件功能,涉及到了跨服务上传文件的方法,直接使用FeignClient去远程调用注册中心上上次文件服务的上传文件接口,一直报错。
最开始的时候Spring cloud中,Feign本身是不支持上传文件的能力的,估约1年前.
要想实现这个方法,需要自己去编写Encoder的,然而这种情况编写起来比较复杂麻烦.
我也在网上看过编写Encoder的方式,情况比较麻烦.
在寻找的路途中发现了Feign官方提供了上传子项目, "feign-form ".其中就实现了我们所需要的Encoder.
解决方法
一 . 首先在服务的调用方添加依赖
<dependency><groupId>io.github.openfeign.form</groupId><artifactId>feign-form</artifactId><version>3.8.0</version></dependency><dependency><groupId>io.github.openfeign.form</groupId><artifactId>feign-form-spring</artifactId><version>3.8.0</version></dependency>这里建议使用最新版本的,由于之前我使用的是2.3.0之后,一直报LinkHashMap not a type supported by this encoder,所有建议大家使用最新的版本
二 . 添加自定义配置类的Encoder的Config
import feign.codec.Encoder;import feign.form.spring.SpringFormEncoder;import org.springframework.beans.factory.ObjectFactory;import org.springframework.beans.factory.annotation.Autowired;import org.springframework.boot.autoconfigure.http.HttpMessageConverters;import org.springframework.cloud.openfeign.support.SpringEncoder;import org.springframework.context.annotation.Bean;import org.springframework.context.annotation.Configuration;publicclassFeignMultipartSupportConfig{//不会影响其他接口的传参,可以传对象、文件等@Autowiredprivate ObjectFactory<HttpMessageConverters> messageConverters;@Beanpublic EncoderfeignFormEncoder(){returnnewSpringFormEncoder(newSpringEncoder(messageConverters));}}三 . 在FeginClient上添加config参数,并配置上面的FeignMultipartSupportConfig
import com.gupaoedu.example.ImageOssService;import com.gupaoedu.example.config.FeignMultipartSupportConfig;import org.springframework.cloud.openfeign.FeignClient;@FeignClient(value="order-service",contextId="image",configuration=FeignMultipartSupportConfig.class)publicinterfaceImageOssServiceFeginClientextendsImageOssService{}四 . 在RequestMapping中添加参数如下,并且接收MultipartFile使用@RequestPart注解
Produces = {MediaType.APPLICATION_JSON_UTF8_VALUE},consumes = MediaType.MULTIPART_FORM_DATA_VALUE
import com.gupaoedu.example.dto.ImageOssDto;import org.springframework.http.MediaType;import org.springframework.web.bind.annotation.*;import org.springframework.web.multipart.MultipartFile;publicinterfaceImageOssService{@RequestMapping(
        value={"/oss/upload"},
        produces={MediaType.APPLICATION_JSON_UTF8_VALUE},
        consumes= MediaType.MULTIPART_FORM_DATA_VALUE,
        method={RequestMethod.POST})
    Stringupload(@RequestPart("file") MultipartFile file,@RequestParam("pictureUrl") String pictureUrl,@RequestParam("bucketName") String bucketName);}
五. 源码解析
一.SpringFormEncoder
首先看一下Encoder编码器的实现类
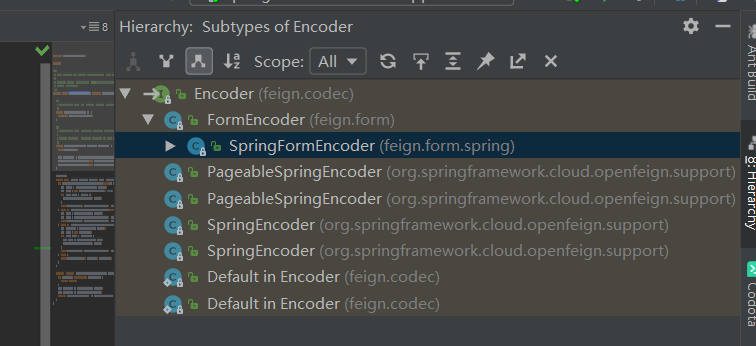
publicclassSpringFormEncoderextendsFormEncoder{/**
   * Constructor with the default Feign's encoder as a delegate.
   */public SpringFormEncoder(){this(newEncoder.Default());}/**
   * Constructor with specified delegate encoder.
   *
   * @param delegate  delegate encoder, if this encoder couldn't encode object.
   */public SpringFormEncoder(Encoder delegate){super(delegate);

        val processor=(MultipartFormContentProcessor)getContentProcessor(MULTIPART);
        processor.addFirstWriter(newSpringSingleMultipartFileWriter());
        processor.addFirstWriter(newSpringManyMultipartFilesWriter());}@Overridepublicvoid encode(Object object, Type bodyType, RequestTemplate template)throws EncodeException{if(bodyType.equals(MultipartFile[].class)){
            val files=(MultipartFile[]) object;
            val data=newHashMap<String, Object>(files.length,1.F);for(val file: files){
                data.put(file.getName(), file);}super.encode(data, MAP_STRING_WILDCARD, template);}elseif(bodyType.equals(MultipartFile.class)){
            val file=(MultipartFile) object;
            val data=singletonMap(file.getName(), object);super.encode(data, MAP_STRING_WILDCARD, template);}elseif(isMultipartFileCollection(object)){
            val iterable=(Iterable<?>) object;
            val data=newHashMap<String, Object>();for(val item: iterable){
                val file=(MultipartFile) item;
                data.put(file.getName(), file);}super.encode(data, MAP_STRING_WILDCARD, template);}else{super.encode(object, bodyType, template);}}
Fegin中默认使用的编码器是 SpringEncoder,但是SpringEncoder有不支持MultipartFile,查看其子类SpringFromEncoder可以使用MultipartFile上次文件,
故在配置类中将SpringFromEncoder注入就可以使用了,但是有一个问题,定义了全局的配置文件,每次调用请求都会到SpringFromEncoder中,这样会引起我正常的
传输对象出问题。
二. 隔离FeignClient的配置
要想解决上面的问题,不让我提供的feign配置污染调用方的项目,此时需要进到FeignClient注解中,可以看到如下配置项:
/**
	 * A custom <code>@Configuration</code> for the feign client. Can contain override
	 * <code>@Bean</code> definition for the pieces that make up the client, for instance
	 * {@link feign.codec.Decoder}, {@link feign.codec.Encoder}, {@link feign.Contract}.
	 *
	 * @see FeignClientsConfiguration for the defaults
	 */
	Class<?>[]configuration()default{};
从注释可以看出,是用来定制FeignClient的配置的,我们需要将代码修改如下:
publicclassFeignMultipartSupportConfig{//不会影响其他接口的传参,可以传对象、文件等@Autowiredprivate ObjectFactory<HttpMessageConverters> messageConverters;@Beanpublic EncoderfeignFormEncoder(){returnnewSpringFormEncoder(newSpringEncoder(messageConverters));}}上面首先是防止FeignMultipartSupportConfig被调用方自动扫到,然后在FeignClient注解上指定了配置类,这样就能让FeignMultipartSupportConfig里配置的bean只在demo-spi中生效了,通过测试,验证了结果正确,大功告成。
但是为什么呢?DemoFeignClientConfig里面还是有@Bean的存在,理论上来说FeignMultipartSupportConfig还是会被注册到springContext里,那么为什么这个bean没有被其他FeignClient找到呢?
三. FeignContext
如何隔离bean,奥秘就在FeignContext.class这个类,首先看获取FeignClient的源码中有这样一段:
classFeignClientFactoryBeanimplementsFactoryBean<Object>, InitializingBean,
ApplicationContextAware{/**
	 * @param <T> the target type of the Feign client
	 * @return a {@link Feign} client created with the specified data and the context information
	 */<T> TgetTarget(){
        FeignContext context= applicationContext.getBean(FeignContext.class);
        Feign.Builder builder=feign(context);
我们可以看到在build的时候从容器中拿到了一个FeignContext的实例,再看生成builder的方法:
protected Feign.Builderfeign(FeignContext context){
    FeignLoggerFactory loggerFactory=get(context, FeignLoggerFactory.class);
    Logger logger= loggerFactory.create(this.type);// @formatter:off
Feign.Builder builder=get(context, Feign.Builder.class)// required values.logger(logger).encoder(get(context, Encoder.class)).decoder(get(context, Decoder.class)).contract(get(context, Contract.class));// @formatter:onconfigureFeign(context, builder);return builder;}大家可以跟进去get(context, Encoder.class),可以看到构造builder时,是从这个FeignContext中获取对应的ecoder实例的,那么FeignContext到底是什么呢?
protected<T> Tget(FeignContext context, Class<T> type){//调用getInstance方法
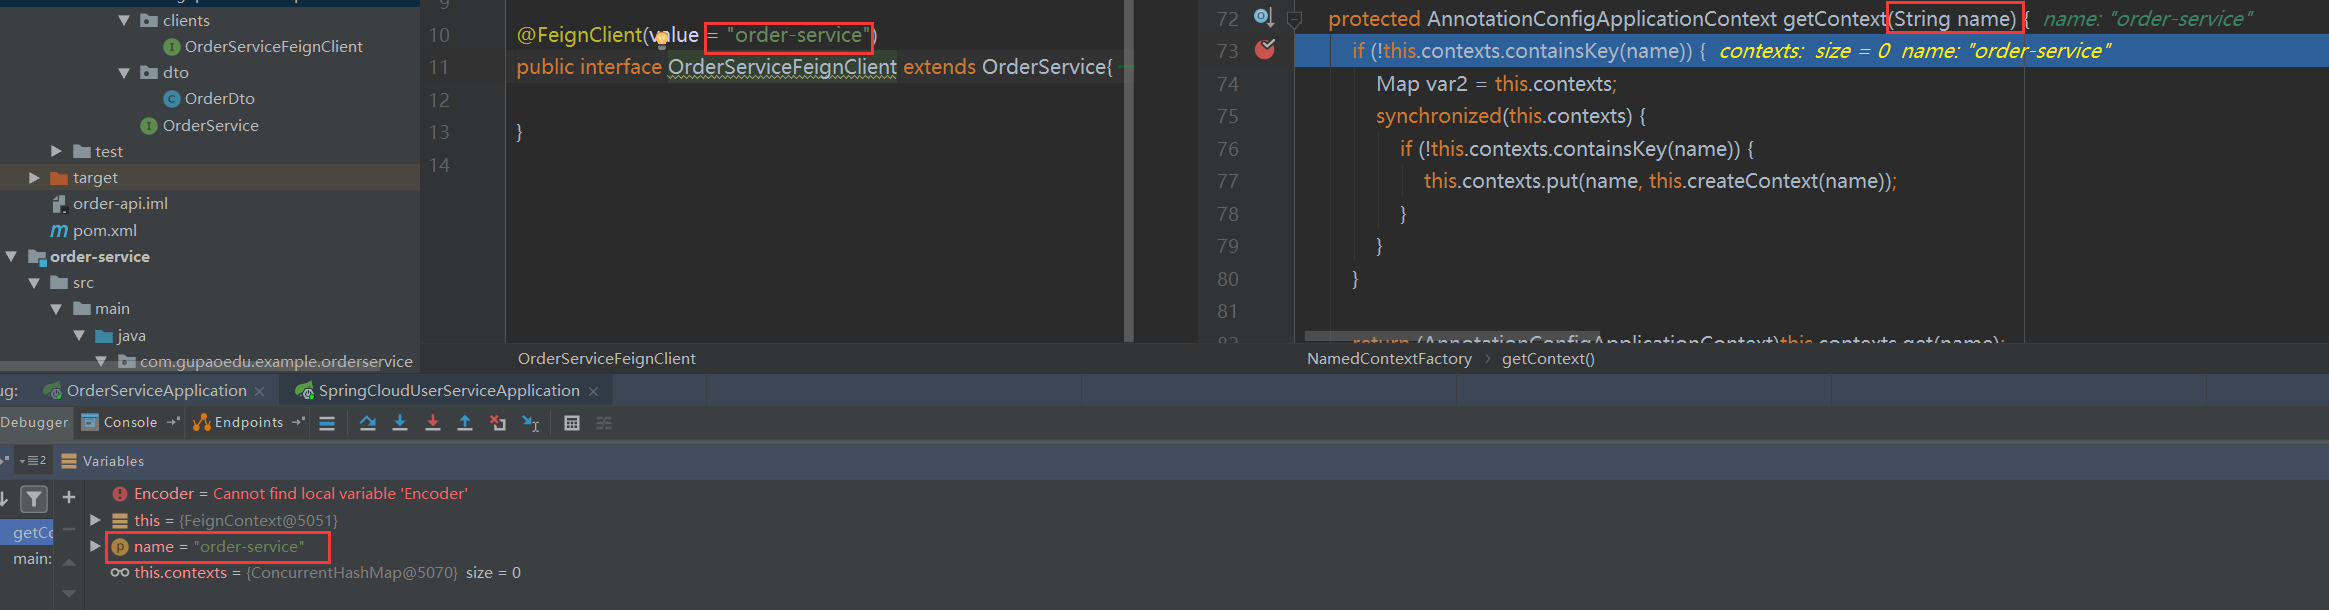
T instance= context.getInstance(this.contextId, type);if(instance== null){thrownewIllegalStateException("No bean found of type "+ type+" for "+this.contextId);}return instance;}public<T> TgetInstance(String name, Class<T> type){//调用getContext(),获取applicationContext
AnnotationConfigApplicationContext context=this.getContext(name);return BeanFactoryUtils.beanNamesForTypeIncludingAncestors(context, type).length>0? context.getBean(type): null;}protected AnnotationConfigApplicationContextgetContext(String name){//先从缓存中查找,如果有直接返回,if(!this.contexts.containsKey(name)){
Map var2=this.contexts;synchronized(this.contexts){if(!this.contexts.containsKey(name)){//没有的话,重新构建一个,调用createContext()方法this.contexts.put(name,this.createContext(name));}}}return(AnnotationConfigApplicationContext)this.contexts.get(name);}从FeignContext的源码中可以看到,它是继承自NamedContextFactory的一个类,这个类主要的两个属性如下:
private Map<String, AnnotationConfigApplicationContext> contexts=newConcurrentHashMap<>();private ApplicationContext parent;contexts是一个map,key是feign的name,value是一个AnnotationConfigApplicationContext,从protected AnnotationConfigApplicationContext createContext(String name)的源码中可以看出,每个context会去解析配置在FeignClient中的configuration类,将类中定义的@bean注册到当前的AnnotationConfigApplicationContext里,同时将容器的context设置为自己的父context:
protected AnnotationConfigApplicationContextcreateContext(String name){//根据不同的Name,重新构建一个Applicationcontext,实现了不同FeginClient之间的隔离,互补影响
    AnnotationConfigApplicationContext context=newAnnotationConfigApplicationContext();if(this.configurations.containsKey(name)){for(Class<?> configuration:this.configurations.get(name).getConfiguration()){//注册配置类中的bean
            context.register(configuration);}}for(Map.Entry<String, C> entry:this.configurations.entrySet()){if(entry.getKey().startsWith("default.")){for(Class<?> configuration: entry.getValue().getConfiguration()){
                context.register(configuration);}}}
    context.register(PropertyPlaceholderAutoConfiguration.class,this.defaultConfigType);
    context.getEnvironment().getPropertySources().addFirst(newMapPropertySource(this.propertySourceName,
        Collections.<String, Object>singletonMap(this.propertyName, name)));if(this.parent!= null){//设置自己的父context为容器的context
        context.setParent(this.parent);}
    context.setDisplayName(generateDisplayName(name));
    context.refresh();return context;}
然后在生成FeignClient的时候,获取作用在该Client上的组件时,调用如下方法:
public<T> TgetInstance(String name, Class<T> type){//获取该Feign对应的context
    AnnotationConfigApplicationContext context=getContext(name);if(BeanFactoryUtils.beanNamesForTypeIncludingAncestors(context,
                                                            type).length>0){//从自己的context中获取对应的组件,会依次往上从父context中寻找return context.getBean(type);}return null;}
至此,就搞清了Feign是如何隔离开不同FeignClient的配置。
四. 一些小问题
由于FeignContext是已feign.name隔离的,所以当有不同的Api,但是有相同的Feign.name时,需要全部都配上一样的configuration,否则配置会覆盖,根据加载顺序的不同会出现不同的效果,偏离配置的预期。