零、前言
Exchange、Queue与Routing Key三个概念是理解RabbitMQ消息投递的关键。RabbitMQ中一个核心的原则是,消息不能直接投递到Queue中。Producer只能将自己的消息投递到Exchange中,由Exchange按照routing_key投递到对应的Queue中,具体的架构参见下图。
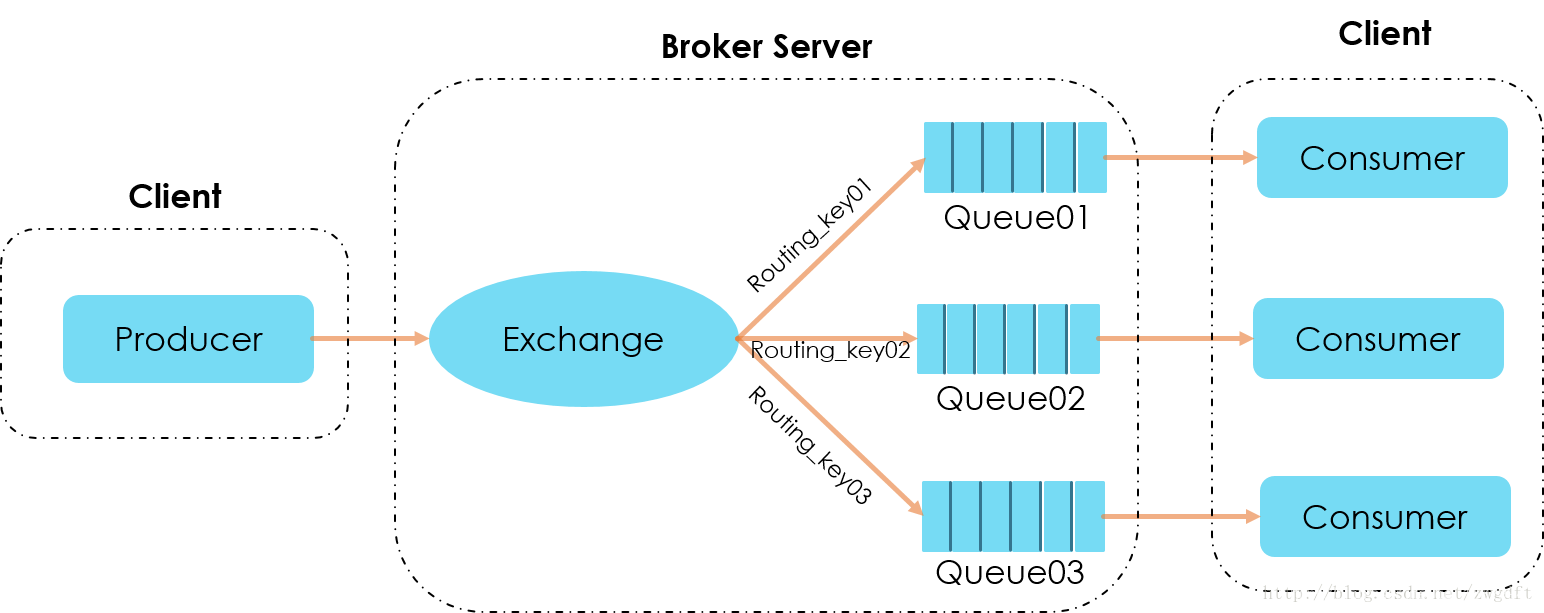
那么,具体实现时,如何完成这三者关系的绑定?总结起来是两点:第一,在Consumer Worker中,声明自己对哪个Exchange感兴趣,并将自己的Queue绑定到自己感兴趣的一组routing_key上,建立相应的映射关系;第二,在Producer中,将消息投递一个Exchange中,并指明它的routing_key。由此可见,Queue这个概念只是对Consumer可见,Producer并不关心消息被投递到哪个Queue中。
搞清楚上述概念,就不难理解Exchange的四种类型了。Direct、Fanout、Topic、Headers,区别在于如何将消息从Exchange投递到Queue中。Direct使用具体的routing_key来投递;Fanout则忽略routing_key,直接广播给所有的Queue;Topic是使用模糊匹配来对一组routing_key进行投递;Headers也是忽略routing_key,使用消息中的Headers信息来投递。
Headers交换机在本文不会提及。
关于交换机、绑定(路由键)、队列和虚拟主机的关系如下图。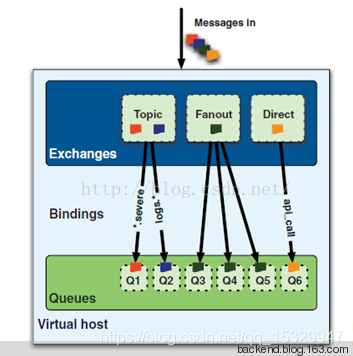
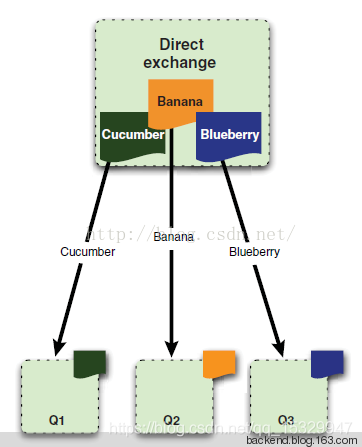
一、Direct直连交换机
1.1 默认直连交换机
看过RabbitMQ的”Hello World”教程的童鞋可能会发现在那里面的图中并没有看到Exchange和routing_key的踪迹,但这并不意味着RabbitMQ可以支持直接将消息投递到Queue中,而是在内部使用了默认的Exchange和routing_key了。默认情况下,RabbitMQ使用名称为“amq.direct”的Direct Exchange,routing_key默认名字与Queue保持一致。
我的博客:《RabbitMQ中间件方案:BPM-SAP的应用解耦和用户并发量控制(基于SpringBoot)》https://blog.csdn.net/qq_15329947/article/details/85298978
中的项目就只创建了队列,而没有创建交换机和绑定,使用的就是这种默认直连交换机。
1.2 创建直连交换机
直连交换机中,每对交换机和队列之间只能通过唯一一个路由键来绑定(当然,每个交换机可绑定多个队列,每个队列也可绑定多个交换机),直接了当,所以直接上代码:
1.2.1 配置
package com.jake.rabbitbootdemo.config;import org.springframework.amqp.core.Binding;import org.springframework.amqp.core.BindingBuilder;import org.springframework.amqp.core.DirectExchange;import org.springframework.amqp.core.Queue;import org.springframework.context.annotation.Bean;import org.springframework.context.annotation.Configuration;@ConfigurationpublicclassDirectConfig{@Beanpublic QueuedirectQueue1(){returnnewQueue("jake.direct.queue.1");}@Beanpublic QueuedirectQueue2(){returnnewQueue("jake.direct.queue.2");}@Beanpublic QueuedirectQueue3(){returnnewQueue("jake.direct.queue.3");}@Beanpublic DirectExchangedirectExchange(){returnnewDirectExchange("jake.direct.exchange");}@Beanpublic BindingbindQueue1(){return BindingBuilder.bind(directQueue1()).to(directExchange()).with("jake.direct.routingKey.1");}@Beanpublic BindingbindQueue2(){return BindingBuilder.bind(directQueue2()).to(directExchange()).with("jake.direct.routingKey.2");}@Beanpublic BindingbindQueue3(){return BindingBuilder.bind(directQueue3()).to(directExchange()).with("jake.direct.routingKey.3");}}1.2.2 生产者
package com.jake.rabbitbootdemo.producer;import org.springframework.amqp.rabbit.core.RabbitTemplate;import org.springframework.beans.factory.annotation.Autowired;import org.springframework.stereotype.Component;@ComponentpublicclassDirectProducer{@Autowiredprivate RabbitTemplate rabbitTemplate;publicvoidsend1(String msg){
        rabbitTemplate.convertAndSend("jake.direct.exchange","jake.direct.routingKey.1", msg);}publicvoidsend2(String msg){
        rabbitTemplate.convertAndSend("jake.direct.exchange","jake.direct.routingKey.2", msg);}publicvoidsend3(String msg){
        rabbitTemplate.convertAndSend("jake.direct.exchange","jake.direct.routingKey.3", msg);}}
1.2.3 消费者
package com.jake.rabbitbootdemo.consumer;import org.springframework.amqp.rabbit.annotation.RabbitHandler;import org.springframework.amqp.rabbit.annotation.RabbitListener;import org.springframework.stereotype.Component;@Component@RabbitListener(queues={"jake.direct.queue.1","jake.direct.queue.2","jake.direct.queue.3"})publicclassDirectConsumer{@RabbitHandlerpublicvoidprocess(String msg){
        System.out.println(msg);}}
1.2.4 控制层
package com.jake.rabbitbootdemo.controller;import com.jake.rabbitbootdemo.producer.DirectProducer;import org.springframework.beans.factory.annotation.Autowired;import org.springframework.web.bind.annotation.RequestMapping;import org.springframework.web.bind.annotation.RestController;@RestController@RequestMapping("direct")publicclassDirectController{@Autowiredprivate DirectProducer directProducer;@RequestMapping("1")publicvoidproduce1(String msg){
        directProducer.send1(msg);}@RequestMapping("2")publicvoidproduce2(String msg){
        directProducer.send2(msg);}@RequestMapping("3")publicvoidproduce3(String msg){
        directProducer.send3(msg);}}
1.3 Postman测试
localhost:8091/rabbit-demo/direct/1 携带请求体:msg = “直连1”
localhost:8091/rabbit-demo/direct/2 携带请求体:msg = “直连2”
localhost:8091/rabbit-demo/direct/3 携带请求体:msg = “直连3”
测试结果
控制台一一对应输出:
直连1
直连2
直连3
二、Topic主题交换机

2.1 三种主题详细剖析
Topic交换机中路由键有一套规范化的命名规则,参考博客:
https://www.jianshu.com/p/419ecc092f1e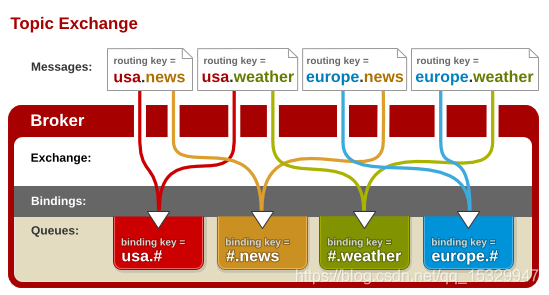
Topic Exchange转发消息主要是根据通配符。在这种交换机下,队列和交换机的绑定会定义一种路由模式,那么,通配符就要在这种路由模式和路由键之间匹配后交换机才能转发消息。
在这种交换机模式下:
(1)路由键(Routing Key)命名必须为一串字符,用句号(.) 隔开,比如 jake.topic.queue。
(2)队列和交换机通过路由键绑定。
i). 当绑定的路由键主题为精确匹配模式时,如:
@Beanpublic BindingbindWithAccurateMatcher(){return BindingBuilder.bind(topicQueueAccurate()).to(topicExchange()).with("jake.topic.routingKey.accurate");}只有生产者发送至主题交换机的路由键与绑定的路由键完全匹配时,被绑定的队列才会被消费:
publicvoidsendAccurate(String msg){
        rabbitTemplate.convertAndSend("jake.topic.exchange","jake.topic.routingKey.accurate", msg);}
ii). 当绑定的路由键主题为单词模糊匹配模式(一个星号*代表模糊匹配句号.之后的一个单词)时,如:
@Beanpublic BindingbindWithSingleWordMatcher(){return BindingBuilder.bind(topicQueueSingle()).to(topicExchange()).with("jake.topic.routingKey.*");}或者
@Beanpublic BindingbindWithSingleWordMatcher(){return BindingBuilder.bind(topicQueueSingle()).to(topicExchange()).with("jake.topic.*.*");}当生产者发送至主题交换机的路由键与绑定的路由键能够完成非星号位置的全词匹配和星号位置的单词数量匹配时,被绑定的队列即可被消费:
publicvoidsendSingle(String msg){
        rabbitTemplate.convertAndSend("jake.topic.exchange","jake.topic.routingKey.only-one-word", msg);}
iii). 当绑定的路由键主题为任意匹配模式时(井号#匹配句号.后面的任意多个单词),如:
@Beanpublic BindingbindWithAnyWordMatcher(){return BindingBuilder.bind(topicQueueAny()).to(topicExchange()).with("jake.topic.#");}当生产者发送至主题交换机的路由键与绑定的路由键能够完成非井号位置的全词匹配时,被绑定的队列即可被消费:
publicvoidsendAny(String msg){
        rabbitTemplate.convertAndSend("jake.topic.exchange","jake.topic.routingKey.as.much.as.you.want", msg);}
2.2 完整代码
2.2.1 配置
TopicConfig
Topic相关配置包括:创建Topic交换机,并绑定队列。
package com.jake.rabbitbootdemo.config;import org.springframework.amqp.core.Binding;import org.springframework.amqp.core.BindingBuilder;import org.springframework.amqp.core.Queue;import org.springframework.amqp.core.TopicExchange;import org.springframework.context.annotation.Bean;import org.springframework.context.annotation.Configuration;@ConfigurationpublicclassTopicConfig{@Beanpublic QueuetopicQueueAccurate(){returnnewQueue("jake.topic.queue.accurate");}@Beanpublic QueuetopicQueueSingle(){returnnewQueue("jake.topic.queue.single");}@Beanpublic QueuetopicQueueAny(){returnnewQueue("jake.topic.queue.any");}@Beanpublic TopicExchangetopicExchange(){returnnewTopicExchange("jake.topic.exchange");}@Beanpublic BindingbindWithAccurateMatcher(){return BindingBuilder.bind(topicQueueAccurate()).to(topicExchange()).with("jake.topic.routingKey.accurate");}@Beanpublic BindingbindWithSingleWordMatcher(){return BindingBuilder.bind(topicQueueSingle()).to(topicExchange()).with("jake.topic.routingKey.*");}@Beanpublic BindingbindWithAnyWordMatcher(){return BindingBuilder.bind(topicQueueAny()).to(topicExchange()).with("jake.topic.#");}}2.2.2 生产者
生产者TopicProducer
发送路由和消息至交换机
package com.jake.rabbitbootdemo.producer;import org.springframework.amqp.rabbit.core.RabbitTemplate;import org.springframework.beans.factory.annotation.Autowired;import org.springframework.stereotype.Component;@ComponentpublicclassTopicProducer{@Autowiredprivate RabbitTemplate rabbitTemplate;publicvoidsendAccurate(String msg){
        rabbitTemplate.convertAndSend("jake.topic.exchange","jake.topic.routingKey.accurate", msg);}publicvoidsendSingle(String msg){
        rabbitTemplate.convertAndSend("jake.topic.exchange","jake.topic.routingKey.only-one-word", msg);}publicvoidsendAny(String msg){
        rabbitTemplate.convertAndSend("jake.topic.exchange","jake.topic.routingKey.as.much.as.you.want", msg);}}
2.2.3 消费者
为了区分生产者发送的路由键匹配到了哪些绑定的主题路由键,每个消费者类都只监听一条队列。
a). 监听全词(精确)匹配:TopicAccurateMatchConsumer
package com.jake.rabbitbootdemo.consumer;import org.springframework.amqp.rabbit.annotation.RabbitHandler;import org.springframework.amqp.rabbit.annotation.RabbitListener;import org.springframework.stereotype.Component;@Component@RabbitListener(queues={"jake.topic.queue.accurate"})publicclassTopicAccurateMatchConsumer{@RabbitHandlerpublicvoidprocess(String msg){
        System.out.println(this.getClass().getSimpleName()+":"+ msg);}}
b). 监听单词匹配:TopicSingleMatchConsumer
package com.jake.rabbitbootdemo.consumer;import org.springframework.amqp.rabbit.annotation.RabbitHandler;import org.springframework.amqp.rabbit.annotation.RabbitListener;import org.springframework.stereotype.Component;@Component@RabbitListener(queues={"jake.topic.queue.single"})publicclassTopicSingleMatchConsumer{@RabbitHandlerpublicvoidprocess(String msg){
        System.out.println(this.getClass().getSimpleName()+":"+ msg);}}
c). 监听任意匹配:TopicAnyMatchConsumer
package com.jake.rabbitbootdemo.consumer;import org.springframework.amqp.rabbit.annotation.RabbitHandler;import org.springframework.amqp.rabbit.annotation.RabbitListener;import org.springframework.stereotype.Component;@Component@RabbitListener(queues={"jake.topic.queue.any"})publicclassTopicAnyMatchConsumer{@RabbitHandlerpublicvoidprocess(String msg){
        System.out.println(this.getClass().getSimpleName()+":"+ msg);}}
2.2.4 控制层
提供Http接口,用于测试。
package com.jake.rabbitbootdemo.controller;import com.jake.rabbitbootdemo.producer.TopicProducer;import org.springframework.beans.factory.annotation.Autowired;import org.springframework.web.bind.annotation.RequestMapping;import org.springframework.web.bind.annotation.RestController;@RestController@RequestMapping("topic")publicclassTopicController{@Autowiredprivate TopicProducer topicProducer;@RequestMapping("accurate")publicvoidaccurate(String msg){
        topicProducer.sendAccurate(msg);}@RequestMapping("single")publicvoidsingle(String msg){
        topicProducer.sendSingle(msg);}@RequestMapping("any")publicvoidany(String msg){
        topicProducer.sendAny(msg);}}
2.3 Postman测试
测试1
localhost:8091/rabbit-demo/topic/accurate 携带请求体:msg = “精确打击”
控制台输出:
TopicAccurateMatchConsumer:精确打击
TopicSingleMatchConsumer:精确打击
TopicAnyMatchConsumer:精确打击
测试2
localhost:8091/rabbit-demo/topic/single 携带请求体:msg = “单词匹配”
控制台输出:
TopicAnyMatchConsumer:单词匹配
TopicSingleMatchConsumer:单词匹配
测试3
localhost:8091/rabbit-demo/topic/any 携带请求体:msg = “任意匹配”
控制台输出:
TopicAnyMatchConsumer:任意匹配
三、Fanout扇出交换机

扇出交换机无需绑定路由,只要是生产者发送到扇出交换机上的消息全部都会被消费者监听到并消费。所以,随意发送任意路由都可以。
3.1 代码
3.1.1 配置
package com.jake.rabbitbootdemo.config;import org.springframework.amqp.core.Binding;import org.springframework.amqp.core.BindingBuilder;import org.springframework.amqp.core.FanoutExchange;import org.springframework.amqp.core.Queue;import org.springframework.context.annotation.Bean;import org.springframework.context.annotation.Configuration;@ConfigurationpublicclassFanoutConfig{@Beanpublic QueuefanoutQueue1(){returnnewQueue("jake.fanout.queue.1");}@Beanpublic QueuefanoutQueue2(){returnnewQueue("jake.fanout.queue.2");}@Beanpublic QueuefanoutQueue3(){returnnewQueue("jake.fanout.queue.3");}@Beanpublic FanoutExchangefanoutExchange(){returnnewFanoutExchange("jake.fanout.exchange");}@Beanpublic BindingbindFanoutQueue1(){return BindingBuilder.