目录
2.9.1 AddStudentServlet——对应添加学生操作
2.9.2 QueryStudentServlet——对应查询学生操作
2.10.2 显示添加学生处理结果——对应AddStudentServlet
2.10.3 显示查询学生处理结果——对应QueryStudentServlet
2.11.1 添加学生(AddStudentServlet)的测试结果
2.11.2 查询学生(QueryStudentServlet)的测试结果
1.前言
在学完了Java Web(HTML、CSS、JS、Tomcat、Servlet、JSP、MVC)这些内容之后才能完成真正上的三层架构实现前后端交互。
本篇只是实现三层架构的最基本功能,很简陋,只是学习用的,本篇不含springMVC的内容只是通过Java Web+spring+mybatis的。
2. 项目步骤
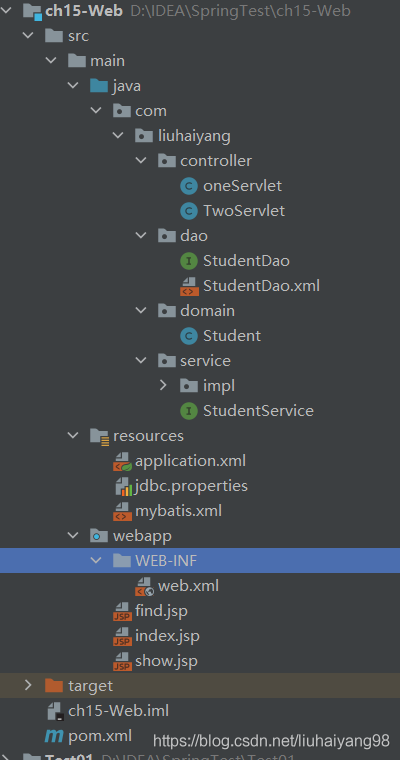
2.1 目录结构
controller包:界面层
dao包:数据库访问层
service包:业务逻辑层
domain包:每一个Java类对应于数据库中的一个表
resources目录:mybatis主配置文件、spring配置文件、jdbc外部属性配置文件
webapp:web项目相关内容,注册servlet、监听器、jsp页面
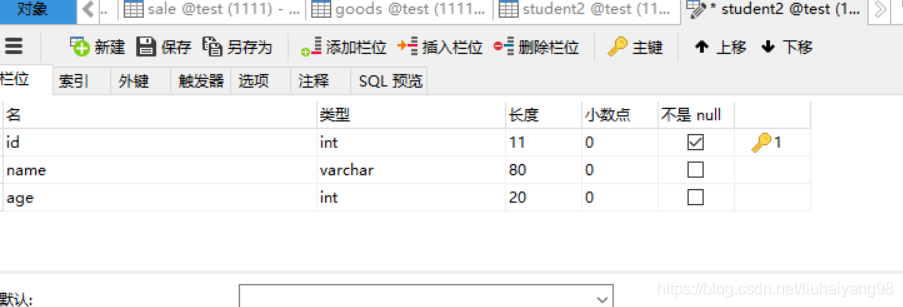
2.2 数据库
2.3 在pom.xml文件中加入依赖
<?xml version="1.0" encoding="UTF-8"?>

<project xmlns="http://maven.apache.org/POM/4.0.0" xmlns:xsi="http://www.w3.org/2001/XMLSchema-instance"
  xsi:schemaLocation="http://maven.apache.org/POM/4.0.0 http://maven.apache.org/xsd/maven-4.0.0.xsd">
  <modelVersion>4.0.0</modelVersion>

  <groupId>org.example</groupId>
  <artifactId>ch15-Web</artifactId>
  <version>1.0.0</version>
  <packaging>war</packaging>

  <properties>
    <project.build.sourceEncoding>UTF-8</project.build.sourceEncoding>
    <maven.compiler.source>1.8</maven.compiler.source>
    <maven.compiler.target>1.8</maven.compiler.target>
  </properties>

  <dependencies>
    <dependency>
      <groupId>junit</groupId>
      <artifactId>junit</artifactId>
      <version>4.11</version>
      <scope>test</scope>
    </dependency>

<!--    监听器依赖-->
    <dependency>
      <groupId>org.springframework</groupId>
      <artifactId>spring-web</artifactId>
      <version>5.2.5.RELEASE</version>
    </dependency>

<!--    servlet-->
    <dependency>
      <groupId>javax.servlet</groupId>
      <artifactId>javax.servlet-api</artifactId>
      <version>3.0.1</version>
    </dependency>
    <dependency>
      <groupId>javax.servlet.jsp</groupId>
      <artifactId>jsp-api</artifactId>
      <version>2.2.1-b03</version>
    </dependency>
    <!--  Spring依赖-->
    <dependency>
      <groupId>org.springframework</groupId>
      <artifactId>spring-context</artifactId>
      <version>5.2.5.RELEASE</version>
    </dependency>
    <!--    spring事务的依赖-->
    <dependency>
      <groupId>org.springframework</groupId>
      <artifactId>spring-tx</artifactId>
      <version>5.2.5.RELEASE</version>
    </dependency>
    <dependency>
      <groupId>org.springframework</groupId>
      <artifactId>spring-jdbc</artifactId>
      <version>5.2.5.RELEASE</version>
    </dependency>
    <!--    mybatis依赖-->
    <dependency>
      <groupId>org.mybatis</groupId>
      <artifactId>mybatis</artifactId>
      <version>3.5.1</version>
    </dependency>
    <!--    spring和mybatis集成-->
    <dependency>
      <groupId>org.mybatis</groupId>
      <artifactId>mybatis-spring</artifactId>
      <version>1.3.1</version>
    </dependency>
    <!--    mysql驱动-->
    <dependency>
      <groupId>mysql</groupId>
      <artifactId>mysql-connector-java</artifactId>
      <version>5.1.9</version>
    </dependency>
    <!--    阿里的连接池-->
    <dependency>
      <groupId>com.alibaba</groupId>
      <artifactId>druid</artifactId>
      <version>1.1.12</version>
    </dependency>
  </dependencies>

  <build>
    <resources>
      <resource>
        <directory>src/main/java</directory><!--所在的目录-->
        <includes><!--包括目录下的.properties,.xml 文件都会扫描到-->
          <include>**/*.properties</include>
          <include>**/*.xml</include>
        </includes>
        <filtering>false</filtering>
      </resource>
    </resources>
  </build>

</project>
2.4 创建Student实体类
package com.liuhaiyang.domain;

public class Student {
    private Integer id;
    private  String name;
    private  Integer age;

    //set()和get()方法、toString()、有参构造和无参构造

}
2.5 创建dao接口和对应的mapper文件
package com.liuhaiyang.dao;

import com.liuhaiyang.domain.Student;

public interface StudentDao {
    public int insertStudent(Student student);
    public Student selectId(Integer id);
}
<?xml version="1.0" encoding="UTF-8" ?>
<!DOCTYPE mapper
PUBLIC "-//mybatis.org//DTD Mapper 3.0//EN"
"http://mybatis.org/dtd/mybatis-3-mapper.dtd">
<mapper namespace="com.liuhaiyang.dao.StudentDao">
<!--使用insert,uodate,delete,select标签写sql-->
<insert id="insertStudent">
insert into student2(name,age) values(#{name},#{age})
</insert>
<select id="selectId" resultType="com.liuhaiyang.domain.Student">
select * from student2 where id=#{id}
</select>
<!-- 定义列和属性的对应关系
<resultMap id="studentMap" type="com.liuhaiyang.domain.Student">
<id column="列" property="属性"/>
</resultMap>
-->
</mapper>2.6 创建mybatis主配置文件
<?xml version="1.0" encoding="UTF-8" ?>
<!DOCTYPE configuration
        PUBLIC "-//mybatis.org//DTD Config 3.0//EN"
        "http://mybatis.org/dtd/mybatis-3-config.dtd">
<configuration>
<!--    设置日志-->
<!--        <settings>-->
<!--            <setting name="logImpl" value="STDOUT_LOGGING"/>-->
<!--        </settings>-->
    <!--指定其他mapper文件的位置  才能找到其他文件sql语句-->
    <mappers>
<!--        <mapper resource="com/lhy/dao/studentDao.xml"/>-->
        <package name="com.liuhaiyang.dao"/>
    </mappers>
</configuration>
2.7 创建service接口和实现类
2.7.1 StudentService接口
package com.liuhaiyang.service;

import com.liuhaiyang.domain.Student;

public interface StudentService {
    int addStudent(Student student);
    Student findStudentId(Integer id);
}
2.7.2 StudentServiceImpl实现类
package com.liuhaiyang.service.impl;

import com.liuhaiyang.dao.StudentDao;
import com.liuhaiyang.domain.Student;
import com.liuhaiyang.service.StudentService;

public class StudentServiceImpl implements StudentService {

    private  StudentDao stuDao;

    public void setStuDao(StudentDao studentDao) {
        this.stuDao = studentDao;
    }

    @Override
    public int addStudent(Student student) {
        System.out.println(student.getName());
        int a=stuDao.insertStudent(student);
        return a;
    }

    @Override
    public Student findStudentId(Integer id) {
        Student student=stuDao.selectId(id);
        return student;
    }
}
2.8 创建jdbc外部属性配置文件、spring配置文件
jdbc.url=jdbc:mysql://localhost:3306/test?useUnicode=true&characterEncoding=utf-8
jdbc.username=root
jdbc.password=123456
<?xml version="1.0" encoding="UTF-8"?>
<beans xmlns="http://www.springframework.org/schema/beans"
xmlns:xsi="http://www.w3.org/2001/XMLSchema-instance"
xmlns:context="http://www.springframework.org/schema/context"
xmlns:aop="http://www.springframework.org/schema/aop"
xsi:schemaLocation="http://www.springframework.org/schema/beans http://www.springframework.org/schema/beans/spring-beans.xsd http://www.springframework.org/schema/context https://www.springframework.org/schema/context/spring-context.xsd http://www.springframework.org/schema/tx http://www.springframework.org/schema/tx/spring-tx.xsd http://www.springframework.org/schema/aop https://www.springframework.org/schema/aop/spring-aop.xsd">
<!-- 加载引入外部属性配置文件-->
<context:property-placeholder location="classpath:jdbc.properties"/>
<!--声明数据源DataSource-->
<bean id="myDataSource" class="com.alibaba.druid.pool.DruidDataSource" init-method="init" destroy-method="close">
<property name="url" value="${jdbc.url}"/>
<property name="username" value="${jdbc.username}"/>
<property name="password" value="${jdbc.password}"/>
</bean>
<!--声明SqlSessionFactoryBean,在这个类内部,创建SqlSessionFactory-->
<bean id="factory" class="org.mybatis.spring.SqlSessionFactoryBean">
<!--指定数据源-->
<property name="dataSource" ref="myDataSource"/>
<!--指定myBatis主配置文件
Resource可以直接使用value属性赋值-->
<property name="configLocation" value="classpath:mybatis.xml"/>
</bean>
<bean class="org.mybatis.spring.mapper.MapperScannerConfigurer">
<!-- 指定sqlsessionFactory对象的名称-->
<property name="sqlSessionFactoryBeanName" value="factory"/>
<!-- 指定基本包,dao接口所在的包名-->
<property name="basePackage" value="com.liuhaiyang.dao"/>
</bean>
<!-- 声明式事务:不用写代码(只需要在文件中更改即可)
优点:代码和事务配置是分开的。控制事务源代码不能更改 能快速的了解和掌控项目的全部事务。适合大型项目
-->
<!-- 1.声明事务管理器-->
<bean id="transactionManager" class="org.springframework.jdbc.datasource.DataSourceTransactionManager">
<property name="dataSource" ref="myDataSource"/>
</bean>
<bean id="studentService" class="com.liuhaiyang.service.impl.StudentServiceImpl">
<property name="stuDao" ref="studentDao"/>
</bean>
</beans>2.9 创建servlet
2.9.1 AddStudentServlet——对应添加学生操作
package com.liuhaiyang.controller;

import com.liuhaiyang.domain.Student;
import com.liuhaiyang.service.StudentService;
import org.springframework.context.ApplicationContext;
import org.springframework.context.support.ClassPathXmlApplicationContext;
import org.springframework.web.context.WebApplicationContext;

import javax.servlet.ServletContext;
import javax.servlet.ServletException;
import javax.servlet.http.HttpServlet;
import javax.servlet.http.HttpServletRequest;
import javax.servlet.http.HttpServletResponse;
import java.io.IOException;

public class AddStudentServlet extends HttpServlet {
    @Override
    protected void doPost(HttpServletRequest req, HttpServletResponse resp) throws ServletException, IOException {
        req.setCharacterEncoding("UTF-8");
        String name=req.getParameter("name");
       String age=req.getParameter("age");
       //这里写text的的东西
//        String config="application.xml";
//        ApplicationContext ctx=new ClassPathXmlApplicationContext(config);
        //使用监听器创建application.xml文件的容器
        WebApplicationContext ctx=null;
        String key=WebApplicationContext.ROOT_WEB_APPLICATION_CONTEXT_ATTRIBUTE;  //获取key的值
        ServletContext sc=req.getServletContext(); //获得全局作用域对象
        Object attr=sc.getAttribute(key); //取出全局作用域对象的value
        if (attr!=null){
            ctx=(WebApplicationContext) attr;  //强转,将object转换成为ApplicationContext类型
        }

        System.out.println("在servlet在创建的对象容器======"+ctx);
        StudentService service=(StudentService) ctx.getBean("studentService");
        Student student=new Student();
        student.setName(name);
        student.setAge(Integer.valueOf(age));
        service.addStudent(student);
        req.getRequestDispatcher("/show.jsp").forward(req,resp);
    }
}
2.9.2 QueryStudentServlet——对应查询学生操作
package com.liuhaiyang.controller;

import com.liuhaiyang.domain.Student;
import com.liuhaiyang.service.StudentService;
import com.liuhaiyang.service.impl.StudentServiceImpl;
import org.springframework.context.ApplicationContext;
import org.springframework.context.support.ClassPathXmlApplicationContext;
import org.springframework.web.context.WebApplicationContext;
import org.springframework.web.context.support.WebApplicationContextUtils;

import javax.servlet.ServletContext;
import javax.servlet.ServletException;
import javax.servlet.http.HttpServlet;
import javax.servlet.http.HttpServletRequest;
import javax.servlet.http.HttpServletResponse;
import java.io.IOException;

public class QueryStudentServlet extends HttpServlet {
    @Override
    protected void doGet(HttpServletRequest req, HttpServletResponse resp) throws ServletException, IOException {
       resp.setContentType("");
        String id=req.getParameter("id");
//        String config="application.xml";
//        ApplicationContext ctx=new ClassPathXmlApplicationContext(config);
        //使用spring提供的工具方法,获取容器对象
        // getRequiredWebApplicationContext底层还是调用全局变量的key值取获取value,在进行判断和强转 只是帮我们做好封装起来了而已
        WebApplicationContext ctx= WebApplicationContextUtils.getRequiredWebApplicationContext(getServletContext());

        StudentService service=(StudentService)ctx.getBean("studentService");
        Student student=service.findStudentId(Integer.valueOf(id));
        req.setAttribute("stu",student);
        req.getRequestDispatcher("/find.jsp").forward(req,resp);


    }

}
2.9.3 在web.xml中注册servlet和监听器
<?xml version="1.0" encoding="UTF-8"?>
<web-app xmlns="http://xmlns.jcp.org/xml/ns/javaee"
         xmlns:xsi="http://www.w3.org/2001/XMLSchema-instance"
         xsi:schemaLocation="http://xmlns.jcp.org/xml/ns/javaee http://xmlns.jcp.org/xml/ns/javaee/web-app_4_0.xsd"
         version="4.0">

    <servlet>
        <servlet-name>one</servlet-name>
        <servlet-class>com.liuhaiyang.controller.AddStudentServlet</servlet-class>
    </servlet>
    <servlet-mapping>
        <servlet-name>one</servlet-name>
        <url-pattern>/one</url-pattern>
    </servlet-mapping>
    <servlet>
        <servlet-name>two</servlet-name>
        <servlet-class>com.liuhaiyang.controller.QueryStudentServlet</servlet-class>
    </servlet>
    <servlet-mapping>
        <servlet-name>two</servlet-name>
        <url-pattern>/two</url-pattern>
    </servlet-mapping>

<!--    声明监听器   默认规则:创建容器对象,读取配置文件: /WEB-INF/applicationContext.xml-->
<!--   自定义使用容器的配置 context-param:叫做上下文参数,给监听器提供参数的
-->
    <context-param>
<!--        contextConfigLocation:名称是固定的,表示自定义spring配置文件的路径-->
        <param-name>contextConfigLocation</param-name>
<!--        自定义配置文件的路径  可以是多个用逗号的方式连接-->
        <param-value>classpath:application.xml</param-value>
    </context-param>
    <listener>
        <listener-class>org.springframework.web.context.ContextLoaderListener</listener-class>
    </listener>
</web-app>
2.10 创建jsp页面
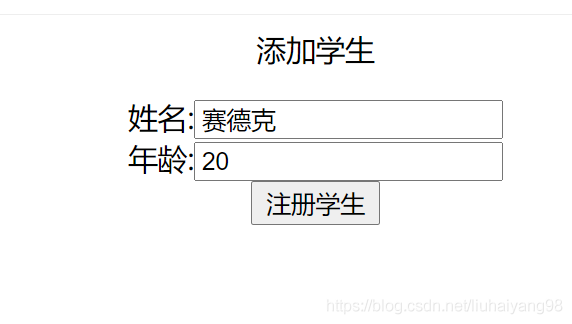
2.10.1 提交请求参数 (主界面)
<%@ page contentType="text/html;charset=UTF-8" language="java" %>
<html>
<head>
<title>添加学生</title>
</head>
<body>
<div align="center">
<p>添加学生</p>
<form action="one" method="post">
姓名:<input type="text" name="name"> <br>
年龄:<input type="text" name="age"> <br>
<input type="submit" value="注册学生"> <br>
</form>
<br>
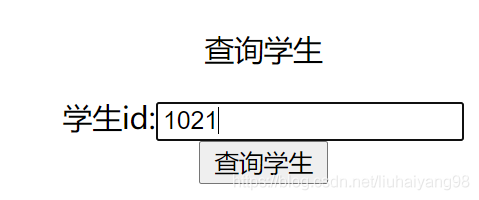
<p>查询学生</p>
<form action="two" method="get">
学生id:<input type="text" name="id"> <br>
<input type="submit" value="查询学生">
</form>
</div>
</body>
</html>2.10.2 显示添加学生处理结果——对应AddStudentServlet
<%@ page contentType="text/html;charset=UTF-8" language="java" %>
<html>
<head>
    <title>Title</title>
</head>
<body>
        <h1>注册成功</h1>
</body>
</html>
2.10.3 显示查询学生处理结果——对应QueryStudentServlet
<%@ page contentType="text/html;charset=UTF-8" language="java" %>
<html>
<head>
    <title>Title</title>
</head>
<body>
    <p>查询结果:${stu}</p>
</body>
</html>
2.11测试结果截图
2.11.1 添加学生(AddStudentServlet)的测试结果

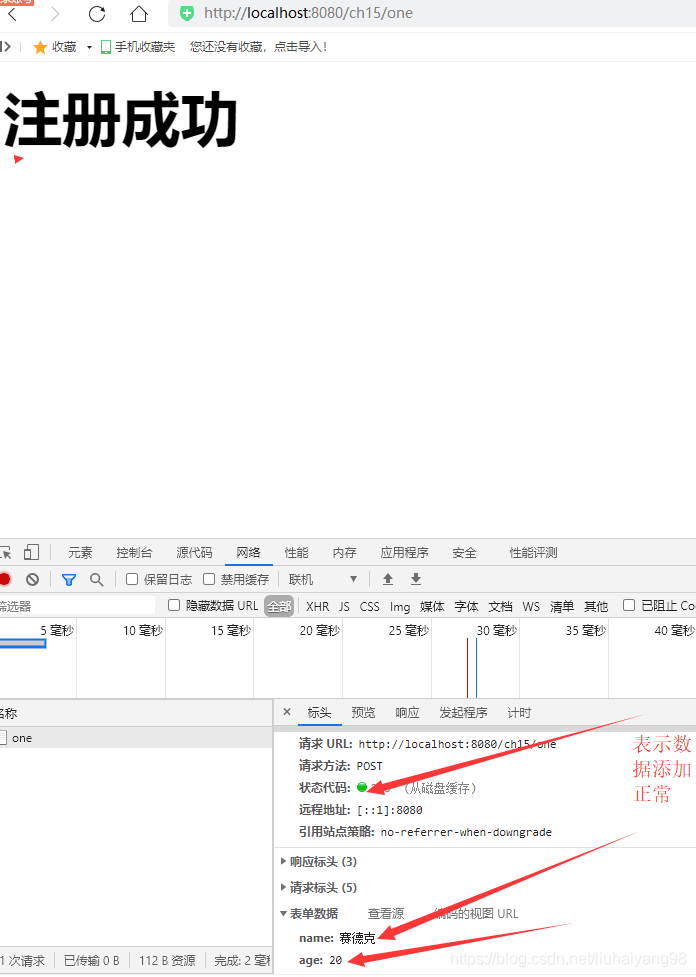
数据库数据截图
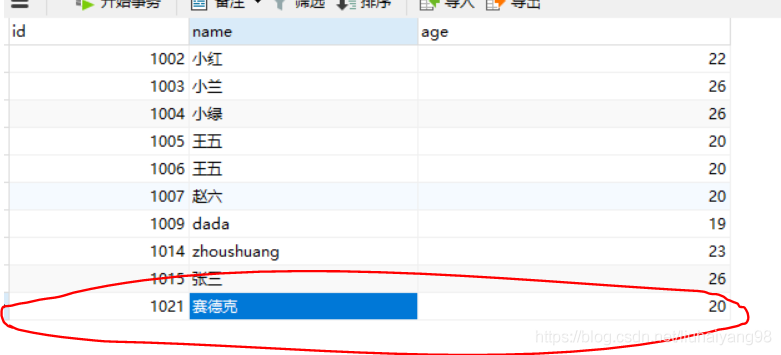
2.11.2 查询学生(QueryStudentServlet)的测试结果
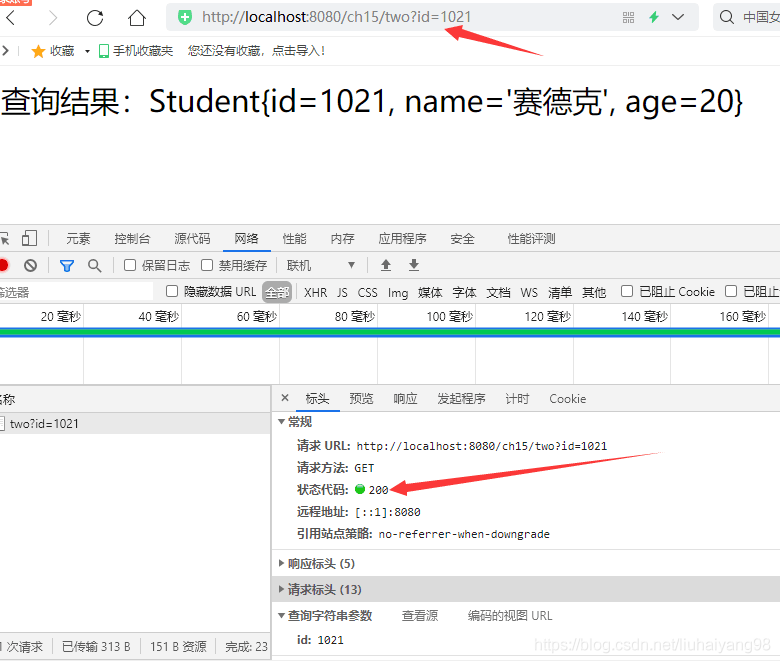
和数据库的数据是一致的,证明程序没有错误,这就是前后端数据交互,界面很简陋主要是学习中间的操作,要在心里有相关步骤,会自己添加相关功能就可以了。spring基本学完了,接下来就是开始springMVC的学习了。