1.SwaggerUI的简单介绍
Swagger是一个Restful风格接口的文档在线自动生成和测试的框架
官网:http://swagger.io
官方描述:The World’s Most Popular Framework for APIs.
页面UI如下: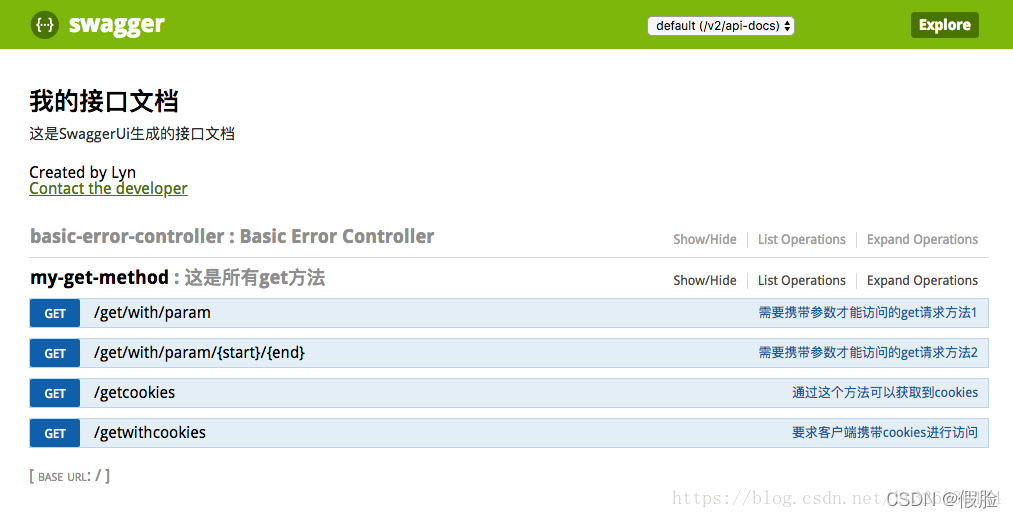
demo内的接口,已在之前的文章中介绍过,有兴趣的同学可以自己看一看:
https://editor.csdn.net/md?not_checkout=1&articleId=122317433
https://editor.csdn.net/md?not_checkout=1&articleId=122317555
https://editor.csdn.net/md?not_checkout=1&articleId=122317610
2.pom文件配置
在pom.xml文件中,引入swagger的包
<properties><swagger.version>2.6.1</swagger.version></properties><dependencies><dependency><groupId>io.springfox</groupId><artifactId>springfox-swagger2</artifactId><version>${swagger.version}</version></dependency><dependency><groupId>io.springfox</groupId><artifactId>springfox-swagger-ui</artifactId><version>${swagger.version}</version></dependency></dependencies>3.新建配置文件
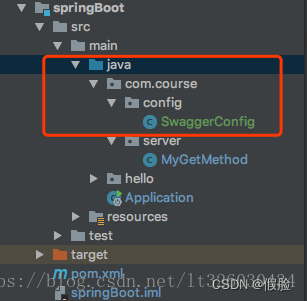
在main/java目录下,新建com.course.config目录以存放配置文件,然后新建SwaggerConfig。
配置内容如下:
@Configuration@EnableSwagger2publicclassSwaggerConfig{@BeanpublicDocketapi(){returnnewDocket(DocumentationType.SWAGGER_2).apiInfo(apiInfo()).pathMapping("/").select().paths(PathSelectors.regex("/.*")).build();}privateApiInfoapiInfo(){returnnewApiInfoBuilder().title("我的接口文档").contact(newContact("Lyn","","326030434@qq.com")).description("这是SwaggerUi生成的接口文档").build();}}4.给接口加上注解
首先要在整个类前面加上
@Api(value="/",description="这是所有get方法")然后在每个接口前加上
@ApiOperation(value="通过这个方法可以获取到cookies",httpMethod="GET")在这里,以/getcookies接口举例,完整代码如下
@RestController@Api(value="/",description="这是所有get方法")publicclassMyGetMethod{@RequestMapping(value="/getcookies",method=RequestMethod.GET)@ApiOperation(value="通过这个方法可以获取到cookies",httpMethod="GET")publicStringgetCookies(HttpServletResponse response){//HttpServletRequest  装请求信息的类//HttpServletResponse  装相应信息的类Cookie cookie=newCookie("login","true");
        response.addCookie(cookie);return"恭喜获得cookies信息成功";}}
5.修改Application文件
之前是@ComponentScan(“com.course.server”)并没有包含到com.course.config文件,所以,这里修改为@ComponentScan(“com.course”)
@SpringBootApplication@ComponentScan("com.course")publicclassApplication{publicstaticvoidmain(String[] args){SpringApplication.run(Application.class,args);}}6.查看接口文档
Rerun Application文件,然后浏览器访问http://localhost:9527/swagger-ui.html
到这里SwaggerUI的集成就完成了!