一、webpack配置
1.配置vue.config.js
 publicPath: './',
 outputDir: 'dist',
 assetsDir:"static",
 indexPath:'index.html',
2.配置DllPlugin提高构建和打包速度
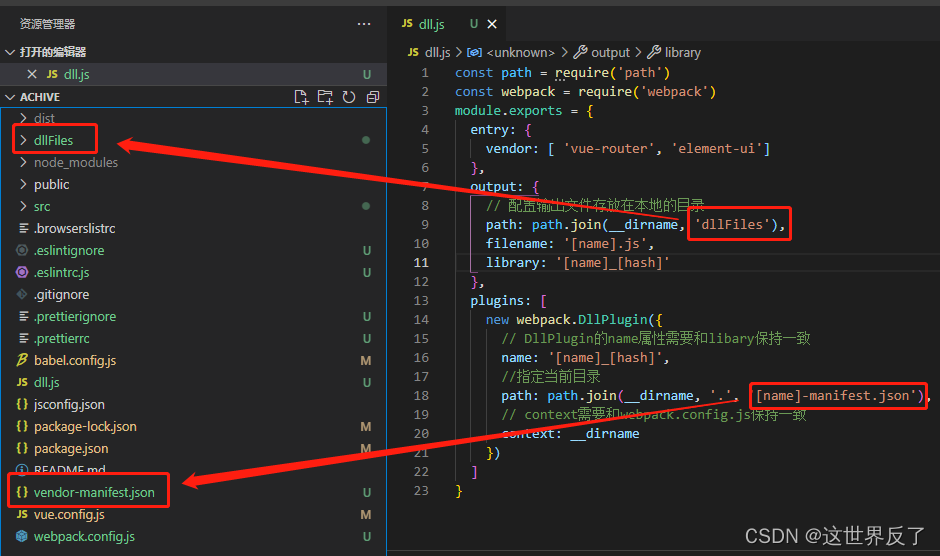
1:项目根目录新建dll.js文件
const path = require('path')
const webpack = require('webpack')
module.exports = {
  entry: {
    vendor: [ 'vue-router', 'element-ui']
  },
  output: {
    // 配置输出文件存放在本地的目录
    path: path.join(__dirname, 'dllFiles'),
    filename: '[name].js',
    library: '[name]_[hash]'
  },
  plugins: [
    new webpack.DllPlugin({
      // DllPlugin的name属性需要和libary保持一致
      name: '[name]_[hash]',
      //指定当前目录
      path: path.join(__dirname, '.', '[name]-manifest.json'),
      // context需要和webpack.config.js保持一致
      context: __dirname
    })
  ]
}
2:webpack-cli依赖的安装
npm install webpack-cli -D3:package.json文件的scripts内添加dll运行命令行
"scripts": {
    "serve": "vue-cli-service serve",
    "build": "vue-cli-service build",
    "dll": "webpack --config ./dll.js"
  },
运行指令:
npm run dll此时会在根目录生成vendor-manifest.json文件和dllFiles文件夹
4:根目录的webpack.config.js文件配置dll(tip:也可以用vue.config.js文件configureWebpack配置)
module.exports = {
    // ...其他配置
    // 配置dll
    plugins: [
      new webpack.DllReferencePlugin({
        context: __dirname,
        // manifest就是我们第3步中打包出来的json文件
        manifest: require('./vendor-manifest.json'),
      })
    ]
  }
二、打包验证
运行指令:
npm run build
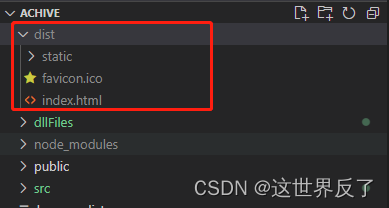
打包好的文件部署在服务端后:
