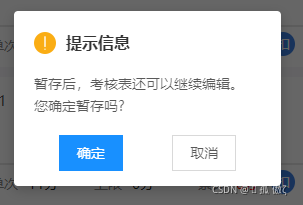
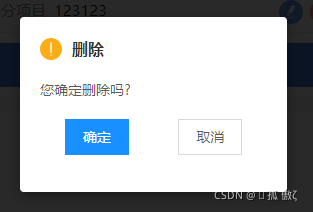
效果图:


思路:1、创建 initModal.js文件 放在store 文件夹下 初始化这个二级弹出窗
2、创建 show-modal.vue 文件 组件的主体
3、main.js 文件全局引入
4、想用的地方使用
initModal.js 文件
import Vuex from 'vuex'
export default function initModal(v) {
  // 挂在store到全局Vue原型上
  v.prototype.$modalStore = new Vuex.Store({
    state: {
      show: false,
      title: '标题',
      content: '内容',
      showCancel: true,
      cancelText: '取消',
      cancelColor: 'rgba(0, 0, 0, 0.65)',
      cancelBackgroundColor: '#FFFFFF',
      confirmText: '确定',
      confirmColor: '#FFFFFF',
      confirmBackgroundColor: '#1890FF',
      success: null,
    },
    mutations: {
       // 关闭
      hideModal(state) {
        state.show = false
      },
       // 打开
      showModal(state, data) {
        state = Object.assign(state, data)
        state.show = true
      },
        // 成功/失败回调函数
      success(state, res) {
        let cb = state.success
        let resObj = {
          cancel: false,
          confirm: false,
        }
        res == 'confirm' ? (resObj.confirm = true) : (resObj.cancel = true)
        cb && cb(resObj)
      },
    },
  })
  v.prototype.$showModal = function (option) {
    if (typeof option === 'object') {
      v.prototype.$modalStore.commit('showModal', option)
    } else {
      throw '配置项必须为对象传入的值为:' + typeof option
    }
  }
}
show-modal.vue 文件(自己写的样式 可以根据自己需要修改)
<template>
  <view class="_showModal" v-show="show">
    <!--  黑色背景遮罩 -->
    <view class="_shade"></view>
    <!-- 模态框主体 -->
    <view class="_modalBox">
      <view class="_modal">
        <slot name="title">
          <view class="title" v-show="title"
            ><img src="@/static/img/assess/warning.png" />{{ title }}</view
          >
        </slot>
        <slot name="content">
          <view class="content">{{ content }}</view>
        </slot>
        <slot name="btn">
          <view class="btnbox">
            <view
              class="btn"
              :style="{
                color: confirmColor,
                background: confirmBackgroundColor,
              }"
              @click.stop="clickBtn('confirm')"
              >{{ confirmText }}</view
            >
            <view
              class="btn"
              :style="{ color: cancelColor, background: cancelBackgroundColor }"
              style="border: 1px solid #d9d9d9"
              @click.stop="clickBtn('cancel')"
              >{{ cancelText }}</view
            >
          </view>
        </slot>
      </view>
    </view>
  </view>
</template>

<script>
export default {
  name: "show-modal",
  computed: {
    show() {
      return this.$modalStore.state.show;
    },
    title() {
      return this.$modalStore.state.title;
    },
    content() {
      return this.$modalStore.state.content;
    },
    showCancel() {
      return this.$modalStore.state.showCancel;
    },
    cancelText() {
      return this.$modalStore.state.cancelText;
    },
    cancelColor() {
      return this.$modalStore.state.cancelColor;
    },
    cancelBackgroundColor() {
      return this.$modalStore.state.cancelBackgroundColor;
    },
    confirmText() {
      return this.$modalStore.state.confirmText;
    },
    confirmColor() {
      return this.$modalStore.state.confirmColor;
    },
    confirmBackgroundColor() {
      return this.$modalStore.state.confirmBackgroundColor;
    },
  },
  methods: {
    closeModal() {
      this.$modalStore.commit("hideModal");
    },
    clickBtn(res) {
      this.$modalStore.commit("hideModal");
      this.$modalStore.commit("success", res);
    },
  },
  beforeDestroy() {
    this.$modalStore.commit("hideModal");
  },
  data() {
    return {};
  },
};
</script>

<style lang="scss" scoped>
._showModal {
  position: fixed;
  top: 0;
  left: 0;
  width: 100%;
  height: 100%;
  z-index: 10000;
  ._shade {
    width: 100%;
    height: 100%;
    position: absolute;
    top: 0;
    left: 0;
    background: #000;
    opacity: 0.6;
    z-index: 11000;
  }
  ._modalBox {
    width: 100%;
    height: 100%;
    position: absolute;
    top: 0;
    left: 0;
    z-index: 12000;
    display: flex;
    justify-content: center;
    align-items: center;
    ._modal {
      flex: none;
      width: 267px;
      min-height: 175px;
      background: #ffffff;
      box-shadow: 0px 4px 12px 0px rgba(0, 0, 0, 0.2);
      border-radius: 4px;
      padding: 20px 20px 5px 20px;
      .title {
        font-size: 16px;
        font-family: PingFangSC-Medium, PingFang SC;
        font-weight: 500;
        color: rgba(0, 0, 0, 0.85);
        line-height: 24px;
        text-align: center;
        font-weight: bold;
        color: #333333;
        display: flex;
        align-items: center;
        justify-content: left;
        img {
          width: 22px;
          height: 22px;
          margin-right: 10px;
        }
      }
      .content {
        // min-height: 80px;
        // display: flex;
        // justify-content: center;
        // align-items: center;
        // text-align: center;
        margin: 18px auto;
        font-size: 14px;
        font-family: PingFangSC-Regular, PingFang SC;
        font-weight: 400;
        color: rgba(0, 0, 0, 0.65);
        line-height: 22px;
      }
      .btnbox {
        display: flex;
        flex-direction: row;
        justify-content: space-around;
        .btn {
          width: 64px;
          height: 36px;
          //   border-radius: 16px;
          display: flex;
          justify-content: center;
          align-items: center;
          font-size: 14px;
          font-family: PingFangSC-Regular, PingFang SC;
          font-weight: 400;
          color: #ffffff;
          line-height: 22px;
        }
      }
    }
  }
}
</style>
main.js 文件
// 全局自定义模态弹窗
import initModal from "@/common/store/modules/initModal.js"
import showModal from "@/components/commons/show-modal.vue"
initModal(Vue);
//注册组件
Vue.component('show-modal',showModal);
最后 在使用的地方引入
在使用的页面引入

在点击方法中调用:
     submit() {
        //TODO  提前保存一下 this  要不下面直接使用会报错 this is undefined
      var that = this;
      that.$showModal({
        title: "提示信息",//标题
        content: "想写的内容",
        cancelText: "取消", //按钮
        confirmText: "确定",//按钮
        async success(res) {
          if (res.confirm) {
            try {
                // 调用接口  TODO  this要用 that  根据自己封装的接口调用
                var resData = await that.$api.XXXXX({
                  XX: that.XX,
                  XX: that.XX,
                });
              if (resData.data.code == 200 && resData.data.success) {
                  // 提示信息
                uni.showToast({
                  title: "提交成功",
                  icon: "success",
                  duration: 1000,
                });
                 // 修改上个页面的值
                var pages = getCurrentPages();
                var prevPage = pages[pages.length - 2];
                prevPage.seachId = that.seachId;
                prevPage.officeId = that.officeId;
                //返回上一个页面
                setTimeout(() => {
                  uni.navigateBack({
                    delta: 1,
                  });
                }, 1000);
              }
            } catch (e) {
              console.log(e);
            }
          }
        },
      });
    },
到此结束了 如果觉得有帮助 点个赞 ^_^
注:参照之前的一个博主的文章 自己使用的时候改写的 原作者链接找不到了 侵权请联系我删除