这篇文章是初探mybatis的总结
借助 MyBatis-Spring-Boot-Starter 来实现零xml使用mybatis
参考文章
http://mybatis.org/spring/zh/index.html
http://mybatis.org/spring-boot-starter/mybatis-spring-boot-autoconfigure/
前言
众所周知,MyBatis的核心有两大组件:SqlSessionFactory 和 Mapper 接口。前者表示数据库链接,后者表示SQL映射。当我们基于Spring使用MyBatis的时候,也要保证在Spring环境中能存在着两大组件。
MyBatis-Spring-Boot-Starter 将会完成以下功能:
1、Autodetect an existing DataSource
自动发现存在的DataSource
2、Will create and register an instance of a SqlSessionFactory passing that DataSource as an input using the SqlSessionFactoryBean
利用SqlSessionFactoryBean创建并注册SqlSessionFactory
3、Will create and register an instance of a SqlSessionTemplate got out of the SqlSessionFactory
创建并注册SqlSessionTemplate
4、Auto-scan your mappers, link them to the SqlSessionTemplate and register them to Spring context so they can be injected into your beans
自动扫描Mappers,并注册到Spring上下文环境方便程序的注入使用
mybatis-spring-boot-starter就是参照Spring Boot的设计思想,化繁为简,以简单注解的方式让用户快速上手。
下面我们简单的创建一个springboot项目,让他跑起来:
使用SpringBoot整合mybatis
依赖配置
pom.xml
<dependency><groupId>org.mybatis.spring.boot</groupId><artifactId>mybatis-spring-boot-starter</artifactId><version>2.2.0</version></dependency><dependency><groupId>mysql</groupId><artifactId>mysql-connector-java</artifactId><scope>runtime</scope></dependency><dependency><groupId>org.projectlombok</groupId><artifactId>lombok</artifactId><optional>true</optional></dependency><dependency><groupId>junit</groupId><artifactId>junit</artifactId><version>4.13.1</version><scope>test</scope></dependency>application.yml
mybatis:configuration:map-underscore-to-camel-case:true# 该配置就是将带有下划线的表字段映射为驼峰格式的实体类属性spring:datasource:driver-class-name: com.mysql.cj.jdbc.Driverurl: jdbc:mysql://localhost:3306/mybits?serverTimezone=GMT%2B8&useUnicode=true&characterEncoding=UTF-8username: rootpassword: aaaa建表语句和数据
DROPTABLEIFEXISTS`user`;CREATETABLE`user`(`id`int(0)UNSIGNEDNOTNULLAUTO_INCREMENT,`name`varchar(10)CHARACTERSET utf8COLLATE utf8_binNULLDEFAULTNULL,`sex`char(6)CHARACTERSET utf8COLLATE utf8_binNULLDEFAULTNULL,`pwd`varchar(20)CHARACTERSET utf8COLLATE utf8_binNULLDEFAULTNULL,`email`varchar(20)CHARACTERSET utf8COLLATE utf8_binNULLDEFAULTNULL,PRIMARYKEY(`id`)USINGBTREE)ENGINE=InnoDBAUTO_INCREMENT=7CHARACTERSET= utf8COLLATE= utf8_bin ROW_FORMAT= Dynamic;INSERTINTO`user`VALUES(2,'java','✔','aaaa','teat@163.com');INSERTINTO`user`VALUES(3,'张三','男','a','67676@qq.com');INSERTINTO`user`VALUES(4,'李四','男','a','7676776@qq.com');INSERTINTO`user`VALUES(5,'王五','女','a','7575@qq.com');INSERTINTO`user`VALUES(6,'赵六','女','a','123@qq.com');INSERTINTO`user`VALUES(7,'测试','男','aaaaa','1234@qq.com');实体类
@Data@BuilderpublicclassUser{privateInteger id;privateString name;privateString sex;privateString pwd;privateString email;publicUser(){}publicUser(Integer id,String name,String sex,String pwd,String email){this.id= id;this.name= name;this.sex= sex;this.pwd= pwd;this.email= email;}}创建Mapper
@MapperpublicinterfaceUserMapper{@Select("select * from user")List<User>selectAll();@Select("select * from user where id = #{id}")UserselectById(@Param("id")int id);@Select("select * from user where name = #{name}")Map<String,Object>selectByName1(@Param("name")String name);@Select("select * from user where name = #{name}")UserselectByName2(@Param("name")String name);// @Select("select * from user where name = #{name} and pwd = #{name}")// User selectByNameAndPwd(@Param("name") String name, @Param("pwd") String pwd);@Select("select * from user where name = #{name} and pwd = #{pwd}")UserselectByNameAndPwd(String name,String pwd);@Delete("delete from user where id = #{id}")booleandeleteById(int id);@Insert("insert into user values (null,#{name},#{sex},#{pwd},#{email})")booleaninsertUser(String name,String sex,String pwd,String email);@Update("update user set name = #{name} where id = #{id}")booleanupdateById(String name,int id);}创建server层
@ServicepublicclassUserBiz{@ResourceprivateUserMapper um;publicUserselectById(int id){return um.selectById(id);}publicList<User>queryAll(){return um.selectAll();}publicMap<String,Object>queryByName1(String name){return um.selectByName1(name);}publicUserqueryByName2(String name){return um.selectByName2(name);}publicUserqueryByNameAndPwd(String name,String pwd){return um.selectByNameAndPwd(name, pwd);}publicbooleandelete(int id){return um.deleteById(id);}publicbooleanadd(User user){return um.insertUser(user.getName(), user.getSex(), user.getPwd(), user.getEmail());}publicbooleanchange(String name,int id){return um.updateById(name, id);}}测试代码
@SpringBootTestpublicclassUserBizTest{@AutowiredUserBiz userBiz;@TestpublicvoidselectByAccountAndPwd(){System.out.println(userBiz.selectById(2));}@TestpublicvoidqueryAll(){System.out.println(userBiz.queryAll());}@TestpublicvoidqueryByName(){long t1=newDate().getTime();Map<String,Object> maps= userBiz.queryByName1("张三");long t2=newDate().getTime();System.out.println(t2- t1);System.out.println(maps);

        t1=newDate().getTime();User user= userBiz.queryByName2("张三");
        t2=newDate().getTime();System.out.println(t2- t1);System.out.println(user);}@Testpublicvoidlogin(){User user= userBiz.queryByNameAndPwd("张三","a");System.out.println(user);
        user= userBiz.queryByNameAndPwd("张三","aa");System.out.println(user);}@Testpublicvoiddelete(){Assert.isTrue(userBiz.delete(1));}@Testpublicvoidadd(){User user=newUser(null,"Test","男","aaaaa","1234@qq.com");Assert.isTrue(userBiz.add(user));}@Testpublicvoidchange(){Assert.isTrue(userBiz.change("测试",7),"修改失败");}}
上面的代码就演示了使用mybatis对数据库的增删改查操作
MyBatis 中 #{} 和 ${} 的区别
1、在MyBatis 的映射配置文件中,动态传递参数有两种方式:
(1)#{} 占位符
(2)${} 拼接符
2、#{} 和 ${} 的区别
#{} 为参数占位符 ?,即sql 预编译
${} 为字符串替换,即 sql 拼接#{}:动态解析 -> 预编译 -> 执行
${}:动态解析 -> 编译 -> 执行#{} 的变量替换是在DBMS 中
${} 的变量替换是在 DBMS 外变量替换后,#{} 对应的变量自动加上单引号 ‘’
变量替换后,${} 对应的变量不会加上单引号 ‘’#{} 能防止sql 注入
${} 不能防止sql 注入
3、演示
Mapper 层
/**
     * 使用 #{} 占位符
     *
     * @param id
     * @return
     */@Select("select * from user where id > #{id}")List<User>select1(String id);/**
     * 使用  ${} 拼接符
     *
     * @param id
     * @return
     */@Select("select * from user where id > ${id}")List<User>select2(String id);
server层
publicList<User>test1(String id){return um.select1(id);}publicList<User>test2(String id){return um.select2(id);}测试类
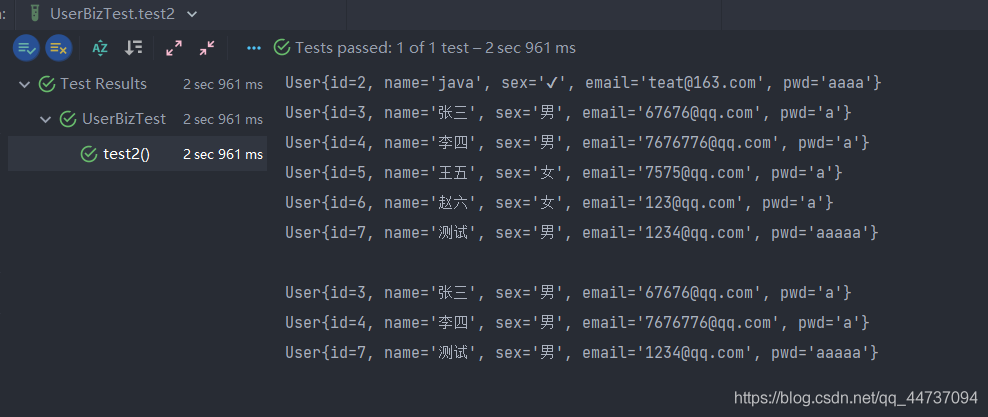
@Testpublicvoidtest1(){printList(userBiz.test1("1"));System.out.println();printList(userBiz.test1("1 and sex = '男'"));}@Testpublicvoidtest2(){printList(userBiz.test2("1"));System.out.println();printList(userBiz.test2("1 and sex = '男'"));}publicvoidprintList(List list){for(Object o: list){System.out.println(o);}}查询结果对比
- 使用#{}
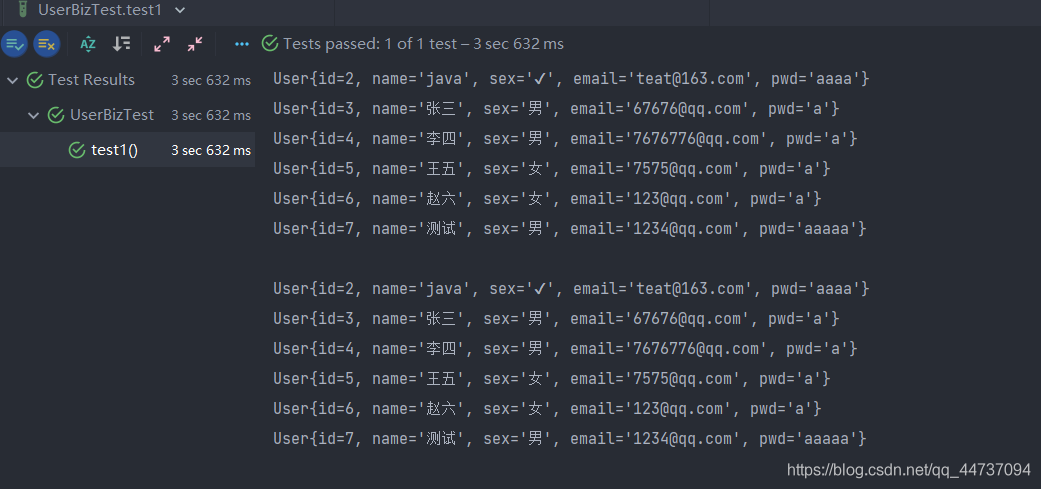
- 使用${}
MyBits批量插入大量数据
使用 @InsertProvider
@Insert和@InsertProvider都是用来在实体类的Mapper类里注解保存方法的SQL语句。不同的是,@Insert是直接配置SQL语句,而@InsertProvider则是通过SQL工厂类及对应的方法生产SQL语句,这种方法的好处在于,我们可以根据不同的需求生产出不同的SQL,适用性更好。
1. 建表语句
DROPTABLEIFEXISTS`users`;CREATETABLE`users`(`id`int(0)NOTNULLAUTO_INCREMENT,`time_datetime`datetime(0)NOTNULL,`time_timestamp`timestamp(0)NOTNULLDEFAULTCURRENT_TIMESTAMP(0)ONUPDATECURRENT_TIMESTAMP(0),`time_long`bigint(0)NOTNULL,PRIMARYKEY(`id`)USINGBTREE,INDEX`time_long`(`time_long`)USINGBTREE,INDEX`time_timestamp`(`time_timestamp`)USINGBTREE,INDEX`time_datetime`(`time_datetime`)USINGBTREE)ENGINE=InnoDBAUTO_INCREMENT=1000003CHARACTERSET= latin1COLLATE= latin1_swedish_ci ROW_FORMAT= Dynamic;2. 项目中的实体类
@Builder@DatapublicclassUsers{//自增唯一idprivateLong id;//datetime类型的时间privateTimestamp timeDatetime;//timestamp类型的时间privateTimestamp timeTimestamp;//long类型的时间privatelong timeLong;}3. 每个实体类对应的Mapper方法
@MapperpublicinterfaceUsersMapper{//批量插入数据方法@InsertProvider(type=UsersDaoProvider.class, method="insertAll")voidbatchSaveUsersList(@Param("list")List<Users