前言
MMDetection是商汤和港中文大学针对目标检测任务推出的一个开源工具包,统一标准化了很多前沿模型,为研究者复现代码提供了便利。本篇就来尝试安装一下MMDetection并简单跑一下官方的示例教程。
官方文档:https://mmdetection.readthedocs.io/zh_CN/latest/get_started.html
官方仓库:https://github.com/open-mmlab/mmdetection
MMDetection架构
首先安装之前,需要先简单了解一下MMDetection的架构,整体架构如下图所示[1]:
MMDetection的底层是使用PyTorch进行编写,再上一层是MMCV,这个工具包提供了一些通用工具类和训练,检测工具。
MMDetection仅仅是多个Codebases中的其中一个,除此之外,还有专用于图像分类的MMClassification,用于目标追踪的MMTracking等。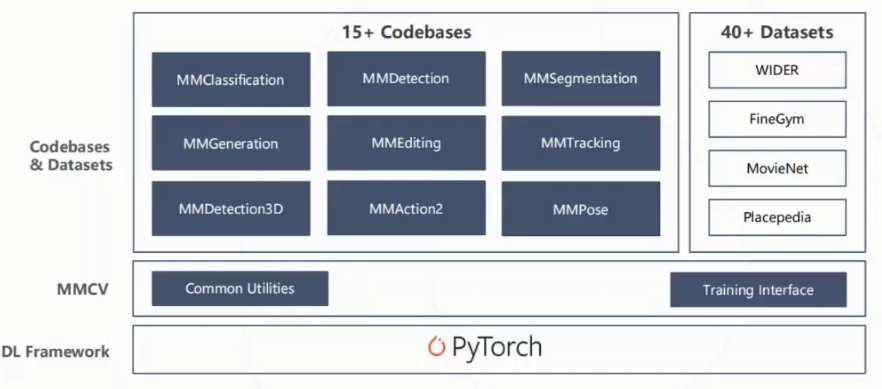
安装
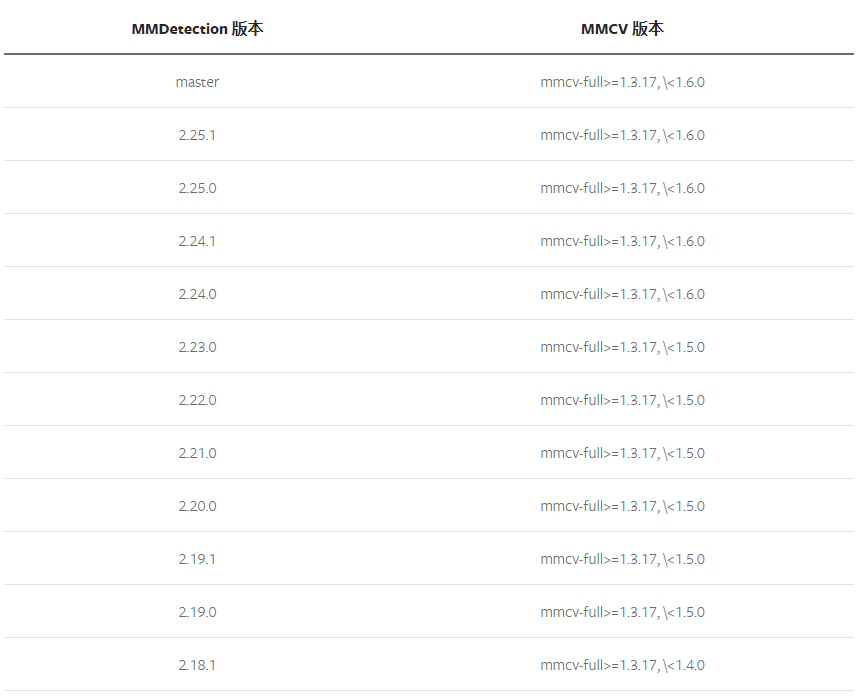
有了项目的概念之后,我们就知道需要安装两个库:MMCV和MMDetection
和Pytorch和torchvision一样,这两个库的版本必须要对应,官网给出这张版本对应参考表。
这里官方提供了一个比较简介的方案,首先查看自己的cuda版本和pytorch版本,比如我的cuda版本是11.5,torch版本是1.11.0,那么可以这样进行快速安装mmcv:
pip install mmcv-full-f https://download.openmmlab.com/mmcv/dist/cu115/torch1.11.0/index.html注:这样安装的是mmcv1.6.1版本,对照表似乎没及时进行更新。
更多版本参考: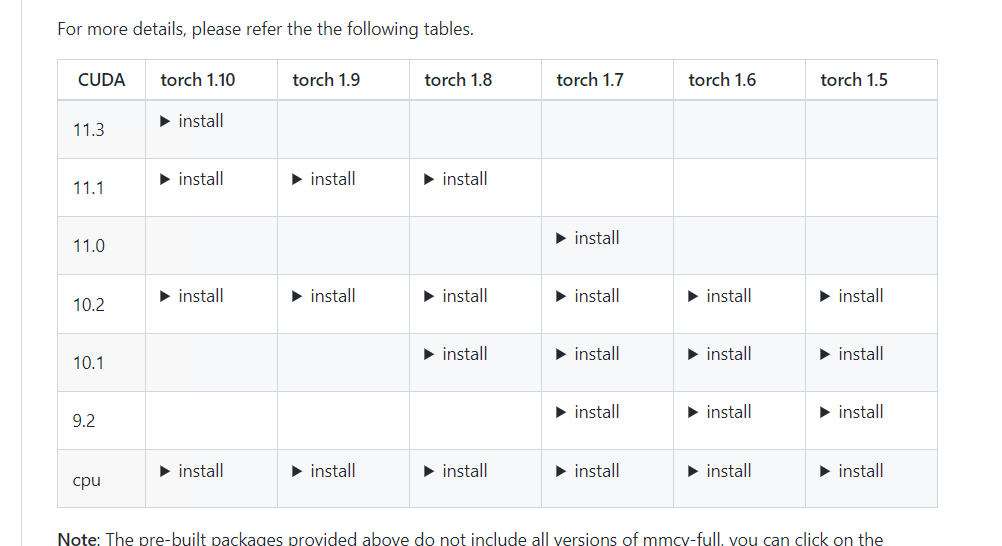
稳妥起见,我直接访问https://download.openmmlab.com/mmcv/dist/cu115/torch1.11.0/index.html下载mmcv_full-1.5.0-cp37-cp37m-win_amd64.whl进行安装。
MMDetection安装很简单,查阅对照表,安装2.25.1版本即可。
pip install mmdet==2.25.1安装完成之后,运行下面的程序进行检测。
# Check Pytorch installationimport torch, torchvisionprint(torch.__version__, torch.cuda.is_available())# Check MMDetection installationimport mmdetprint(mmdet.__version__)# Check mmcv installationfrom mmcv.opsimport get_compiling_cuda_version, get_compiler_versionprint(get_compiling_cuda_version())print(get_compiler_version())输出:
1.11.0+cu115 True
2.25.1
11.5
MSVC 192930140
说明安装成功。
显示图片
在官方仓库的demo文件夹下,提供了三个示例教程,这里就跟着来跑一下。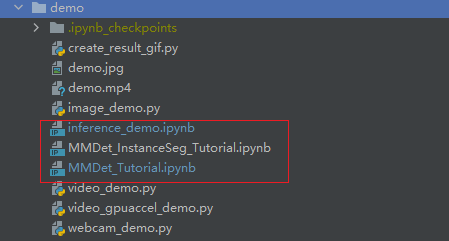
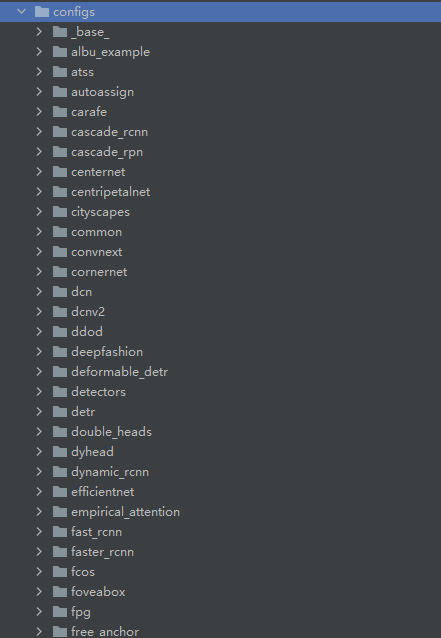
首先需要将源码中的configs文件夹复制到测试工程路径下,这个文件夹包含了各种算法的结构。
使用mmcv.imread读取图片,并用matplotlib进行显示。
import mmcvimport matplotlib.pyplotas pltimport os

os.environ["KMP_DUPLICATE_LIB_OK"]="TRUE"
img= mmcv.imread('kitti_tiny/training/image_2/000073.jpeg')
plt.figure(figsize=(15,10))
plt.imshow(mmcv.bgr2rgb(img))
plt.show()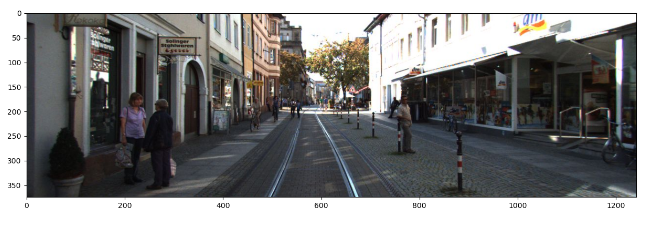
模型推理
第二个示例程序是加载模型进行推理。
首先需要根据官方教程指引,下载faster_rcnn的权重文件faster_rcnn_r50_fpn_1x_coco_20200130-047c8118.pth,放置在checkpoints文件夹下。
from mmdet.apisimport init_detector, inference_detector, show_result_pyplot

config_file='configs/faster_rcnn/faster_rcnn_r50_fpn_1x_coco.py'
checkpoint_file='checkpoints/faster_rcnn_r50_fpn_1x_coco_20200130-047c8118.pth'
device='cuda:0'# 初始化检测器
model= init_detector(config_file, checkpoint_file, device=device)# 推理演示图像
img='img/demo.jpg'
result= inference_detector(model, img)
show_result_pyplot(model, img, result, score_thr=0.3)加载模型主要通过init_detector这个函数,注意模型的config_file文件和模型权重必须对应。
运行之后,输出下图。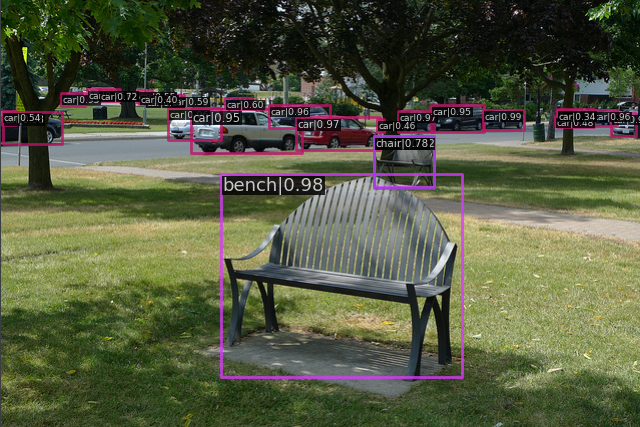
这里顺便对config_file文件进行一个解析:
configs/faster_rcnn/faster_rcnn_r50_fpn_1x_coco.py文件内容:
_base_='./faster_rcnn_r50_fpn_1x_coco.py'
model=dict(
    backbone=dict(
        norm_cfg=dict(requires_grad=False),
        norm_eval=True,
        style='caffe',
        init_cfg=dict(type='Pretrained',
            checkpoint='open-mmlab://detectron2/resnet50_caffe')))# use caffe img_norm
img_norm_cfg=dict(
    mean=[103.530,116.280,123.675], std=[1.0,1.0,1.0], to_rgb=False)
train_pipeline=[dict(type='LoadImageFromFile'),dict(type='LoadAnnotations', with_bbox=True),dict(type='Resize',
        img_scale=[(1333,640),(1333,672),(1333,704),(1333,736),(1333,768),(1333,800)],
        multiscale_mode='value',
        keep_ratio=True),dict(type='RandomFlip', flip_ratio=0.5),dict(type='Normalize',**img_norm_cfg),dict(type='Pad', size_divisor=32),dict(type='DefaultFormatBundle'),dict(type='Collect', keys=['img','gt_bboxes','gt_labels']),]
test_pipeline=[dict(type='LoadImageFromFile'),dict(type='MultiScaleFlipAug',
        img_scale=(1333,800),
        flip=False,
        transforms=[dict(type='Resize', keep_ratio=True),dict(type='RandomFlip'),dict(type='Normalize',**img_norm_cfg),dict(type='Pad', size_divisor=32),dict(type='ImageToTensor', keys=['img']),dict(type='Collect', keys=['img']),])]
data=dict(
    train=dict(pipeline=train_pipeline),
    val=dict(pipeline=test_pipeline),
test=dict(pipeline=test_pipeline))在MMDetection中,所有的参数都使用字典dict的形式构建。
先看主要模型model,这里指定了backbone的结构,init_cfg为默认参数,后续载入模型会将其进行覆盖。
后面是train_pipeline和test_pipeline,定义了数据预处理的各种方式。
最后看第一行的_base_,这里相当于引用了另一个文件./faster_rcnn_r50_fpn_1x_coco.py的内容
./faster_rcnn_r50_fpn_1x_coco.py
_base_=['../_base_/models/faster_rcnn_r50_fpn.py','../_base_/datasets/coco_detection.py','../_base_/schedules/schedule_1x.py','../_base_/default_runtime.py']这个文件非常简单,直接调用了另外四个文件。
- …/base/models/faster_rcnn_r50_fpn.py :包含faster_rcnn的整体结构
- …/base/datasets/coco_detection.py:包含数据集预处理策略,后面写的会将其进行覆盖
- …/base/schedules/schedule_1x.py:包含学习率的调度策略
- …/base/default_runtime.py:模型运行时通用策略
可以发现,MMDetection的文件加载方式是一层层读取和覆盖,这样就不需要重复写相同的内容,只需要注意后面需要修改的参数。
如果需要预览模型整体架构,可以运行下面的代码:
import mmcvfrom mmcv.runnerimport load_checkpointfrom mmdet.modelsimport build_detector# Choose to use a config and initialize the detector
config='configs/faster_rcnn/faster_rcnn_r50_caffe_fpn_mstrain_3x_coco.py'# Setup a checkpoint file to load
checkpoint='checkpoints/faster_rcnn_r50_caffe_fpn_mstrain_3x_coco_20210526_095054-1f77628b.pth'# Set the device to be used for evaluation
device='cuda:0'# Load the config
config= mmcv.Config.fromfile(config)# Set pretrained to be None since we do not need pretrained model here
config.model.pretrained=None# Initialize the detector
model= build_detector(config.model)# Load checkpoint
checkpoint= load_checkpoint(model, checkpoint, map_location=device)# Set the classes of models for inference
model.CLASSES= checkpoint['meta']['CLASSES']# We need to set the model's cfg for inference
model.cfg= config# Convert the model to GPU
model.to(device)# Convert the model into evaluation mode
model.eval()print(model)
模型训练
第三个示例关于模型训练,使用的是kitti_tiny数据集
训练过程不做详解,各注释已写在代码中。
import copyimport os.pathas ospimport mmcvimport numpyas npfrom mmdet.datasets.builderimport DATASETSfrom mmdet.datasets.customimport CustomDatasetfrom mmcvimport Configfrom mmdet.apisimport set_random_seedfrom mmdet.datasetsimport build_datasetfrom mmdet.modelsimport build_detectorfrom mmdet.apisimport train_detectorfrom mmdet.utilsimport get_device@DATASETS.register_module()classKittiTinyDataset(CustomDataset):
    CLASSES=('Car','Pedestrian','Cyclist')defload_annotations(self, ann_file):
        cat2label={k: ifor i, kinenumerate(self.CLASSES)}# load image list from file
        image_list= mmcv.list_from_file(self.ann_file)

        data_infos=[]# convert annotations to middle formatfor image_idin image_list:
            filename=f'{self.img_prefix}/{image_id}.jpeg'
            image= mmcv.imread(filename)
            height, width= image.shape[:2]

            data_info=dict(filename=f'{image_id}.jpeg', width=width, height=height)# load annotations
            label_prefix= self.img_prefix.replace('image_2','label_2')
            lines= mmcv.list_from_file(osp.join(label_prefix,f'{image_id}.txt'))

            content=[line.strip().split(' ')for linein lines]
            bbox_names=[x[0]for xin content]
            bboxes=[[float(info)for infoin x[4:8]]for xin content]

            gt_bboxes=[]
            gt_labels=[]
            gt_bboxes_ignore=[]
            gt_labels_ignore=[]# filter 'DontCare'# 过滤不关心类别标签,需要筛选的类别在上面CLASSES中进行了指定for bbox_name, bboxinzip(bbox_names, bboxes):if bbox_namein cat2label:
                    gt_labels.append(cat2label[bbox_name])
                    gt_bboxes.append(bbox)else:
                    gt_labels_ignore.append(-1)
                    gt_bboxes_ignore.append(bbox)

            data_anno=dict(
                bboxes=np.array(gt_bboxes, dtype=np.float32).reshape(-1,4),
                labels=np.array(gt_labels, dtype=np.int64),
                bboxes_ignore=np.array(gt_bboxes_ignore,
                                       dtype=np.float32).reshape(-1,4),
                labels_ignore=np.array(gt_labels_ignore, dtype=np.int64))

            data_info.update(ann=data_anno)
            data_infos.append(data_info)return data_infos# 加载配置文件
cfg= Config.fromfile('./configs/faster_rcnn/faster_rcnn_r50_caffe_fpn_mstrain_1x_coco.py')# 获取设备状态
cfg.device= get_device()# 指定数据集类型,这里对应的是上面注册的KittiTinyDataset类
cfg.dataset_type='KittiTinyDataset'
cfg.data_root='kitti_tiny/'# 测试
cfg.data.test.type='KittiTinyDataset'
cfg.data.test.data_root='kitti_tiny/'
cfg.data.test.ann_file='train.txt'# 训练集索引
cfg.data.test.img_prefix='training/image_2'# 图片文件夹# 训练
cfg.data.train.type='KittiTinyDataset'
cfg.data.train.data_root='kitti_tiny/'
cfg.data.train.ann_file='train.txt'
cfg.data.train.img_prefix='training/image_2'# 验证
cfg.data.val.type='KittiTinyDataset'
cfg.data.val.data_root='kitti_tiny/'
cfg.data.val.ann_file='val.txt'
cfg.data.val.img_prefix='training/image_2'

cfg.data.workers_per_gpu=0# 设置workers数量

cfg.model.roi_head.bbox_head.num_classes=3# 加载预训练权重
cfg.load_from='checkpoints/faster_rcnn_r50_caffe_fpn_mstrain_3x_coco_20210526_095054-1f77628b.pth'# 输出模型/训练日志保存路径
cfg.work_dir='./tutorial_exps'# 原始的预训练学习率0.02是在八卡GPU训练时设置的,只有单卡环境则需除以8
cfg.optimizer.lr=0.02/8
cfg.lr_config.warmup=None
cfg.log_config.interval=10# 评估指标
cfg.evaluation.metric='mAP'# 每12个epoch进行一次eval
cfg.evaluation.interval=12# 每12个epoch保存模型
cfg.checkpoint_config.interval=12# 设置随机种子/gpuid
cfg.seed=0
set_random_seed(0, deterministic=False)
cfg.gpu_ids=range(1)# 使用tensorboard
cfg.log_config.hooks=[dict(type='TextLoggerHook'),dict(type='TensorboardLoggerHook')]# 构建数据集
datasets=[build_dataset(cfg.data.train)]# 构建检测器
model= build_detector(cfg.model)# 模型类别
model.CLASSES= datasets[0].CLASSES# 创建输出路径,如果存在就跳过,不存在则创建文件夹
mmcv.mkdir_or_exist(osp.abspath(cfg.work_dir))# 开始训练
train_detector(model, datasets, cfg, distributed=False, validate=True)
这里需要注意原始代码因为版本问题,可能存在两个问题[2]。
IOError
这个原因是windows对多线程支持欠佳,因此需要将workers数量设为0.cfg.data.workers_per_gpu = 0RuntimeError
将np.long改成np.int64
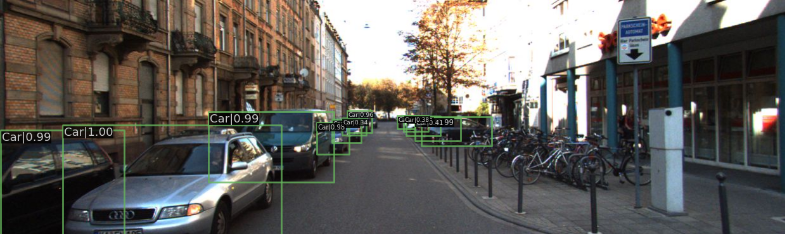
运行完之后,导入之前的模型进行检测,相关代码和第二个示例类似,检测效果。
扩展学习
MMDetection的使用体验下来难度不高,后续将探索更多示例进行学习。
这里看到一篇讲解比较细致的教程,对于MMCV机理作了比较详细的解析。
MMDetection框架入门教程(完全版):https://blog.csdn.net/qq_16137569/article/details/121316235
References
[1]https://www.bilibili.com/video/BV1Jb4y1r7ir?p=1&vd_source=9fef0d77bd45dc7fe5635b8e5496e032
[2]https://wenku.baidu.com/view/f6e8466a28160b4e767f5acfa1c7aa00b52a9d8e.html