在 openFeign 未出现前,Spring 提供了 RestTemplate 作为远程服务调用的客户端,提供了多种便捷访问远程 Http 服务的方法,能够大大提高客户端的编写效率。由于文章内容会使用到 RestTemplate,所以这里就简单说下。
一讲到服务调用,我们肯定会联想到服务的路由与负载均衡,那么我们接下来就先介绍两种客户端的服务负载均衡组件:LoadBalancerClient 与 Ribbon
一、SpringCloud的客户端负载均衡:
1、客户端负载均衡:
负载均衡分为客户端负载均衡和服务端负载均衡,它们之间的区别在于:服务清单所在的位置。
我们通常说的负载均衡都是服务端的负载均衡,其中可以分为硬件的负载均衡和软件负载均衡:硬件的负载均衡就是在服务器节点之间安装用于负载均衡的设备,比如F5;软件负载均衡则是在服务器上安装一些具有负载均衡功能的模块或软件来完成请求分发的工作,比如nginx。服务端的负载均衡会在服务端维护一个服务清单,然后通过心跳检测来剔除故障节点以保证服务清单中的节点都正常可用。
客户端负载均衡指客户端都维护着自己要访问的服务端实例清单,而这些服务端清单来自服务注册中心。客户端负载均衡也需要心跳检测维护清单服务的健康性,只不过这个工作要和服务注册中心配合完成。
2、LoadBalancerClient:
LoadBalancerClient 是 SpringCloud 提供的一种负载均衡客户端,LoadBalancerClient 在初始化时会通过 Eureka Client 向 Eureka 服务端获取所有服务实例的注册信息并缓存在本地,并且每10秒向 EurekaClient 发送“ ping ”,来判断服务的可用性。如果服务的可用性发生了改变或者服务数量和之前的不一致,则更新或者重新拉取。最后,在得到服务注册列表信息后,ILoadBalancer 根据 IRule 的策略进行负载均衡(默认策略为轮询)。
当使用 LoadBalancerClient 进行远程调用的负载均衡时,LoadBalancerClient 先通过目标服务名在本地服务注册清单中获取服务提供方的某一个实例,比如订单服务需要访问商品服务,商品服务有3个节点,LoadBalancerClient 会通过 choose() 方法获取到3个节点中的一个服务,拿到服务的信息之后取出服务IP信息,就可以得到完整的想要访问的IP地址和接口,最后通过 RestTempate 访问商品服务。
2.1、springboot + LoadBalancerClient 负载均衡调用:
注:本案例需要 springboot 提前整合 nacos 作为注册中心,但是 nacos 并非本文的重点,此处就不重点介绍,对 nacos 注册中心有疑惑的读者请移步这篇文章:Nacos注册中心的部署与用法详细介绍
2.1.1、服务提供方代码:
    //nacos注册中心的服务名:cloud-producer-server
	//两数求和
    @PostMapping ("getSum")
    public String getSum(@RequestParam (value = "num1") Integer num1, @RequestParam (value = "num2") Integer num2)
    {
        return "两数求和结果=" + (num1 + num2);
    }
2.1.2、服务消费方代码:
(1)指定服务,通过 LoadBalancerClient 自动获取某个服务实例与请求地址
@Component
public class LoadBalancerUtil
{
    // 注入LoadBalancerClient
    @Autowired
    LoadBalancerClient loadBalancerClient;

    /**
     * 通过 LoadBalancer 获取提供服务的host与ip
     */
    public String getService(String serviceId)
    {
        //获取实例服务中的某一个服务
        ServiceInstance instance = loadBalancerClient.choose(serviceId);
        //获取服务的ip地址和端口号
        String host = instance.getHost();
        int port = instance.getPort();

        //格式化最终的访问地址
        return String.format("http://%s:%s", host, port);
    }
}
(2)通过 RestTemplate 请求远程服务地址并接收返回值:
@RestController
@RequestMapping (value = "api/invoke")
public class InvokeController
{
	@Autowired
    private LoadBalancerUtil loadBalancerUtil;

    /**
     * 使用 SpringCloud 的负载均衡策略组件 LoadBalancerClient 进行远程服务调用
     */
    @GetMapping ("getByLoadBalancer")
    public String getByLoadBalancer(Integer num1, Integer num2)
    {
        String hostAndIp = loadBalancerUtil.getService("cloud-producer-server");
        //打印服务的请求地址与端口,方便测试负载功能
        System.out.println(hostAndIp);

        String url = hostAndIp + "/cloud-producer-server/getSum";
        MultiValueMap<String, Object> params = new LinkedMultiValueMap<>();
        params.add("num1", num1);
        params.add("num2", num2);

        RestTemplate restTemplate = new RestTemplate();
        String result = restTemplate.postForObject(url, params, String.class);

        return result;
    }
}
多次访问服务消费方的 api/invoke/getByLoadBalancer 接口,并且通过打印出来的 hostAndIp 信息,可以看出 LoadBalancerClient 是轮询调用服务提供方的,这也是 LoadBalancerClient 的默认负载均衡策略
2.2、LoadBalancerClient 原理:
LoadBalancerClient 的原理请读者移步这篇文章:SpringCloud LoadBalancerClient 负载均衡原理
3、ribbon:
Ribbon 负载组件的内部就是集成了 LoadBalancerClient 负载均衡客户端,所以 Ribbon 负载均衡的原理本质也跟上面介绍的 LoadBalancerClient 原理一致,负载均衡器 Ribbon 默认会通过 Eureka Client 向 Eureka 服务端的服务注册列表中获取服务的信息,并缓存一份在本地 JVM 中,根据缓存的服务注册列表信息,可以通过 LoadBalancerClient 来选择不同的服务实例,从而实现负载均衡。
基本用法就是注入一个 RestTemplate,并使用 @LoadBalance 注解标注 RestTemplate,从而使 RestTemplate 具备负载均衡的能力。当 Spring 容器启动时,使用 @LoadBalanced 注解修饰的 RestTemplate 会被添加拦截器 LoadBalancerInterceptor,拦截器会拦截 RestTemplate 发送的请求,转而执行 LoadBalancerInterceptor 中的 intercept() 方法,并在 intercept() 方法中使用 LoadBalancerClient 处理请求,从而达到负载均衡的目的。
那么 RestTemplate 添加 @LoadBalanced 注解后,为什么会被拦截呢?这是因为 LoadBalancerAutoConfiguration 类维护了一个被 @LoadBalanced 修饰的 RestTemplate 列表,在初始化过程中,通过调用 customizer.customize(restTemplate) 方法为 RestTemplate 添加了 LoadBalancerInterceptor 拦截器,该拦截器中的方法将远程服务调用的方法交给了 LoadBalancerClient 去处理,从而达到了负载均衡的目的。
3.1、springboot + Ribbon 负载均衡调用:
通过 Spring Cloud Ribbon 的封装,我们在微服务架构中使用客户端负载均衡非常简单,只需要两步:
- ① 服务提供者启动服务实例并注册到服务注册中心
- ② 服务消费者直接使用被 @LoadBalanced 注解修饰的 RestTemplate 来实现面向服务的接口调用
3.1.1、服务提供方代码:
    //nacos注册中心的服务名:cloud-producer-server
	//两数求和
    @PostMapping ("getSum")
    public String getSum(@RequestParam (value = "num1") Integer num1, @RequestParam (value = "num2") Integer num2)
    {
        return "两数求和结果=" + (num1 + num2);
    }
3.1.2、服务消费方代码:
(1)使用 @LoadBalanced 注解修饰的 RestTemplate:
@LoadBalanced 注解用于开启负载均衡,标记 RestTemplate 使用 LoadBalancerClient 配置
import org.springframework.cloud.client.loadbalancer.LoadBalanced;
import org.springframework.context.annotation.Bean;
import org.springframework.context.annotation.Configuration;
import org.springframework.web.client.RestTemplate;

@Configuration
public class RestConfig
{
    /**
     * 创建restTemplate对象。
     * LoadBalanced注解表示赋予restTemplate使用Ribbon的负载均衡的能力(一定要加上注解,否则无法远程调用)
     */
    @Bean
    @LoadBalanced
    public RestTemplate restTemplate(){
        return new RestTemplate();
    }
}
(2)通过 RestTemplate 请求远程服务地址并接收返回值
@RestController
@RequestMapping (value = "api/invoke")
public class InvokeController
{
    @Autowired
    private RestTemplate restTemplate;

    /**
     * 使用 RestTemplate 进行远程服务调用,并且使用 Ribbon 进行负载均衡
     */
    @ApiOperation (value = "RestTemplate", notes = "使用RestTemplate进行远程服务调用,并使用Ribbon进行负载均衡")
    @GetMapping ("getByRestTemplate")
    public String getByRestTemplate(Integer num1, Integer num2)
    {
        //第一个cloud-producer-server代表在nacos注册中心中的服务名,第二个cloud-producer-server代表contextPath配置的项目路径
        String url = "http://cloud-producer-server/cloud-producer-server/getSum";
        MultiValueMap<String, Object> params = new LinkedMultiValueMap<>();
        params.add("num1", num1);
        params.add("num2", num2);

        //通过服务名的方式调用远程服务(非ip端口)
        return restTemplate.postForObject(url, params, String.class);
    }
}
默认情况下,Ribbon 也是使用轮询作为负载均衡策略,那么处理轮询策略,Ribbon 还有哪些负载均衡策略呢?
3.2、Ribbon 的七种负载均衡策略:
我们打开 com.netflix.loadbalancer.IRule 接口,该接口的实现类主要用于定义负载均衡策略,我们找到它所有的实现类,如下:

(1)随机策略 RandomRule:随机数选择服务列表中的服务节点Server,如果当前节点不可用,则进入下一轮随机策略,直到选到可用服务节点为止
(2)轮询策略 RoundRobinRule:按照接收的请求顺序,逐一分配到不同的后端服务器
(3)重试策略 RetryRule:在选定的负载均衡策略机上重试机制,在一个配置时间段内当选择Server不成功,则一直尝试使用 subRule 的方式选择一个可用的server;
(4)可用过滤策略 PredicateBaseRule:过滤掉连接失败 和 高并发连接 的服务节点,然后从健康的服务节点中以线性轮询的方式选出一个节点返回
(5)响应时间权重策略 WeightedRespinseTimeRule:根据服务器的响应时间分配一个权重weight,响应时间越长,weight越小,被选中的可能性越低。主要通过后台线程定期地从 status 里面读取平均响应时间,为每个 server 计算一个 weight
(6)并发量最小可用策略 BestAvailableRule:选择一个并发量最小的服务节点 server。ServerStats 的 activeRequestCount 属性记录了 server 的并发量,轮询所有的server,选择其中 activeRequestCount 最小的那个server,就是并发量最小的服务节点。该策略的优点是可以充分考虑每台服务节点的负载,把请求打到负载压力最小的服务节点上。但是缺点是需要轮询所有的服务节点,如果集群数量太大,那么就会比较耗时。
(7)区域权重策略 ZoneAvoidanceRule:综合判断 server 所在区域的性能 和 server 的可用性,使用 ZoneAvoidancePredicate 和 AvailabilityPredicate 来判断是否选择某个server,前一个判断判定一个zone的运行性能是否可用,剔除不可用的zone(的所有server),AvailabilityPredicate 用于过滤掉连接数过多的Server。
二、什么是openFeign:
微服务架构中,由于对服务粒度的拆分致使服务数量变多,而作为 Web 服务的调用端方,除了需要熟悉各种 Http 客户端,比如 okHttp、HttpClient 组件的使用,而且还要显式地序列化和反序列化请求和响应内容,从而导致出现很多样板代码,开发起来很痛苦。为了解决这个问题,Feign 诞生了,那么 Feign 是什么呢?
Feign 就是一个 Http 客户端的模板,目标是减少 HTTP API 的复杂性,希望能将 HTTP 远程服务调用做到像 RPC 一样易用。Feign 集成 RestTemplate、Ribbon 实现了客户端的负载均衡的 Http 调用,并对原调用方式进行了封装,使得开发者不必手动使用 RestTemplate 调用服务,而是声明一个接口,并在这个接口中标注一个注解即可完成服务调用,这样更加符合面向接口编程的宗旨,客户端在调用服务端时也不需要再关注请求的方式、地址以及是 forObject 还是 forEntity,结构更加明了,耦合也更低,简化了开发。但 Feign 已经停止迭代了,所以本篇文章我们也不过多的介绍,而在 Feign 的基础上,又衍生出了 openFeign,那么 openFeign 又是什么呢?
openFeign 在 Feign 的基础上支持了 SpringMVC 的注解,如 @RequestMapping 等。OpenFeign 的 @FeignClient 可以解析 SpringMVC 的 @RequestMapping 注解下的接口,并通过动态代理的方式产生实现类,实现类中做负载均衡并调用其他服务。
总的就是,openFeign 作为微服务架构下服务间调用的解决方案,是一种声明式、模板化的 HTTP 的模板,使 HTTP 请求就像调用本地方法一样,通过 openFeign 可以替代基于 RestTemplate 的远程服务调用,并且默认集成了 Ribbon 进行负载均衡。
openFeign 与 Ribbon 的联系:https://www.cnblogs.com/unchain/p/13405814.html
三、Springboot 整合 openFeign:
注:本案例需要 springboot 提前整合 nacos 作为注册中心,但是 nacos 并非本文的重点,此处就不重点介绍,对 nacos 注册中心有疑惑的读者请移步这篇文章:Nacos注册中心的部署与用法详细介绍
1、创建服务提供者 provider:
(1)项目配置:
# 服务在nacos中的服务名
spring.application.name = openFeign-provider

# nacos注册中心配置
nacos.url = 120.76.129.106:80
nacos.namespace = 856a40d7-6548-4494-bdb9-c44491865f63
spring.cloud.nacos.discovery.server-addr = ${nacos.url}
spring.cloud.nacos.discovery.namespace = ${nacos.namespace}
spring.cloud.nacos.discovery.register-enabled = true
注意:此处的 spring.application.name 指定的名称将会在 openFeign 接口调用中使用。
2、创建服务消费者 consumer:
(1)引入 openFeign 相关依赖
 		<!-- 引入openFeign进行远程服务调用 -->
        <dependency>
            <groupId>org.springframework.cloud</groupId>
            <artifactId>spring-cloud-starter-openfeign</artifactId>
        </dependency>
(2)开启 openFeign 功能:
在 Springboot 应用的主启动类上使用注解 @EnableFeignClients 开启 openFeign 功能,如下:
import org.mybatis.spring.annotation.MapperScan;
import org.springframework.boot.SpringApplication;
import org.springframework.boot.autoconfigure.SpringBootApplication;
import org.springframework.cloud.client.discovery.EnableDiscoveryClient;
import org.springframework.cloud.openfeign.EnableFeignClients;

/**
 * SpringBoot启动类:
 * EnableFeignClients:启动OpenFeign客户端
 * EnableDiscoveryClient:启动服务发现
 */
@EnableFeignClients
@EnableDiscoveryClient
@SpringBootApplication
@MapperScan(basePackages = "com.eebbk.*.dao")
public class ConsumerApplication
{
	public static void main(String[] args)
	{
		SpringApplication.run(ConsumerApplication.class, args);
	}
}
(3)新建 FeignClient 接口:
新建一个 openFeign 接口,使用 @FeignClient 注解标注,如下:
@FeignClient(value = "openFeign-provider")
public interface OpenFeignService {
}
注意:注解 @FeignClient 中的 value 属性指定了服务提供者在 nacos 注册中心的服务名
(4)新建 Controller 调试:
新建一个controller用来调试接口,直接调用openFeign的接口,如下:
@RestController
@RequestMapping("/openfeign")
public class OpenFeignController {
}
好了,至此一个openFeign的微服务就搭建好了,并未实现具体的功能,下面一点点实现。
3、openFeign 的传参:
开发中接口传参的方式有很多,但是在 openFeign 中的传参是有一定规则的,下面详细介绍四种常见的传参方式。
3.1、传递JSON数据:
provider 接口中 JSON 传参方法如下:
@RestController
@RequestMapping("/openfeign/provider")
public class OpenFeignProviderController {
    @PostMapping("/order2")
    public Order createOrder2(@RequestBody Order order){
        return order;
    }
}
consumer消费者openFeign代码如下:
@FeignClient(value = "openFeign-provider")
public interface OpenFeignService {
    /**
     * 参数默认是@RequestBody标注的,这里的@RequestBody可以不填
     * 方法名称任意
     */
    @PostMapping("/openfeign/provider/order2")
    Order createOrder2(@RequestBody Order order);
}
注意:openFeign 默认的传参方式就是JSON传参(@RequestBody),因此定义接口的时候可以不用@RequestBody注解标注,不过为了规范,一般都填上。
3.2、POJO表单传参:
provider服务提供者代码如下:
@RestController
@RequestMapping("/openfeign/provider")
public class OpenFeignProviderController {
    @PostMapping("/order1")
    public Order createOrder1(Order order){
        return order;
    }
}
consumer消费者openFeign代码如下:
@FeignClient(value = "openFeign-provider")
public interface OpenFeignService {
    /**
     * 如果通过POJO表单传参的,使用@SpringQueryMap标注
     */
    @PostMapping("/openfeign/provider/order1")
    Order createOrder1(@SpringQueryMap Order order);
}
3.3、URL中携带参数:
此种方式针对restful方式中的GET请求,也是比较常用请求方式。
provider服务提供者代码如下:
@RestController
@RequestMapping("/openfeign/provider")
public class OpenFeignProviderController {

    @GetMapping("/test/{id}")
    public String test(@PathVariable("id")Integer id){
        return "accept one msg id="+id;
}
consumer消费者openFeign接口如下:
@FeignClient(value = "openFeign-provider")
public interface OpenFeignService {

    @GetMapping("/openfeign/provider/test/{id}")
    String get(@PathVariable("id")Integer id);
}
使用注解 @PathVariable 接收url中的占位符,这种方式很好理解。
3.4、普通表单参数:
此种方式传参不建议使用,但是也有很多开发在用。
provider服务提供者代码如下:
@RestController
@RequestMapping("/openfeign/provider")
public class OpenFeignProviderController {
    @PostMapping("/test2")
    public String test2(String id,String name){
        return MessageFormat.format("accept on msg id={0},name={1}",id,name);
    }
}
consumer消费者openFeign接口传参如下:
@FeignClient(value = "openFeign-provider")
public interface OpenFeignService {
    /**
     * 必须要@RequestParam注解标注,且value属性必须填上参数名
     * 方法参数名可以任意,但是@RequestParam注解中的value属性必须和provider中的参数名相同
     */
    @PostMapping("/openfeign/provider/test2")
    String test(@RequestParam("id") String arg1,@RequestParam("name") String arg2);
}
4、设置超时时间:
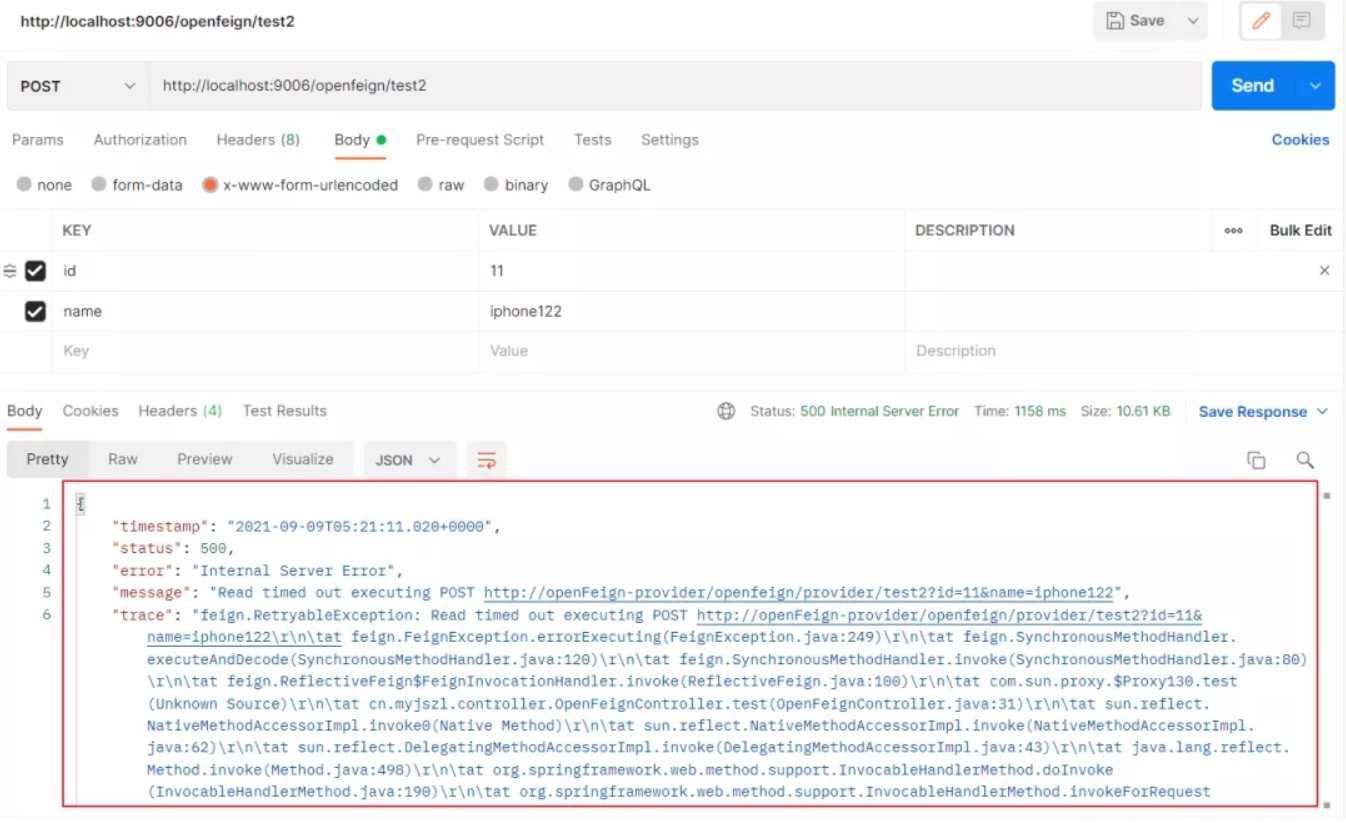
想要理解超时处理,先看一个例子:我将provider服务接口睡眠3秒钟,接口如下:
@PostMapping("/test2")
public String test2(String id,String name) throws InterruptedException {
        Thread.sleep(3000);
        return MessageFormat.format("accept on msg id={0},name={1}",id,name);
}
此时,我们调用consumer的openFeign接口返回结果如下图的超时异常:
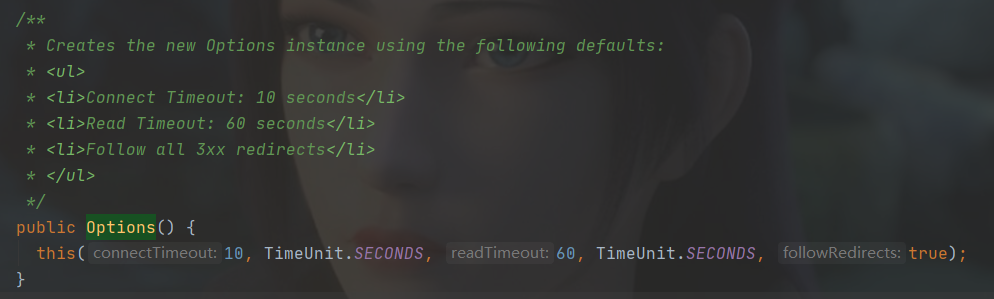
openFeign 其实是有默认的超时时间的,默认分别是连接超时时间 10秒、读超时时间 60秒,源码在 feign.Request.Options#Options() 这个方法中,如下图:
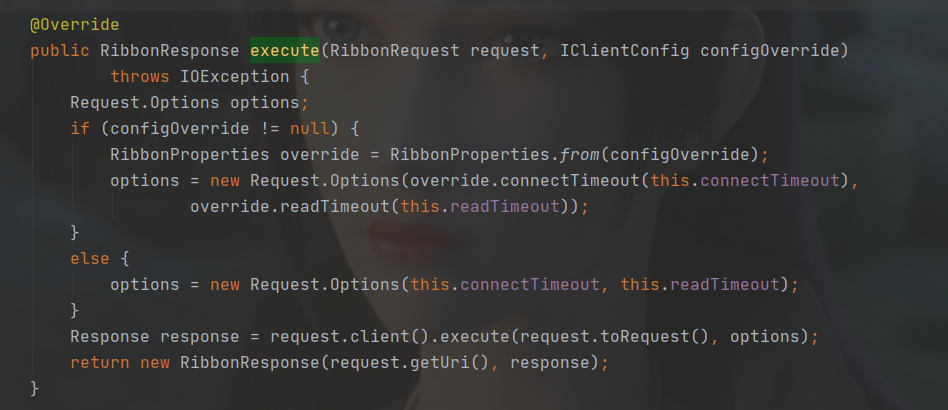
那么为什么我们只设置了睡眠3秒就报超时呢?其实 openFeign 集成了 Ribbon,Ribbon 的默认超时连接时间、读超时时间都是是1秒,源码在 org.springframework.cloud.openfeign.ribbon.FeignLoadBalancer#execute() 方法中,如下图:
源码大致意思:如果openFeign没有设置对应得超时时间,那么将会采用Ribbon的默认超时时间。理解了超时设置的原理,由之产生两种方案也是很明了了,如下:
- 设置openFeign的超时时间
- 设置Ribbon的超时时间
4.1、设置Ribbon的超时时间(不推荐)
ribbon:
  # 值的是建立链接所用的时间,适用于网络状况正常的情况下, 两端链接所用的时间
  ReadTimeout: 5000
  # 指的是建立链接后从服务器读取可用资源所用的时间
  ConectTimeout: 5000
4.2、设置Ribbon的超时时间
openFeign设置超时时间非常简单,只需要在配置文件中配置,如下:
feign:
  client:
    config:
      ## default 设置的全局超时时间,指定服务名称可以设置单个服务的超时时间
      default:
        connectTimeout: 5000
        readTimeout: 5000
default设置的是全局超时时间,对所有的openFeign接口服务都生效,但是正常的业务逻辑中可能有其实 openFeign 接口的调用需要单独配置一个超时时间,比如下面我们就单独给 serviceC 这个服务单独配置了一个超时时间,单个配置的超时时间将会覆盖全局配置:
feign:
  client:
    config:
      ## default 设置的全局超时时间,指定服务名称可以设置单个服务的超时时间
      default:
        connectTimeout: 5000
        readTimeout: 5000
      ## 为serviceC这个服务单独配置超时时间
      serviceC:
        connectTimeout: 30000
        readTimeout: 30000
5、替换的 HTTP 客户端:
openFeign 默认使用的是 JDK 原生的 URLConnection 发送 HTTP 请求,没有连接池,但是对每个地址会保持一个长连接,即利用 HTTP 的 persistence connection。在生产环境中,通常不使用默认的 http client,通常有两种选择:使用 ApacheHttpClient 或者 OkHttp,两者各有千秋,下面我们演示下如何使用 ApacheHttpClient 替换原生的 http client
5.1、添加ApacheHttpClient依赖:
        <!-- 使用 Apache HttpClient 替换 Feign原生httpclient-->
        <dependency>
            <groupId>org.apache.httpcomponents</groupId>
            <artifactId>httpclient</artifactId>
        </dependency>
        <dependency>
            <groupId>io.github.openfeign</groupId>
            <artifactId>feign-httpclient</artifactId>
        </dependency>
为什么要添加上面的依赖呢?从源码中不难看出,请看org.springframework.cloud.openfeign.FeignAutoConfiguration.HttpClientFeignConfiguration 这个类,代码如下:
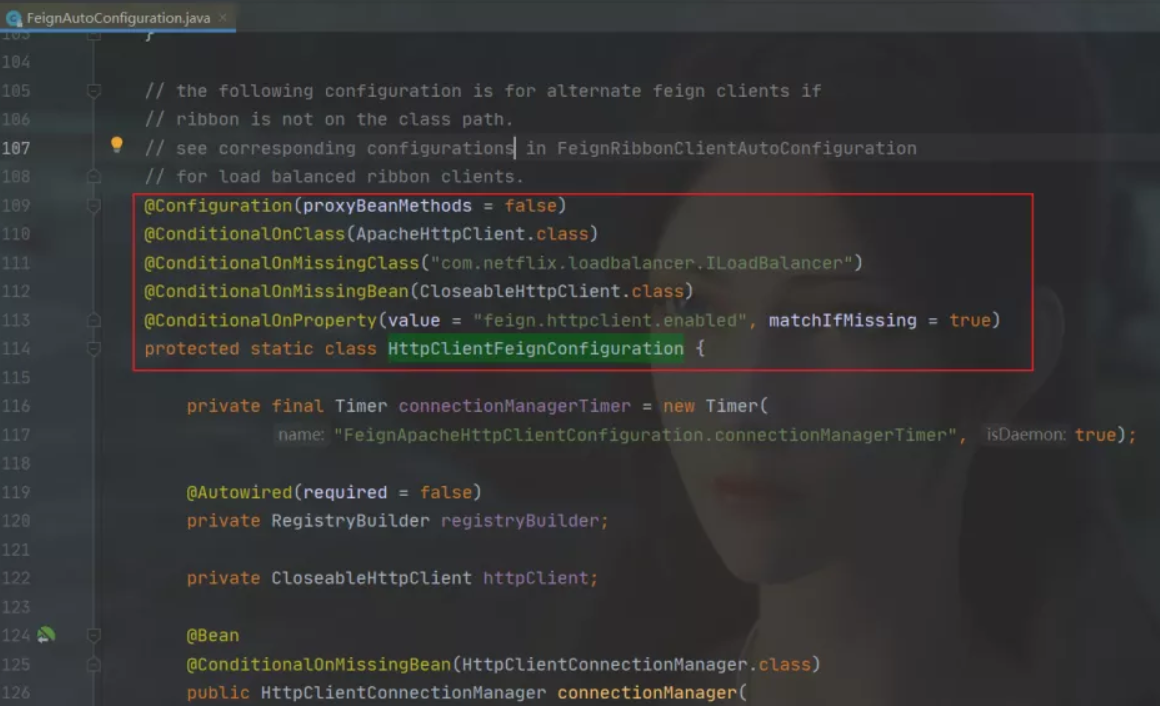
上述红色框中的生成条件,其中的 @ConditionalOnClass(ApacheHttpClient.class),必须要有 ApacheHttpClient 这个类才会生效,并且 feign.httpclient.enabled 这个配置要设置为 true。
5.2、配置文件中开启:
在配置文件中要配置开启,代码如下:
feign:
  client:
    httpclient:
      # 开启 Http Client
      enabled: true
5.3、如何验证?
其实很简单,在 feign.SynchronousMethodHandler#executeAndDecode() 这个方法中可以清楚的看出调用哪个client,如下图:
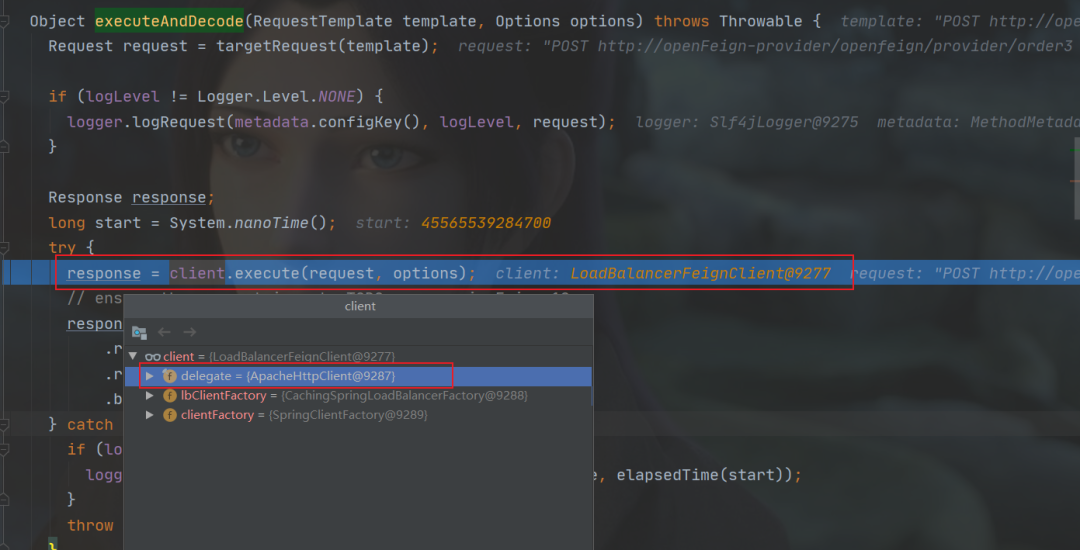
上图中可以看到最终调用的是 ApacheHttpClient。
6、开启日志增强:
openFeign 虽然提供了日志增强功能,但默认是不显示任何日志的,不过开发者在调试阶段可以自己配置日志的级别。
openFeign 的日志级别如下:
- NONE:默认的,不显示任何日志;
- BASIC:仅记录请求方法、URL、响应状态码及执行时间;
- HEADERS:除了BASIC中定义的信息之外,还有请求和响应的头信息;
- FULL:除了HEADERS中定义的信息之外,还有请求和响应的正文及元数据。
配置起来也很简单,步骤如下:
6.1、配置类中配置日志级别
需要自定义一个配置类,在其中设置日志级别,如下:
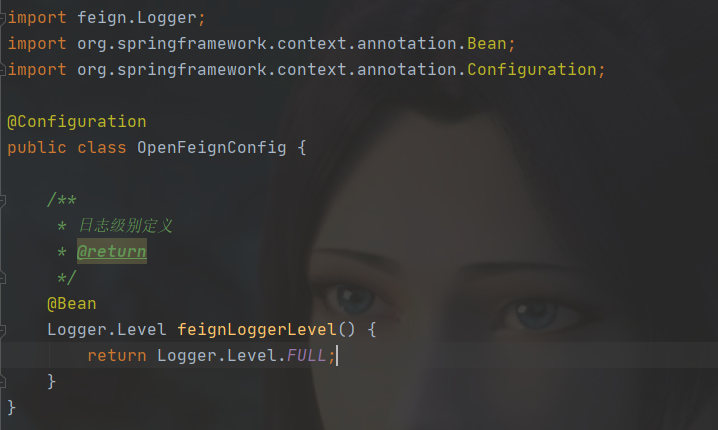
注意:这里的logger是feign包里的。
6.2、yaml文件中设置接口日志级别:
logging:
  level:
    cn.myjszl.service: debug
这里的 cn.myjszl.service 是 openFeign 接口所在的包名,当然你也可以配置一个特定的openFeign接口。
6.3、效果演示
上述步骤将日志设置成了 FULL,此时发出请求,日志效果如下图:
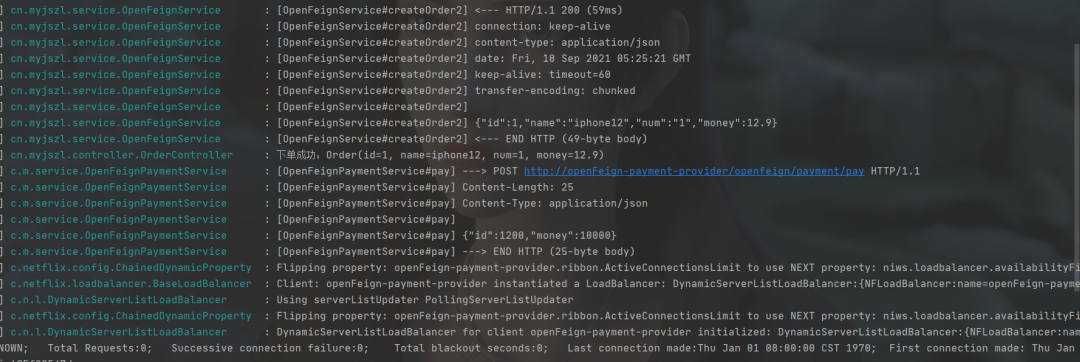
日志中详细的打印出了请求头、请求体的内容。
7、通讯优化:
在讲如何优化之前先来看一下GZIP 压缩算法
7.1、GZIP压缩算法:
gzip是一种数据格式,采用deflate算法压缩数据;当GZIP算法压缩到一个纯文本数据时,效果是非常明显的,大约可以减少70%以上的数据大小。
网络数据经过压缩后实际上降低了网络传输的字节数,最明显的好处就是可以加快网页加载的速度。网页加载速度加快的好处不言而喻,除了节省流量,改善用户的浏览体验外,另一个潜在的好处是GZIP与搜索引擎的抓取工具有着更好的关系。例如 Google就可以通过直接读取GZIP文件来比普通手工抓取更快地检索网页。
GZIP压缩传输的原理如下图:

按照上图拆解出的步骤如下:
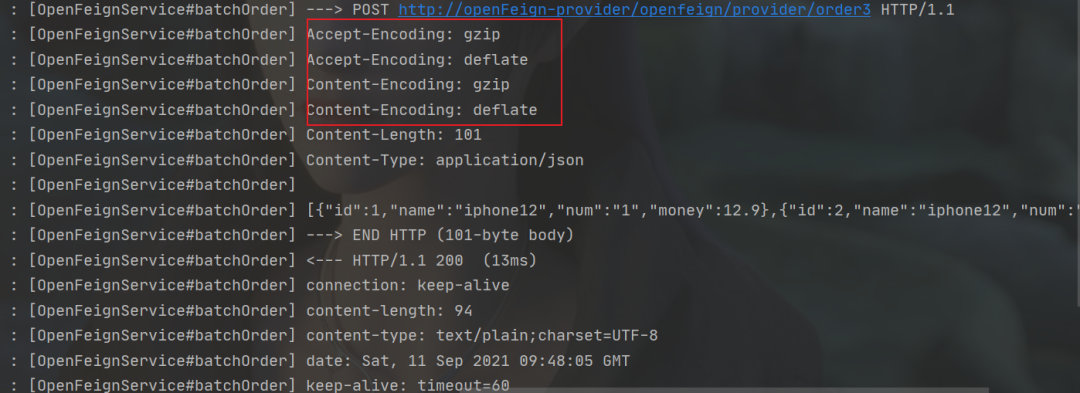
- 客户端向服务器请求头中带有:Accept-Encoding:gzip,deflate 字段,向服务器表示,客户端支持的压缩格式(gzip或者deflate),如果不发送该消息头,服务器是不会压缩的。
- 服务端在收到请求之后,如果发现请求头中含有 Accept-Encoding 字段,并且支持该类型的压缩,就对响应报文压缩之后返回给客户端,并且携带 Content-Encoding:gzip 消息头,表示响应报文是根据该格式压缩过的。
- 客户端接收到响应之后,先判断是否有 Content-Encoding 消息头,如果有,按该格式解压报文。否则按正常报文处理。
7.2、openFeign开启GZIP压缩:
openFeign支持请求/响应开启GZIP压缩,整体的流程如下图:
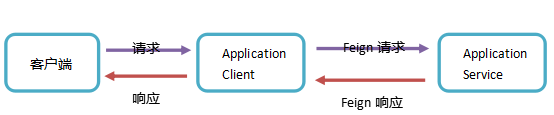
上图中涉及到GZIP传输的只有两块,分别是 Application client -> Application Service、 Application Service->Application client。
注意:openFeign支持的GZIP仅仅是在openFeign接口的请求和响应,即openFeign消费者调用服务提供者的接口。
openFeign开启GZIP步骤也是很简单,只需要在配置文件中开启如下配置:
feign:
  ## 开启压缩
  compression:
    request:
      enabled: true
      ## 开启压缩的阈值,单位字节,默认2048,即是2k,这里为了演示效果设置成10字节
      min-request-size: 10
      mime-types: text/xml,application/xml,application/json
    response:
      enabled: true
上述配置完成之后,发出请求,可以清楚看到请求头中已经携带了GZIP压缩,如下图:
四、OpenFeign 的原理:
文章该部分转自:https://blog.csdn.net/manzhizhen/article/details/110013311
Feign 只是对 HTTP 调用组件进行了易用性封装,底层还是使用我们常见的 OkHttp、HttpClient 等组件,你瞧:
Feign 的目标之一就让这些 HTTP 客户端更好用,使用方式更统一,更像RPC。要想了解 Spring Cloud OpenFeign 整体实现原理,我们需要回答如下四个问题:
- (1)@FeignClient 如何根据接口生成实现(代理)类的?
- (2)生成的实现(代理)类是如何适配各种HTTP组件的?
- (3)生成的实现(代理)类如何实现HTTP请求应答序列化和反序列化的?
- (4)生成的实现(代理)类是如何注入到Spring容器中的?
接下来,我们通过解读源码方式,逐一解答上述问题。
1、@FeignClient 如何根据接口生成实现类的?
Fegin 使用的是 JDK 动态代理技术来生成实现类的,因此 Feign 的使用必须要有接口。但还有一个小问题,我们回看上面提到的 OpenFeignService 接口,里面有多个方法,每个方法有 @RequestMapping ,意味着这些方法可以映射到不同的远端HTTP路径,所以给整个 OpenFeignService 接口做代理时,代理类的方法必须知道对应到哪个远端HTTP路径,虽然我们可以在 java.lang.reflect.InvocationHandler#invoke 的方法入参 Method 中去解析 @RequestMapping 拿url,但需要注意的是,大多数开源框架很忌讳在运行时高频使用JDK的反射,因为这样非常影响执行效率,Dubbo 的 Provider 端也不是用反射来调用本地方法的,所以在 Feign 使用 JDK动态代理技术时,需要提前将接口(例如 OpenFeignService)带 @RequestMapping 方法解析出来。为了探究这块的具体实现,我们移步原生 Feign 的 feign-core 包的核心类 ReflectiveFeign:
package feign;

import feign.InvocationHandlerFactory.MethodHandler;

import java.lang.reflect.InvocationHandler;
import java.lang.reflect.Method;
import java.lang.reflect.Proxy;
import java.util.LinkedHashMap;
import java.util.Map;

import static feign.Util.checkNotNull;

public class ReflectiveFeign extends Feign {

    private final InvocationHandlerFactory factory;

    /**
     * creates an api binding to the {@code target}. As this invokes reflection, care should be taken
     * to cache the result.
     * 注意:这里我们隐藏了大部分非核心的代码
     */
    @Override
    public <T> T newInstance(Target<T> target) {
        // 将@FeignClient的接口类所有带@RequestMapping方法解析出来,map的key为方法签名,MethodHander为包装过的方法调用Hander
        Map<String, MethodHandler> nameToHandler = targetToHandlersByName.apply(target);
        Map<Method, MethodHandler> methodToHandler = new LinkedHashMap<Method, MethodHandler>();

        // 根据nameToHandler来组装methodToHandler
        for (Method method : target.type().getMethods()) {
            methodToHandler.put(method, nameToHandler.get(Feign.configKey(target.type(), method)));
        }

        // 这里通过一个InvocationHandler工厂来参见JDK动态代理中的InvocationHandler(既下面的FeignInvocationHandler)
        InvocationHandler handler = factory.create(target, methodToHandler);

        // 创建JDK动态代理生成代理类,这个类在Spring Cloud OpenFeign中会被注册到Spring容器中
        T proxy = (T) Proxy.newProxyInstance(target.type().getClassLoader(),
                new Class<?>[]{target.type()}, handler);

        return proxy;
    }

    /**
     * Feign专用FeignInvocationHandler
     */
    static class FeignInvocationHandler implements InvocationHandler {

        private final Target target;
        // 这里保持的是我们在newInstance解析出来的@RequestMapping(在原生Feign中是@RequestLine)方法和方法处理器的映射关系
        private final Map<Method, MethodHandler> dispatch;

        FeignInvocationHandler(Target target, Map<Method, MethodHandler> dispatch) {
            this.target = checkNotNull(target, "target");
            this.dispatch = checkNotNull(dispatch, "dispatch for %s", target);
        }

        @Override
        public Object invoke(Object proxy, Method method, Object[] args) throws Throwable {
            // 常规的用于AOP的动态代理会选择调用target的method方法,但我们这里由于没有自定义的接口实现类,所以直接调用我们包装过的对应MethodHandler
            return dispatch.get(method).invoke(args);
        }
    }
}
这里顺便补充下 MethodHandler 接口的定义:
package feign;

import java.lang.reflect.InvocationHandler;
import java.lang.reflect.Method;
import java.util.Map;

/**
 * Controls reflective method dispatch.
 */
public interface InvocationHandlerFactory {

    InvocationHandler create(Target target, Map<Method, MethodHandler> dispatch);

    /**
     * Like {@link InvocationHandler#invoke(Object, java.lang.reflect.Method, Object[])}, except for a
     * single method.
     */
    interface MethodHandler {
        Object invoke(Object[] argv) throws Throwable;
    }

    static final class Default implements InvocationHandlerFactory {
        @Override
        public InvocationHandler create(Target target, Map<Method, MethodHandler> dispatch) {
            return new ReflectiveFeign.FeignInvocationHandler(target, dispatch);
        }
    }
}
看 ReflectiveFeign 的类名我们就知道它和反射有关,ReflectiveFeign 借助于JDK动态代理,根据我们的业务接口生成对应的代理类,这个代理类会根据调用的方法来直接找到已经提前准备好的对应的 MethodHandler,直接调用即可完成Feign的使命,根据上面的使用方法,我们不难猜到 MethodHandler 里面有HTTP调用的相关信息(这些信息之前是在接口方法定义的 @RequestMapping 或 @RequestLine 之中),而且 MethodHandler#invoke 会完成真正的HTTP调用并将结果反序列化成原接口方法的返回值对象。
2、生成的实现(代理)类是如何适配各种HTTP组件的?
这个问题应该由 Feign 来回答,而不是 Spring Cloud OpenFeign,Feign 的 feign-core 模块中有一个 Client 接口,专门用来给各个HTTP组件提供接入接口,我们看其定义:
package feign;

import feign.Request.Options;

import java.io.IOException;

/**
 * Submits HTTP {@link Request requests}. Implementations are expected to be thread-safe.
 * 注意,为了展现方便,我们裁剪了部分代码
 */
public interface Client {

    /**
     * Executes a request against its {@link Request#url() url} and returns a response.
     *
     * @param request safe to replay.
     * @param options options to apply to this request.
     * @return connected response, {@link Response.Body} is absent or unread.
     * @throws IOException on a network error connecting to {@link Request#url()}.
     */
    Response execute(Request request, Options options) throws IOException;
}
各个 HTTP客户端组件的适配模块(例如feign-okhttp、feign-httpclient等)只需要实现该接口就可以和 Feign 打通,而在原生的 Feign 中,选择何种HTTP组件是自己选择的,比如我们想使用OkHttpClient,在Consumer端可以这样:
public class Example {
  public static void main(String[] args) {
     String response = Feign.builder()
                     .client(new OkHttpClient())
                     .target(ProviderDemoService.class, "https://xxxx");
  }
}
Spring Cloud 遵循 Spring Boot 的“约定优于配置”的原则,通过条件注解,实现了通过当前项目的依赖包决定使用哪个 HTTP 组件,详见 Spring Cloud OpenFeign 中的 org.springframework.cloud.openfeign.FeignAutoConfiguration:
@Configuration(proxyBeanMethods = false)
@ConditionalOnClass(Feign.class)
@EnableConfigurationProperties({FeignClientProperties.class, FeignHttpClientProperties.class})
@Import(DefaultGzipDecoderConfiguration.class)
public class FeignAutoConfiguration {

	@Configuration(proxyBeanMethods = false)
	@ConditionalOnClass(ApacheHttpClient.class)
	@ConditionalOnMissingBean(CloseableHttpClient.class)
	@ConditionalOnProperty(value = "feign.httpclient.enabled", matchIfMissing = true)
	protected static class HttpClientFeignConfiguration {

		private final Timer connectionManagerTimer = new Timer(
			"FeignApacheHttpClientConfiguration.connectionManagerTimer", true);

		@Autowired(required = false)
		private RegistryBuilder registryBuilder;

		private CloseableHttpClient httpClient;

		@Bean
		@ConditionalOnMissingBean(HttpClientConnectionManager.class)
		public HttpClientConnectionManager connectionManager(
			ApacheHttpClientConnectionManagerFactory connectionManagerFactory,
			FeignHttpClientProperties httpClientProperties) {
			// 略
		}

		@Bean
		public CloseableHttpClient httpClient(ApacheHttpClientFactory httpClientFactory,
											  HttpClientConnectionManager httpClientConnectionManager,
											  FeignHttpClientProperties httpClientProperties) {
			// 略
		}

		@Bean
		@ConditionalOnMissingBean(Client.class)
		public Client feignClient(HttpClient httpClient) {
			return new ApacheHttpClient(httpClient);
		}

	}

	@Configuration(proxyBeanMethods = false)
	@ConditionalOnClass(OkHttpClient.class)
	@ConditionalOnMissingBean(okhttp3.OkHttpClient.class)
	@ConditionalOnProperty("feign.okhttp.enabled")
	protected static class OkHttpFeignConfiguration {

		private okhttp3.OkHttpClient okHttpClient;

		@Bean
		@ConditionalOnMissingBean(ConnectionPool.class)
		public ConnectionPool httpClientConnectionPool(FeignHttpClientProperties httpClientProperties,
													   OkHttpClientConnectionPoolFactory connectionPoolFactory) {
			Integer maxTotalConnections = httpClientProperties.getMaxConnections();
			Long timeToLive = httpClientProperties.getTimeToLive();
			TimeUnit ttlUnit = httpClientProperties.getTimeToLiveUnit();
			return connectionPoolFactory.create(maxTotalConnections, timeToLive, ttlUnit);
		}

		@Bean
		public okhttp3.OkHttpClient client(OkHttpClientFactory httpClientFactory, ConnectionPool connectionPool,
										   FeignHttpClientProperties httpClientProperties) {
			// 略
		}

		@Bean
		@ConditionalOnMissingBean(Client.class)
		public Client feignClient(okhttp3.OkHttpClient client) {
			return new OkHttpClient(client);
		}
	}
}
从上面各种复杂的条件注解来看,如果我们项目中引入了 feign-httpclient 包(即ApacheHttpClient),并且配置了“feign.httpclient.enable”的值为 true 时,那么就会使用HttpClient,其他的HTTP组件也是类似的方式来判断和加载。
3、生成的实现(代理)类如何实现HTTP请求应答序列化和反序列化的?
原生的Feign允许你添加额外的解码器,官方给出了Consumer的例子:
public class Example {
  public static void main(String[] args) {
    // 这里假定ProviderDemoService中有一个返回MyResponse的方法
    MyResponse response = Feign.builder()
                     .decoder(new GsonDecoder())
                     .client(new OkHttpClient())
                     .target(ProviderDemoService.class, "https://xxxx");
  }
}为了能做到这一点,原生Feign提供了Decoder 和Encoder 两个接口(本文我们只重点关注解码部分):
public interface Decoder {

    /**
     * Decodes an http response into an object corresponding to its
     * {@link java.lang.reflect.Method#getGenericReturnType() generic return type}. If you need to
     * wrap exceptions, please do so via {@link DecodeException}.
     *
     * @param response the response to decode
     * @param type {@link java.lang.reflect.Method#getGenericReturnType() generic return type} of the
     *        method corresponding to this {@code response}.
     * @return instance of {@code type}
     * @throws IOException will be propagated safely to the caller.
     * @throws DecodeException when decoding failed due to a checked exception besides IOException.
     * @throws FeignException when decoding succeeds, but conveys the operation failed.
     */
    Object decode(Response response, Type type) throws IOException, DecodeException, FeignException;
}


public interface Encoder {

    /**
     * Converts objects to an appropriate representation in the template.
     *
     * @param object what to encode as the request body.
     * @param bodyType the type the object should be encoded as. {@link #MAP_STRING_WILDCARD}
     *        indicates form encoding.
     * @param template the request template to populate.
     * @throws EncodeException when encoding failed due to a checked exception.
     */
    void encode(Object object, Type bodyType, RequestTemplate template) throws EncodeException;
}
换成 Spring Cloud OpenFeign 的话,就得和Spring的Web体系打通了,这里就不得不提一个构造类即FeignClientsConfiguration:
// 注意:为了演示方便,对其进行了代码裁剪
@Configuration(proxyBeanMethods = false)
public class FeignClientsConfiguration {

	@Autowired
	// 这里将Spring Web的消息转换器机制注入进来
	private ObjectFactory<HttpMessageConverters> messageConverters;

	@Bean
	@ConditionalOnMissingBean
	// 构造解码Decoder的Spring Bean
	public Decoder feignDecoder() {
		// 这里的SpringDecoder实现了Feign的Decoder接口,并且将Spring Web的消息转换器设置到SpringDecoder来使用
		return new OptionalDecoder(new ResponseEntityDecoder(new SpringDecoder(this.messageConverters)));
	}

	@Bean
	@ConditionalOnMissingBean
	// 构造编码Encoder的Spring Bean
	public Encoder feignEncoder(ObjectProvider<AbstractFormWriter> formWriterProvider) {
		return springEncoder(formWriterProvider);
	}

	private Encoder springEncoder(ObjectProvider<AbstractFormWriter> formWriterProvider) {
		AbstractFormWriter formWriter = formWriterProvider.getIfAvailable();

		if (formWriter != null) {
			return new SpringEncoder(new SpringPojoFormEncoder(formWriter), this.messageConverters);
		}
		else {
			return new SpringEncoder(new SpringFormEncoder(), this.messageConverters);
		}
	}
}那我们看看SpringDecoder 拿到Spring Web的解码器后如何使用:
// 注意:裁剪了部分代码
public class SpringDecoder implements Decoder {

	private ObjectFactory<HttpMessageConverters> messageConverters;

	public SpringDecoder(ObjectFactory<HttpMessageConverters> messageConverters) {
		this.messageConverters = messageConverters;
	}

	@Override
	public Object decode(final Response response, Type type) throws IOException, FeignException {
		if (type instanceof Class || type instanceof ParameterizedType || type instanceof WildcardType) {
			HttpMessageConverterExtractor<?> extractor = new HttpMessageConverterExtractor(type,
					this.messageConverters.getObject().getConverters());
			// 直接使用了。。。
			return extractor.extractData(new FeignResponseAdapter(response));
		}

		throw new DecodeException(response.status(), "type is not an instance of Class or ParameterizedType: " + type,
				response.request());
	}
}
到此为止,相信你对编解码这块已经有一定的了解。
4、生成的实现(代理)类是如何注入到Spring容器中的?
Spring Cloud OpenFeign 如何将动态生成的代理类和Spring容器打通?还记得我们前面说的 @EnableFeignClients 吗?这时需要我们在使用 Spring Cloud OpenFeign 时显式的在一个能被 Spring 容器扫到并加载的类上使用的,@EnableFeignClients 的定义如下:
@Retention(RetentionPolicy.RUNTIME)
@Target(ElementType.TYPE)
@Documented
@Import(FeignClientsRegistrar.class)
public @interface EnableFeignClients {
	// 注解内容省略
}
就是这里的 @Import 提前加载 Spring Bean 的方式,触发了 FeignClientRegistrar 的初始化,而 FeignClientRegistrar 由于实现了 ImportBeanDefinitionRegistrar 接口,我们知道在处理 @Configuration 类时可以通过 Import 注册其他 Spring Bean 定义的能力,而前面说过,我们还不知道哪些接口使用了 @FeignClient,所以在 FeignClientRegistrar 中我们需要做的就是扫描某些路径(该路径由配置Spring扫描路径包括@EnableFeignClients中配置的路径)的接口类,识别对应的 @FeignClient ,给这些接口类创建代理对象。而为了把这些代理对象注入到Spring 容器中,所以还得借助 FactoryBean 的能力。我们先看下 ImportBeanDefinitionRegistrar 的实现:
// 注意:裁剪了大量代码
class FeignClientsRegistrar implements ImportBeanDefinitionRegistrar, ResourceLoaderAware, EnvironmentAware {

	private ResourceLoader resourceLoader;
	private Environment environment;

	@Override
	public void setResourceLoader(ResourceLoader resourceLoader) {
		this.resourceLoader = resourceLoader;
	}

	@Override
	public void registerBeanDefinitions(AnnotationMetadata metadata, BeanDefinitionRegistry registry) {
		// 获取 @EnableFeignClients 上的相关属性并用这些属性做一些基本配置Bean的注册
		registerDefaultConfiguration(metadata, registry);
        // 注册Bean
		registerFeignClients(metadata, registry);
	}

	private void registerDefaultConfiguration(AnnotationMetadata metadata, BeanDefinitionRegistry registry) {
		// 略
	}

	public void registerFeignClients(AnnotationMetadata metadata, BeanDefinitionRegistry registry) {
		LinkedHashSet<BeanDefinition> candidateComponents = new LinkedHashSet<>();
		Map<String, Object> attrs = metadata.getAnnotationAttributes(EnableFeignClients.class.getName());
		final Class<?>[] clients = attrs == null ? null : (Class<?>[]) attrs.get("clients");
		if (clients == null || clients.length == 0) {
			// 获取包路径下的扫描器
			ClassPathScanningCandidateComponentProvider scanner = getScanner();
			scanner.setResourceLoader(this.resourceLoader);
			scanner.addIncludeFilter(new AnnotationTypeFilter(FeignClient.class));
			Set<String> basePackages = getBasePackages(metadata);
			for (String basePackage : basePackages) {
				// 将所有 @FeignClient 的接口的BeanDefinition拿到
				candidateComponents.addAll(scanner.findCandidateComponents(basePackage));
			}
		} else {
			for (Class<?> clazz : clients) {
				candidateComponents.add(new AnnotatedGenericBeanDefinition(clazz));
			}
		}

		for (BeanDefinition candidateComponent : candidateComponents) {
			if (candidateComponent instanceof AnnotatedBeanDefinition) {

				AnnotatedBeanDefinition beanDefinition = (AnnotatedBeanDefinition) candidateComponent;
				AnnotationMetadata annotationMetadata = beanDefinition.getMetadata();

				// 对,这里要求必须是接口
				Assert.isTrue(annotationMetadata.isInterface(), "@FeignClient can only be specified on an interface");

				Map<String, Object> attributes = annotationMetadata
					.getAnnotationAttributes(FeignClient.class.getCanonicalName());

				// 根据这些属性和接口来注册FeignClient Bean
				registerFeignClient(registry, annotationMetadata, attributes);
			}
		}
	}

	private void registerFeignClient(BeanDefinitionRegistry registry, AnnotationMetadata annotationMetadata,
									 Map<String, Object> attributes) {
		String className = annotationMetadata.getClassName();
		// 使用FactoryBean,将Bean的具体生成过程收拢到FeignClientFactoryBean之中
		BeanDefinitionBuilder definition = BeanDefinitionBuilder.genericBeanDefinition(FeignClientFactoryBean.class);
		definition.addPropertyValue("type", className);
		definition.setAutowireMode(AbstractBeanDefinition.AUTOWIRE_BY_TYPE);

		AbstractBeanDefinition beanDefinition = definition.getBeanDefinition();

		BeanDefinitionHolder holder = new BeanDefinitionHolder(beanDefinition, className, new String[]{alias});
		// 将这个使用了 @FeignClient 的接口的工厂Bean的 BeanDefinition 注册到Spring容器中
		BeanDefinitionReaderUtils.registerBeanDefinition(holder, registry);
	}
}
可以看出,关键逻辑又回到 FeignClientFactoryBean 拿到业务接口、@EnableFeignClient 和 @FeignClient 的数据后如何去构造代理类了,而 FeignClientFactoryBean 内部其实使用的是原生 Feign 的 API 来构建代理对象。
相关阅读:
常见的服务器架构入门:从单体架构、EAI 到 SOA 再到微服务和 ServiceMesh
常见分布式理论(CAP、BASE)和一致性协议(Gosssip协议、Raft一致性算法)
SpringCloud OpenFeign 远程HTTP服务调用用法与原理
Sentinel-Dashboard 与 apollo 规则的相互同步
Spring Cloud Gateway 服务网关的部署与使用详细介绍
Spring Cloud Gateway 整合 sentinel 实现流控熔断
Spring Cloud Gateway 整合 knife4j 聚合接口文档