文章目录
Spring Boot —— 工作机制
目标
- 了解 Spring Boot 如何启动
- 了解 Spring Boot 如何工作
开始
Spring Boot 是 Spring 框架对“约定优先于配置(Convention Over Configuration)”理念对最佳实践的产物。如果对Spring 原理很熟悉对话,再来看Spring Boot 会发现“阳光之下,并无新事。”
一段Spring Boot 启动程序
import org.springframework.boot.SpringApplication;
import org.springframework.boot.autoconfigure.SpringBootApplication;

@SpringBootApplication
public class StartApplication {
    public static void main(String[] args) {
        SpringApplication.run(StartApplication.class, args);
    }
}
上述代码发现Annotation(注解)定义的@SpringBootApplication和类定义的SpringApplication.run最为重要,我们则从这里开始作为了解Spring Boot 工作机制的入口。
@SpringBootApplication 背后的秘密
- @SpringBootApplication是复合Annotation(注解)
@Target(ElementType.TYPE)
@Retention(RetentionPolicy.RUNTIME)
@Documented
@Inherited
@SpringBootConfiguration
@EnableAutoConfiguration
@ComponentScan(excludeFilters = {
		@Filter(type = FilterType.CUSTOM, classes = TypeExcludeFilter.class),
		@Filter(type = FilterType.CUSTOM, classes = AutoConfigurationExcludeFilter.class) })
public @interface SpringBootApplication {
	....
	....
	....
}
虽然SpringBootApplication拥有复数注解,只需要记住三个重要的注解,记住三个!
- @SpringBootConfiguration
而SpringBootConfiguration点击进入会发现它也是一个复合注解,我们只需关心它的Configuration
@Target({ElementType.TYPE})
@Retention(RetentionPolicy.RUNTIME)
@Documented
@Configuration
public @interface SpringBootConfiguration {
}
- @EnableAutoConfiguration
- @ComponentScan
将StartApplication.java中的@SpringBootApplication注解改为这三个注解 @Configuration、@EnableAutoConfiguration、@ComponentScan,应用程序依然可以正常启动,而使用@SpringBootApplication使我们不用在每个启动类上面都写三个注解,这样一站式复合Annotation更加方便。
下面我们就来了解这三个注解吧。
@Configuration 创世纪
JavaConfig形式的Spring IoC 容器的配置类使用的@Configuration,因为Spring Boot骨子里就是一个Spring应用,所以Spring Boot自然也需要加载某个IoC容器的配置,而Spring Boot社区推荐使用基于JavaConfig的配置形式,所以,很明显,这里启动类标注了@Configuration之后,本身就是一个IoC容器的配置类!
Spring Boot中@SpringBootApplication内的@Configuration是基于JavaConfig配置形式,即因为有@Configuration注解,Spring Boot本身就成为类一个IoC容器的配置类。
@EnableAutoConfiguration 的功效
@EnableAutoConfiguration理念和“做事方式”其实如出一辙,简单概括一下就是,借助@Import的支持,收集和注册特定场景相关的bean定义:
- @EnableScheduling 是通过 @Import 将Spring调度框架相关的bean定义都加载到IoC容器。
- @EnableMBeanExport 是通过 @Import 将JMX相关的bean定义加载到IoC容器。
而@EnableAutoConfiguration 也是借助@Import的帮助,将所有符合自动配置条件的bean定义加载到IoC容器。@EnableAutoConfiguration作为一个复合Annotation,其自身定义关键信息如下:
package org.springframework.boot.autoconfigure;

import java.lang.annotation.Documented;
import java.lang.annotation.ElementType;
import java.lang.annotation.Inherited;
import java.lang.annotation.Retention;
import java.lang.annotation.RetentionPolicy;
import java.lang.annotation.Target;

import org.springframework.boot.autoconfigure.condition.ConditionalOnBean;
import org.springframework.boot.autoconfigure.condition.ConditionalOnClass;
import org.springframework.boot.autoconfigure.condition.ConditionalOnMissingBean;
import org.springframework.boot.web.embedded.tomcat.TomcatServletWebServerFactory;
import org.springframework.boot.web.servlet.server.ServletWebServerFactory;
import org.springframework.context.annotation.Conditional;
import org.springframework.context.annotation.Configuration;
import org.springframework.context.annotation.Import;
import org.springframework.core.io.support.SpringFactoriesLoader;

/**
 * 启动Spring Application Context的自动配置,自动配置需要的bean,基本是自动配置,根据类路径以及定义的bean来应用。
 * 后面举例没看懂。
 *
 * Enable auto-configuration of the Spring Application Context, attempting to guess and
 * configure beans that you are likely to need. Auto-configuration classes are usually
 * applied based on your classpath and what beans you have defined. For example, if you
 * have {@code tomcat-embedded.jar} on your classpath you are likely to want a
 * {@link TomcatServletWebServerFactory} (unless you have defined your own
 * {@link ServletWebServerFactory} bean).
 * <p>
 * 使用SpringBootApplication注解时,自动配置上下文是自动的。
 *
 * When using {@link SpringBootApplication}, the auto-configuration of the context is
 * automatically enabled and adding this annotation has therefore no additional effect.
 * <p>
 * 自动配置尝试尽可能智能化,并且支持自定义配置。
 *
 * Auto-configuration tries to be as intelligent as possible and will back-away as you
 * define more of your own configuration. You can always manually {@link #exclude()} any
 * configuration that you never want to apply (use {@link #excludeName()} if you don't
 * have access to them). You can also exclude them via the
 * {@code spring.autoconfigure.exclude} property. Auto-configuration is always applied
 * after user-defined beans have been registered.
 * <p>
 * 使用@EnableAutoConfiguration注释的类的包,通过@SpringBootApplication就可以配置。
 *
 * The package of the class that is annotated with {@code @EnableAutoConfiguration},
 * usually via {@code @SpringBootApplication}, has specific significance and is often used
 * as a 'default'. For example, it will be used when scanning for {@code @Entity} classes.
 * It is generally recommended that you place {@code @EnableAutoConfiguration} (if you're
 * not using {@code @SpringBootApplication}) in a root package so that all sub-packages
 * and classes can be searched.
 * <p>
 * 自动装配是常规的Spring Configuration Bean。找到SpringFactoriesLoader(这是Spring原有的一个工具类)。
 *
 * Auto-configuration classes are regular Spring {@link Configuration} beans. They are
 * located using the {@link SpringFactoriesLoader} mechanism (keyed against this class).
 * Generally auto-configuration beans are {@link Conditional @Conditional} beans (most
 * often using {@link ConditionalOnClass @ConditionalOnClass} and
 * {@link ConditionalOnMissingBean @ConditionalOnMissingBean} annotations).
 *
 * @author Phillip Webb
 * @author Stephane Nicoll
 * @see ConditionalOnBean
 * @see ConditionalOnMissingBean
 * @see ConditionalOnClass
 * @see AutoConfigureAfter
 * @see SpringBootApplication
 */
@Target(ElementType.TYPE)
@Retention(RetentionPolicy.RUNTIME)
@Documented
@Inherited
@AutoConfigurationPackage
@Import(AutoConfigurationImportSelector.class)
public @interface EnableAutoConfiguration {

	String ENABLED_OVERRIDE_PROPERTY = "spring.boot.enableautoconfiguration";
	...
	...
	...

}
其中,最关键的是@Import(AutoConfigurationImportSelector.class),借助AutoConfigurationImportSelector,@EnableAutoConfiguration可以帮助SpringBoot应用将所有符合条件的@Configuration配置都加载到当前Spring Boot创建并使用的IoC容器。借助Spring框架原有的一个工具类:SpringFactoriesLoader的支持,@EnableAutoConfiguration可以“智能”地自动配置功效才得以大功告成。请参照下图: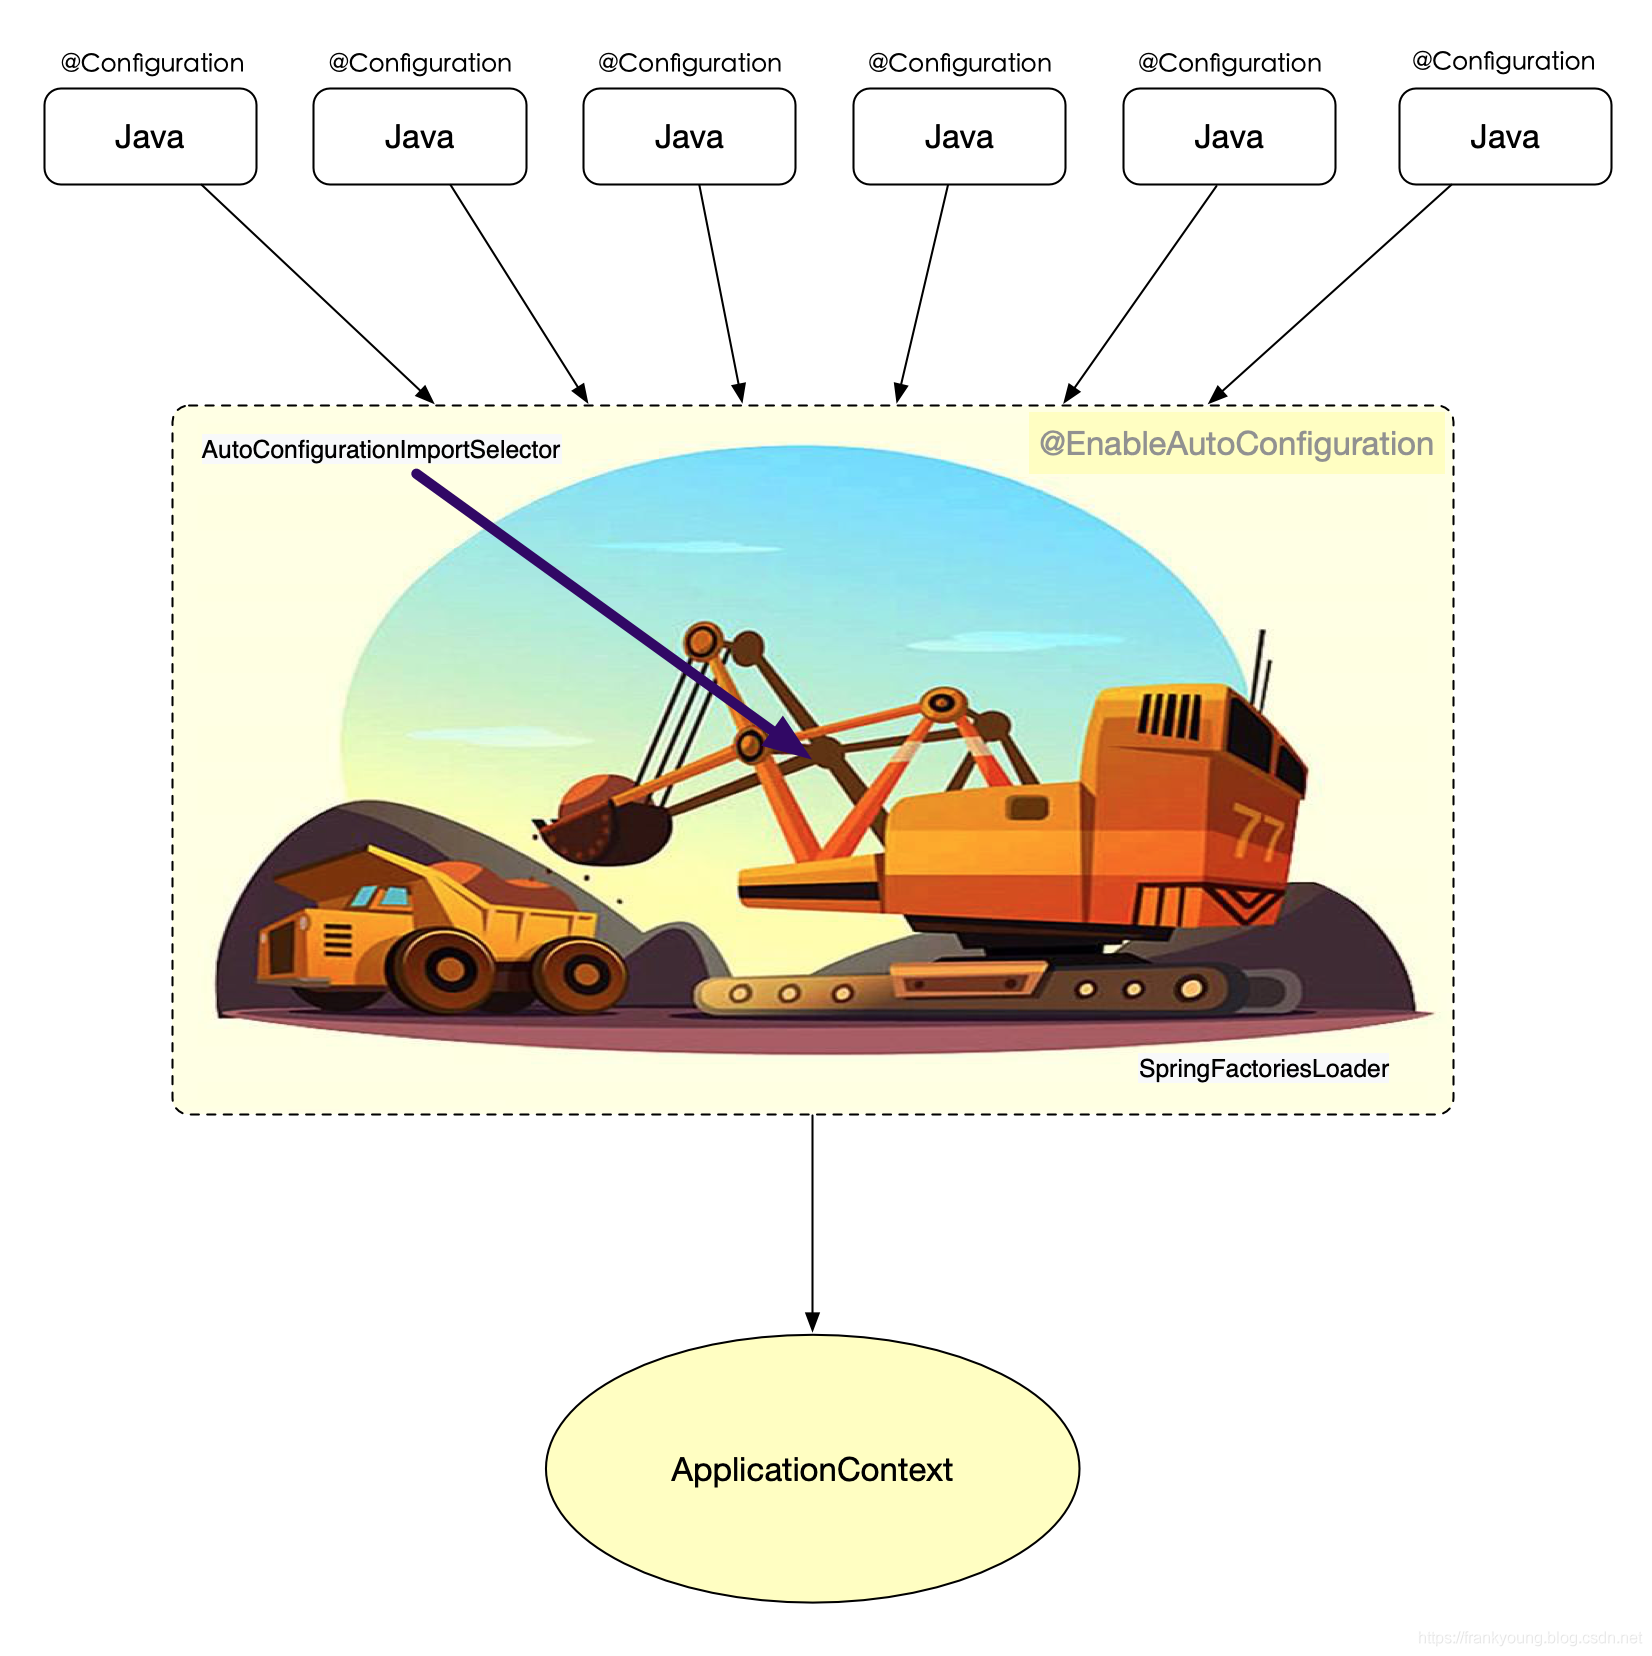
自动配置的幕后英雄:SpringFactoriesLoader 详解
SpringFactoriesLoader 属于Spring 框架私有的一种扩展方案(类似于Java的SPI方案java.util.ServiceLoader),主要功能是从指定的配置文件META-INF/spring.factories加载配置,spring.factories是一个典型的java properties文件,为k=v形式,只不过k和v都是Java类型的完整类名(Fully qualified name),例如:
example.MyService=example.MyServiceImpl1,example.MyServiceImpl2
以此,框架就可以根据某个类型作为Key来查找对应的类型名称列表来:
public abstract class SpringFactoriesLoader {

    ...
    ...

    public SpringFactoriesLoader() {
    }

    public static <T> List<T> loadFactories(Class<T> factoryClass, @Nullable ClassLoader classLoader) {
    ...
    ...
    }

    public static List<String> loadFactoryNames(Class<?> factoryClass, @Nullable ClassLoader classLoader) {
    ...
    ...
    }
}
对于@EnableAutoConfiguration来说,SpringFactoriesLoader的用途稍微不同一些,本意是为了提供SPI(service provider interface)扩展场景,而在@EnableAutoConfiguration的完整类名 org.springframework.boot.autoconfigure.EnableAutoConfiguration 作为查找的Key,获取对应的一组 @Configuration
下面贴出spring boot 2.0.3 :spring-boot-2.0.3.RELEASE.jar/META-INF/spring.factories
# PropertySource Loaders
# 装配配置文件
org.springframework.boot.env.PropertySourceLoader=\
org.springframework.boot.env.PropertiesPropertySourceLoader,\
org.springframework.boot.env.YamlPropertySourceLoader

# Run Listeners
# 执行监听器
org.springframework.boot.SpringApplicationRunListener=\
org.springframework.boot.context.event.EventPublishingRunListener

# Error Reporters
# 错误报告
org.springframework.boot.SpringBootExceptionReporter=\
org.springframework.boot.diagnostics.FailureAnalyzers

# Application Context Initializers
# 初始化上下文设置
org.springframework.context.ApplicationContextInitializer=\
org.springframework.boot.context.ConfigurationWarningsApplicationContextInitializer,\
org.springframework.boot.context.ContextIdApplicationContextInitializer,\
org.springframework.boot.context.config.DelegatingApplicationContextInitializer,\
org.springframework.boot.web.context.ServerPortInfoApplicationContextInitializer

# Application Listeners
# 应用监听器
org.springframework.context.ApplicationListener=\
org.springframework.boot.ClearCachesApplicationListener,\
org.springframework.boot.builder.ParentContextCloserApplicationListener,\
org.springframework.boot.context.FileEncodingApplicationListener,\
org.springframework.boot.context.config.AnsiOutputApplicationListener,\
org.springframework.boot.context.config.ConfigFileApplicationListener,\
org.springframework.boot.context.config.DelegatingApplicationListener,\
org.springframework.boot.context.logging.ClasspathLoggingApplicationListener,\
org.springframework.boot.context.logging.LoggingApplicationListener,\
org.springframework.boot.liquibase.LiquibaseServiceLocatorApplicationListener

# Environment Post Processors
# 后置处理器
org.springframework.boot.env.EnvironmentPostProcessor=\
org.springframework.boot.cloud.CloudFoundryVcapEnvironmentPostProcessor,\
org.springframework.boot.env.SpringApplicationJsonEnvironmentPostProcessor,\
org.springframework.boot.env.SystemEnvironmentPropertySourceEnvironmentPostProcessor

# Failure Analyzers
# 故障分析
org.springframework.boot.diagnostics.FailureAnalyzer=\
org.springframework.boot.diagnostics.analyzer.BeanCurrentlyInCreationFailureAnalyzer,\
org.springframework.boot.diagnostics.analyzer.BeanNotOfRequiredTypeFailureAnalyzer,\
org.springframework.boot.diagnostics.analyzer.BindFailureAnalyzer,\
org.springframework.boot.diagnostics.analyzer.BindValidationFailureAnalyzer,\
org.springframework.boot.diagnostics.analyzer.UnboundConfigurationPropertyFailureAnalyzer,\
org.springframework.boot.diagnostics.analyzer.ConnectorStartFailureAnalyzer,\
org.springframework.boot.diagnostics.analyzer.NoUniqueBeanDefinitionFailureAnalyzer,\
org.springframework.boot.diagnostics.analyzer.PortInUseFailureAnalyzer,\
org.springframework.boot.diagnostics.analyzer.ValidationExceptionFailureAnalyzer,\
org.springframework.boot.diagnostics.analyzer.InvalidConfigurationPropertyNameFailureAnalyzer,\
org.springframework.boot.diagnostics.analyzer.InvalidConfigurationPropertyValueFailureAnalyzer

# FailureAnalysisReporters
# 失败分析报告
org.springframework.boot.diagnostics.FailureAnalysisReporter=\
org.springframework.boot.diagnostics.LoggingFailureAnalysisReporter
- SPI
service provider interface JDK内置服务发现机制
以上是从spring-boot-2.0.3.RELEASE.jar/META-INF/spring.factories配置文件中摘录的一段内容,可以很好地说明问题。
可有可无的@ComponentScan
为什么是可有可无的@ComponentScan?
- @ComponetScan
作为Spring早期的注解,@ComponetScan的功能其实自动扫面并加载符合条件的组件或bean定义,最终将这些bean加载到Spring容器中。
在Spring Boot 2.1.7中,@SpringBootApplication注解包含@ComponentScan注解,如下:
@Target(ElementType.TYPE)
@Retention(RetentionPolicy.RUNTIME)
@Documented
@Inherited
@SpringBootConfiguration
@EnableAutoConfiguration
@ComponentScan(excludeFilters = {
		@Filter(type = FilterType.CUSTOM, classes = TypeExcludeFilter.class),
		@Filter(type = FilterType.CUSTOM, classes = AutoConfigurationExcludeFilter.class) })
public @interface SpringBootApplication {
	...
	...
	...
}
Spring Boot 2.1.7 中的@ComponentScan注解
- excludeFilters
(@ComponentScan的一个属性,代表排除一些不需要扫描的类。)- @Filter
(过滤)- type = FilterType.ANNOTATION
根据注解排除 - type = FilterType.ASSIGNABLE_TYPE
根据类型排除 - type = FilterType.ASPECTJ
根据AspectJ表达式排除 - type = FilterType.REGEX
根据正则表达式排除 - type = FilterType.CUSTOM
自定义排除:需要实现org.springframework.core.type.filter.TypeFilter接口 - classes = TypeExcludeFilter.class
执行的过滤器 - classes = AutoConfigurationExcludeFilter.class)
执行的过滤器
- type = FilterType.ANNOTATION
- @Filter
SpringApplication :Spring Boot 程序启动的一站式解决方案
SpringApplication将一个典型的Spring应用启动的流程 “模版化”。模版化:没有特殊需求,可以统一这么写,例如:SpringApplication.run(XXXSpringBootApplication.class)
- 没有特殊需求
没有特殊需求,直接用上面的代码作为启动语法 - 有特殊需求
比如扩展SpringBoot程序启动和关闭这个过程所需要进行的 “行为”;
比如打印一个自定义ASCII Arts字符画,下述代码所示:
@SpringBootApplication
public class StartApplication {
    public static void main(String[] args) {
//        注释没有特殊需求的"模版化"启动方式
//        SpringApplication.run(StartApplication.class, args);
        SpringApplication bootstrap = new SpringApplication(StartApplication.class);
        bootstrap.setBanner(new Banner() {
            @Override
            public void printBanner(Environment environment, Class<?> sourceClass, PrintStream out) {
                // 打印一个喜欢的ASCII Arts字符画
            }
        });
        bootstrap.setBannerMode(Banner.Mode.CONSOLE);
        // 其它定义设置...
        bootstrap.run(args);

        /***
         * 提示
         * 设置自定义banner最简单的方式是把ASCII Art字符画放到一个资源文件,然后通过ResourceBanner加载:
         * bootstrap.setBanner(new ResourceBanner(new ClassPathResource("banner.txt")));
         */
    }
}
深入探索SpringApplication执行流程
版本:SpringBoot 1.2.6版本!!!版本:SpringBoot 1.2.6版本!!!版本:SpringBoot 1.2.6版本!!!
SpringApplication的run方法的实现是本文核心阐述内容,该方法主要流程大体归纳如下:
- 1.如果使用的是SpringApplication的静态run方法,那么,这个方法首先创建一个SpringApplication对象实例,然后调用SpringApplication对象实例的run方法。在SpringApplication实例初始化的时候,会做以下
4件事:- 根据classpath里面是否存在某个特征类(org.springframework.web.context.ConfigurableWebApplicationContext)来决定是否应该创建一个为Web应用使用的ApplicationContext类型,还是应该创建一个标准Standalone应用使用的ApplicationContext类型。
- 使用SpringFactoriesLoader在应用的classpath中查找并加载所有可用的ApplicationContextInitializer。
- 使用SpringFactoriesLoader在应用的classpath中查找并加载所有可用的ApplicationListener。
- 推断并设置main方法的定义类。
- 2.SpringApplication实例初始化完成并且完成设置后,就开始执行run方法的逻辑,
方法执行伊始:- 首先遍历执行所有通过SpringFactoriesLoader可以查找到并加载的SpringApplicationRunListener,调用它们的started()方法,告诉这些SpringApplicationRunListener,
“嘿,SpringBoot应用开始执行咯!”
- 首先遍历执行所有通过SpringFactoriesLoader可以查找到并加载的SpringApplicationRunListener,调用它们的started()方法,告诉这些SpringApplicationRunListener,
- 3.创建并配置当前SpringBoot应用将要使用的Environment(包括配置要使用的PropertySource 以及 Profile)。
- 4.遍历调用所有SpringApplicationRunListener的environmentPrepared()的方法,告诉它们:
“当前SpringBoot应用使用的Environment准备好咯!” - 5.如果SpringApplication的showBanner属性被设置为true,则打印banner(SpringBoot1.3.x版本基于Banner.Mode决定banner打印行为)。
- 6.根据用户是否明确设置了applicationContextClass类型以及初始化阶段推断结果,决定该为当前SpringBoot应用创建什么类型的ApplicationContext并创建完成,然后根据条件决定是否添加ShutdownHook,决定是否使用自定义的BeanNameGenerator,决定是否使用自定义的ResourceLoader,
最重要的,将之前准备好的Environment设置给创建好的ApplicationContext使用。 - 7.ApplicationContext创建好后,SpringApplication再次借助Spring-FactoriesLoader,查找并加载classPath中所有可用的ApplicationContext-Initializer,然后遍历调用这些ApplicationContextinitializer的initialize(applicationContext)方法来对已经创建好的ApplicationContext进行进一步的处理。
- 8.遍历调用所有SpringApplicationRunListener的contextPrepared()方法,通知它们:
“SpringBoot应用使用的AppliactionContext准备好啦!” - 9.
最核心的一步:将之前通过@EnableAutoConfiguration获取的所有配置以及其它形式的IoC容器配置加载到已经准备完毕的ApplicationContext。 - 10.遍历调用所有SpringApplicationRunListener的contextLoaded()方法,告知所有的SpringApplicationRunListener,
ApplicationContext装配完毕! - 11.调用ApplicationContext的refresh()方法,完成IoC容器可用的最后一道工序。
- 12.查找当前ApplicationContext中是否注册有CommandLineRunner,如果有,则遍历执行它们。
- 13.正常情况下,遍历执行SpringApplicationRunListener的finished()方法,告知它们:
“搞定!”。(如果整个过程发生异常,则依然调用所有SpringApplicationRunListener的finished()方法,只不过这种情况下会将异常信息一并传入处理)。
至此,一个完整的SpringBoot 1.2.6应用启动完毕!
整个过程看起来冗余繁杂,忽略掉一些事件通知的扩展点就可以压缩精简为下面的几步: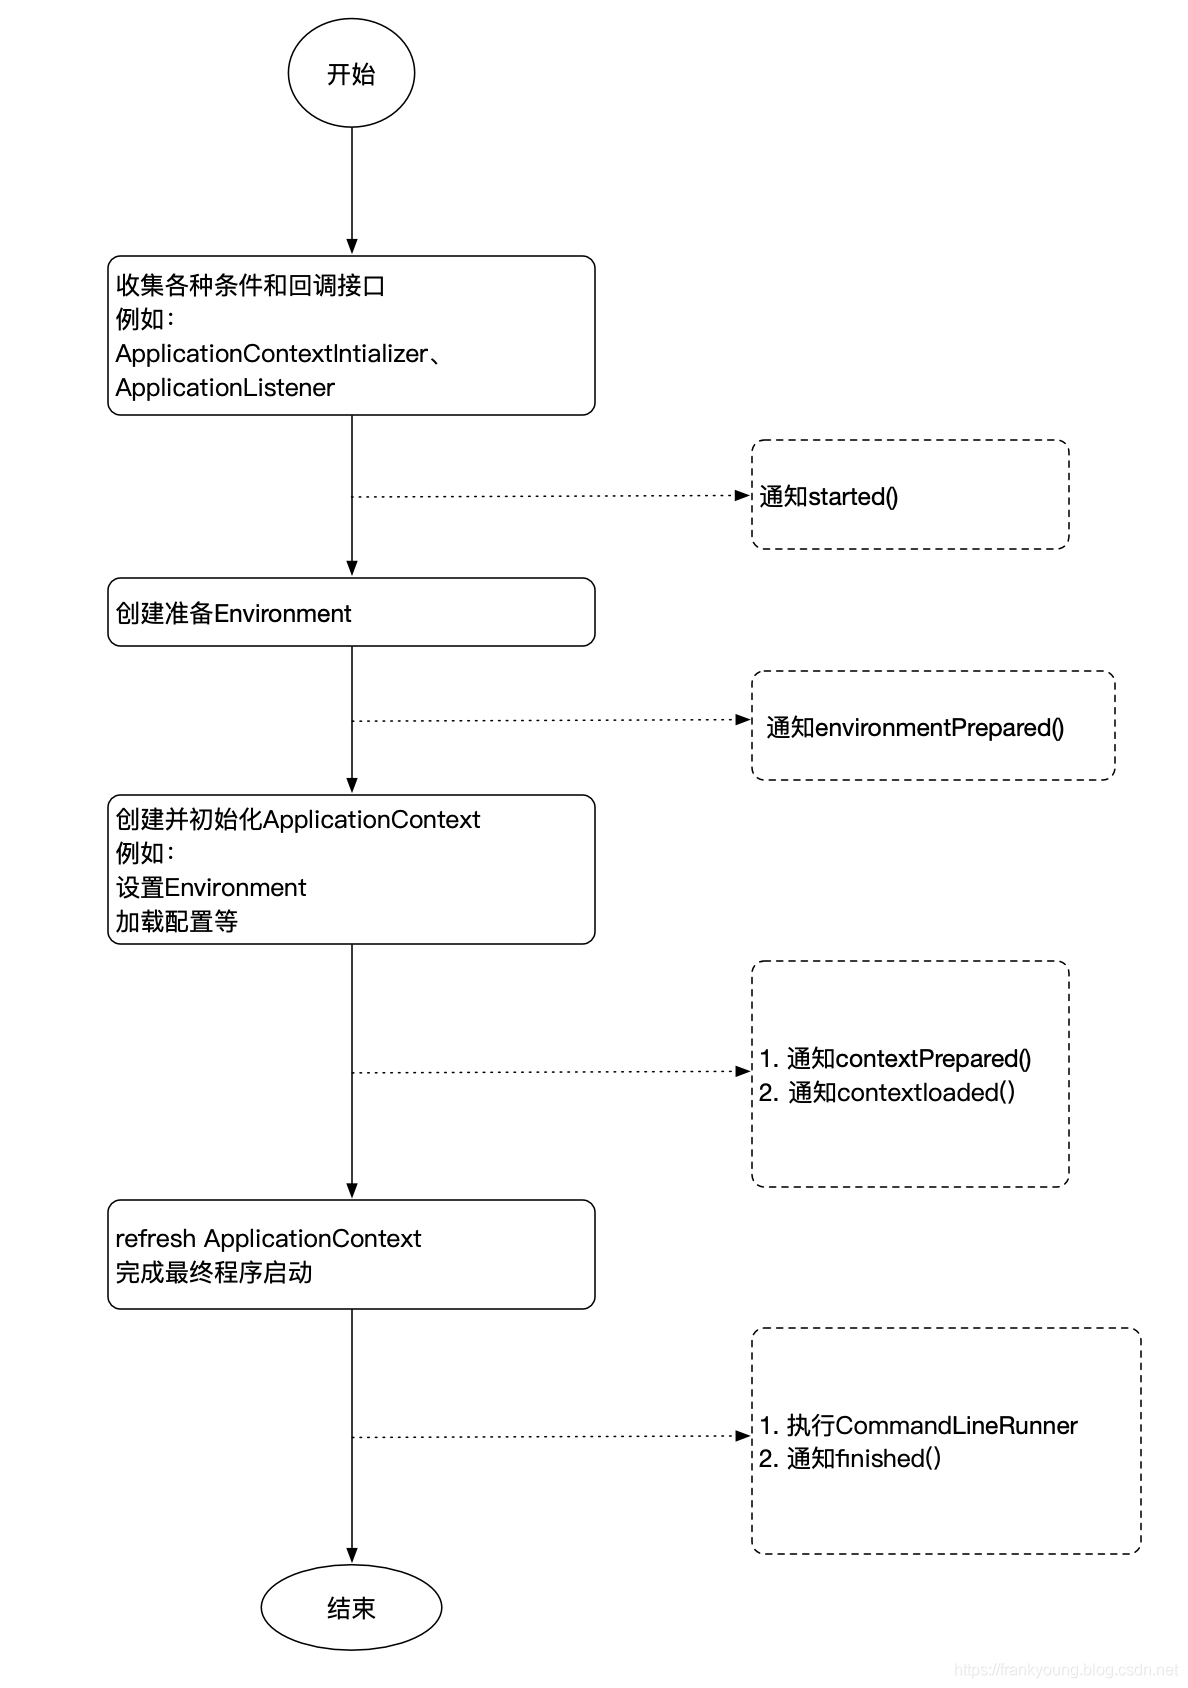
对比上面的图表,其实SpringApplication提供的这些各类扩展点近乎“喧宾夺主”,占据了Spring应用启动逻辑的大部分工作,除了初始化ApplicationContext,剩下的大部分工作都通过扩展点完成,所以,我们必须对各类扩展点进一步剖析,以便需要的时候信手拈来,为我所用。
SpringApplicationRunListener
SpringApplicationRunListener是一个只有Spring Boot mian方法执行过程中接收不同执行时点事件通知的监听者。
/**
 * spring boot 2.1.7
 */
public interface SpringApplicationRunListener {

	/**
	 * Called immediately when the run method has first started. Can be used for very
	 * early initialization.
	 */
	void starting();

	/**
	 * Called once the environment has been prepared, but before the
	 * {@link ApplicationContext} has been created.
	 * @param environment the environment
	 */
	void environmentPrepared(ConfigurableEnvironment environment);

	/**
	 * Called once the {@link ApplicationContext} has been created and prepared, but
	 * before sources have been loaded.
	 * @param context the application context
	 */
	void contextPrepared(ConfigurableApplicationContext context);

	/**
	 * Called once the application context has been loaded but before it has been
	 * refreshed.
	 * @param context the application context
	 */
	void contextLoaded(ConfigurableApplicationContext context);

	/**
	 * The context has been refreshed and the application has started but
	 * {@link CommandLineRunner CommandLineRunners} and {@link ApplicationRunner
	 * ApplicationRunners} have not been called.
	 * @param context the application context.
	 * @since 2.0.0
	 */
	void started(ConfigurableApplicationContext context);

	/**
	 * Called immediately before the run method finishes, when the application context has
	 * been refreshed and all {@link CommandLineRunner CommandLineRunners} and
	 * {@link ApplicationRunner ApplicationRunners} have been called.
	 * @param context the application context.
	 * @since 2.0.0
	 */
	void running(ConfigurableApplicationContext context);

	/**
	 * Called when a failure occurs when running the application.
	 * @param context the application context or {@code null} if a failure occurred before
	 * the context was created
	 * @param exception the failure
	 * @since 2.0.0
	 */
	void failed(ConfigurableApplicationContext context, Throwable exception);

}
ApplicationListener
ApplicationListener与SpringApplicationRunListener不能混淆,并不是一个,如果需要为SpringBoot 应用添加自定义的ApplicationListener,可通过下面两种方式完成:
- 通过SpringApplication.addListener(…) 或者 SpringApplication.setListener(…) 方法添加一个或者多个自定义的ApplicationListener。
-
借助SpringFactoriesLoader机制,在META-INF/spring.factories文件中添加配置,请参照上述(spring-boot-2.0.3.RELEASE.jar/META-INF/spring.factories)中的内容,那是2.0.7中默认的ApplicationListener。
ApplicationContextInitializer
同样,ApplicationContextInitializer也是Spring原有的概念,此类主要目的就是,在ConfigurableApplicationContext类型(或者子类型)的ApplicationContext做refresh之前,允许对ConfigurableApplicationContext的实例做进一步的设置或者处理。
实现ApplicationContextInitializer
仅有一个方法需要实现,即可实现ApplicationContextInitializer:
import org.springframework.context.ApplicationContextInitializer;
import org.springframework.context.ConfigurableApplicationContext;

/**
 * 实现自定义ApplicationContextInitializer,只需实现一个接口的一个函数initialize
 */
public class DemoApplicationContextInitializer implements ApplicationContextInitializer {
    @Override
    public void initialize(ConfigurableApplicationContext configurableApplicationContext) {
        // do whatever you want with applicationContext,
        // e.g. applicationContext.registerShutdownHook();

    }
}
注意:SpringBoot 2.1.7中框架默认只注册了四个个实现:
# Application Context Initializers
org.springframework.context.ApplicationContextInitializer=\
org.springframework.boot.context.ConfigurationWarningsApplicationContextInitializer,\
org.springframework.boot.context.ContextIdApplicationContextInitializer,\
org.springframework.boot.context.config.DelegatingApplicationContextInitializer,\
org.springframework.boot.web.context.ServerPortInfoApplicationContextInitializer
CommandLineRunner
与Spring无关,是SpringBoot应用独有的回调扩展接口(2.1.7):
/**
 * Interface used to indicate that a bean should <em>run</em> when it is contained within
 * a {@link SpringApplication}. Multiple {@link CommandLineRunner} beans can be defined
 * within the same application context and can be ordered using the {@link Ordered}
 * interface or {@link Order @Order} annotation.
 * <p>
 * If you need access to {@link ApplicationArguments} instead of the raw String array
 * consider using {@link ApplicationRunner}.
 *
 * @author Dave Syer
 * @since 1.0.0
 * @see ApplicationRunner
 */
@FunctionalInterface
public interface CommandLineRunner {

	/**
	 * Callback used to run the bean.
	 * @param args incoming main method arguments
	 * @throws Exception on error
	 */
	void run(String... args) throws Exception;

}
CommonLineRunner 的两个重点
- 执行时点在SpringBoot应用的Application-Context完成初始化工作之后(可以认为是main方法执行完成之前最后一步)
- 只要存在于当前SpringBoot应用的ApplicationContext中的任何Command-LineRunner,都会被加载执行(无论是手动注册这个CommandLineRunner到IoC容器,还是自动扫描进去的)
与其它扩展点接口类型相似,建议CommandLineRunner实现类使用@org.springframework.core.annotion.Order进行标注或实现org.springframework.core.Ordered接口,便于对它们执行顺序调整(重要)。
CommonLineRunner是常用的一个扩展接口,例子如下:
import org.springframework.boot.CommandLineRunner;
import org.springframework.context.annotation.Configuration;
import org.springframework.core.annotation.Order;

@Configuration
@Order(value = 2)
public class FrankCommandLineRunner implements CommandLineRunner {
    @Override
    public void run(String... args) throws Exception {
        System.out.println("--- FrankCommandLineRunner ---");
    }
}
再谈自动配置
通过@EnableAutoConfiguration的自动配置功能拥有更加强大的调控能力,通过配合可实现基于条件配置或调整加载顺序,可以对自动配置进行更加细粒度的调整和控制。
基于条件的自动配置
基于条件的自动配置源于Spring框架中“基于条件的配置”这一特性。在Spring中,可以使用@Conditional 此Annotation配合@Configuration或者@Bean等Annotation来干预一个配置或bean定义是否能够生效,其最终实现的效果或者语义类似下述代码:
if(符合@Conditional规定的条件){
	加载当前配置(enable current Configuration)或者注册当前bean定义;
}
实现基于条件的配置,只要通过@Conditional指定自己的Condition实现类就可以(可以应用于类型Type的标注或者方法Method的标注):
@Conditional({MyConditionl.class, MyConditionl.class, ....})
最主要的是:@Conditional可以作为一个Meta Annotation用来标注其它Annotation实现类,从而构造各色的复合Annotation,比如Spring Boot autoconfigure模块实现了一批Annotation(位于org.springframework.boot.autoconfigure.condition):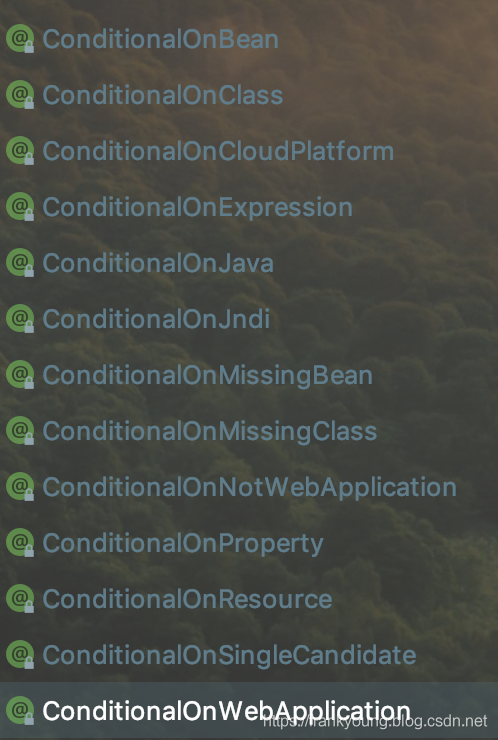
- ConditionalOnBean
- ConditionalOnClass
例如:基于以下条件装配加载指定**Method**
@Configuration
public class ConditionOnClassConfig {

    @Bean
    @ConditionalOnClass(value={java.util.HashMap.class})
    public A beanA(){
	    // 仅当类 java.util.HashMap 存在于 classpath 上时才创建一个bean : beanA
	    // 注意这里使用了 @ConditionalOnClass 的属性value,
        return new A();
    }

    @Bean
    @ConditionalOnClass(name="com.sample.Dummy")
    public B beanB(){
   	    // 仅当类 com.sample.Dummy 存在于 classpath 上时才创建一个bean : beanB
	    // 注意这里使用了 @ConditionalOnClass 的属性 name,
        return new B();
    }
}
- ConditionalOnCloudPlatform
- ConditionalOnExpression
- ConditionalOnJava
- ConditionalOnJndi
- ConditionalOnMissingBean
- ConditionalOnMissingClass
- ConditionalOnNotWebApplication
- ConditionalOnProperty
示例代码:
@Configuration
@ConditionalOnClass({ Feign.class })
@ConditionalOnProperty(value = "feign.oauth2.enabled", matchIfMissing = true)
public class OAuth2FeignAutoConfiguration {

    @Bean
    @ConditionalOnBean(OAuth2ClientContext.class)
    public RequestInterceptor oauth2FeignRequestInterceptor(OAuth2ClientContext oauth2ClientContext) {
        return new OAuth2FeignRequestInterceptor(oauth2ClientContext);
    }
}
- ConditionalOnResource
- ConditionalOnSingleCandidate
- ConditionalOnWebApplication
调整自动配置的顺序
除了可以通过条件来配置,还可以通过注解实现顺序配置。可以使用@org.springframework.boot.autoconfigure.AutoConfigureBefore或者 @org.springframework.boot.autoconfigure.AutoConfigureAfter让当前配置或者组件在某个其它组件之前或者之后进行,例如:AfterFrankReadyConfiguration在FrankAutoConfiguration.class之后执行。